
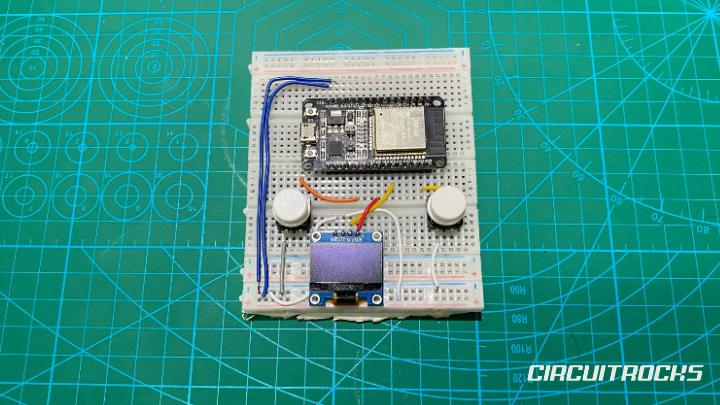
Want to turn a small ESP32 board into a mini arcade game you can actually play? This ESP32 OLED Mini Shooter Game uses a 128×64 OLED display and two push buttons to create a simple shooter experience. The player moves left and right, bullets fire upward, and enemies fall from the top of the screen. It is a small project, but it already feels like a real handheld game once the display starts updating.
This build is a great next step after basic OLED and button tutorials. Instead of only printing text or drawing one shape, the code manages several moving objects at the same time. It tracks the player, bullets, enemies, collisions, and game-over state. That makes the project more exciting because the ESP32 is no longer just showing data; it is running a simple game loop.
The ESP32 OLED Mini Shooter Game is also beginner-friendly because the screen is divided into a simple grid. The 128×64 OLED becomes a 16×8 playfield, where each tile is 8×8 pixels. This makes object movement easier to understand because the player, enemies, and bullets move by grid position instead of raw pixel math. Once this version works, you can add score, sound, restart, or more enemy types without changing the main idea.
Why Build?
This ESP32 OLED Mini Shooter Game is a fun way to learn interactive programming on real hardware. The ESP32 reads button input, updates game objects, checks collisions, and draws the next frame on the OLED. That is much more active than a normal sensor display project. It helps beginners understand how code can respond to users in real time.
It also teaches timing without blocking the whole game flow. The code uses millis() to control when bullets and enemies update, so they can move at different speeds. This is useful because many embedded projects need timed actions without stopping everything else. Learning this through a game makes the concept easier to see and remember.
This build is also great for demos and classroom activities. People can understand the goal quickly: move the player and destroy enemies before they reach the bottom. The buttons make the project hands-on, and the OLED gives instant visual feedback. It is small enough to build on a breadboard, but it can also be placed in a 3D-printed case for a finished handheld look.
What You’ll Learn
- ESP32 OLED display control – drawing text, squares, circles, and game objects on an SSD1306 screen.
- Custom I2C pins – using
Wire.begin(5, 19)so the OLED uses GPIO5 for SDA and GPIO19 for SCL. - Button input handling – reading two push buttons for left and right movement.
- Debounce logic – preventing one press from being counted many times.
- Grid-based game design – turning a 128×64 screen into a simple 16×8 game map.
- Game object arrays – storing multiple bullets and enemies with active/inactive states.
- Timer-based updates – using
millis()to move bullets and enemies at controlled intervals. - Collision checking – detecting when a bullet and enemy share the same grid position.
- Difficulty scaling – making enemies faster by slowly reducing their update interval.
- Game-over handling – stopping the game loop and showing a final screen when an enemy reaches the bottom.
What You'll Need
Fritzing diagram
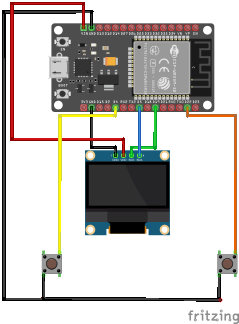
Wiring Connections
OLED Display to ESP32
- VCC – 3.3V
- GND – GND
- SDA – GPIO 5
- SCL – GPIO 19
Button Connections
Left Button
- One leg – GPIO 4
- Other leg – GND
Right Button
- One leg – GPIO 22
- Other leg- GND
Library Setup
Before uploading the code, install the needed display libraries in the Arduino IDE. Open Sketch → Include Library → Manage Libraries, then search for Adafruit SSD1306 and install it. The IDE may also ask for Adafruit GFX Library, which is required for drawing shapes and text. Install both so the display code compiles properly.
The code also uses the built-in Wire library for I2C communication. This library is already included with the Arduino IDE, so you do not need to install it separately. In this project, Wire is important because the OLED communicates using only two signal wires. That keeps the display wiring clean and saves ESP32 pins for buttons or future upgrades.
After installing the libraries, select the correct ESP32 board and port. Open the Serial Monitor at 115200 baud to check startup messages. If the display fails to initialize, the Serial Monitor can help you confirm whether the code is running. This makes troubleshooting easier because you can separate display problems from upload or board problems.
Sample Code
Before using the sketch, confirm that the OLED library is installed and that your display address is 0x3C. This code uses two custom I2C pins, GPIO5 and GPIO19, so the OLED must match that wiring. It also uses two buttons with internal pull-ups, so each button must connect to ground when pressed. After uploading, the game should start immediately on the OLED screen.
Paste the full ESP32 OLED Mini Shooter Game code in the Arduino IDE. Upload it to your ESP32, then watch the OLED for the player square near the bottom. Use the left and right buttons to move the player. Bullets spawn automatically, enemies fall from the top, and the game ends when an enemy reaches the bottom row.
#include <Adafruit_SSD1306.h>
#include <Wire.h>

// OLED setup
Adafruit_SSD1306 display(128, 64, &Wire, -1);

// DebounceButton class combined here
class DebounceButton {
public:
  unsigned long buttonLastAction;
  unsigned long debounceMS;
  bool isAcceptingChanges;
  int targetPin;

  DebounceButton(int pin, unsigned long debounceMS) {
    this->targetPin = pin;
    this->buttonLastAction = millis();
    this->debounceMS = debounceMS;
    this->isAcceptingChanges = true;

    pinMode(pin, INPUT_PULLUP);
  }

  bool CheckPress() {
    bool btnValue = digitalRead(targetPin);

    if (btnValue == LOW &&
        (millis() - buttonLastAction) > debounceMS &&
        isAcceptingChanges) {

      buttonLastAction = millis();
      isAcceptingChanges = false;
      return true;
    }

    if (btnValue == HIGH &&
        !isAcceptingChanges &&
        (millis() - buttonLastAction) > debounceMS) {

      isAcceptingChanges = true;
    }

    return false;
  }
};

// Buttons
DebounceButton BTL(4, 200);
DebounceButton BTR(22, 200);

// Game settings
const int MAX_BULLETS = 5;
const int MAX_ENEMIES = 4;
const int GRID_W = 16;
const int GRID_H = 8;

unsigned long BULLET_INTERVAL = 750;
unsigned long ENEMY_INTERVAL  = 1500;

class Bullet {
public:
  uint8_t bx, by;
  bool active;

  Bullet() {
    bx = 0;
    by = 0;
    active = false;
  }
};

class Enemy {
public:
  uint8_t ex, ey;
  bool active;

  Enemy() {
    ex = 0;
    ey = 0;
    active = false;
  }
};

Bullet playersBullets[MAX_BULLETS];
Enemy enemies[MAX_ENEMIES];

int px = 4;
int py = 6;

unsigned long lastBulletTick = 0;
unsigned long lastEnemyTick  = 0;

bool gameOver = false;

// --- Bullets ---

void spawnBullet() {
  for (int i = 0; i < MAX_BULLETS; i++) {
    if (!playersBullets[i].active) {
      playersBullets[i].bx = px;
      playersBullets[i].by = py - 1;
      playersBullets[i].active = true;
      return;
    }
  }
}

void updateBullets() {
  for (int i = 0; i < MAX_BULLETS; i++) {
    if (!playersBullets[i].active) continue;

    if (playersBullets[i].by == 0) {
      playersBullets[i].active = false;
    } else {
      playersBullets[i].by--;
    }
  }
}

void drawBullets() {
  for (int i = 0; i < MAX_BULLETS; i++) {
    if (playersBullets[i].active) {
      display.fillRect(
        playersBullets[i].bx * 8 + 2,
        playersBullets[i].by * 8,
        4,
        6,
        WHITE
      );
    }
  }
}

// --- Enemies ---

void spawnEnemy() {
  for (int i = 0; i < MAX_ENEMIES; i++) {
    if (!enemies[i].active) {
      enemies[i].ex = random(0, GRID_W);
      enemies[i].ey = 0;
      enemies[i].active = true;
      return;
    }
  }
}

void updateEnemies() {
  for (int i = 0; i < MAX_ENEMIES; i++) {
    if (!enemies[i].active) continue;

    enemies[i].ey++;

    if (enemies[i].ey >= GRID_H) {
      gameOver = true;
      return;
    }
  }
}

void drawEnemies() {
  for (int i = 0; i < MAX_ENEMIES; i++) {
    if (enemies[i].active) {
      display.drawCircle(
        enemies[i].ex * 8 + 4,
        enemies[i].ey * 8 + 4,
        3,
        WHITE
      );
    }
  }
}

// --- Collision ---

void checkCollisions() {
  for (int i = 0; i < MAX_ENEMIES; i++) {
    if (!enemies[i].active) continue;

    for (int b = 0; b < MAX_BULLETS; b++) {
      if (!playersBullets[b].active) continue;

      if (playersBullets[b].bx == enemies[i].ex &&
          playersBullets[b].by == enemies[i].ey) {

        enemies[i].active = false;
        playersBullets[b].active = false;
      }
    }
  }
}

// --- Setup ---

void setup() {
  Serial.begin(115200);

  // ESP32 OLED I2C pins
  Wire.begin(5, 19);

  randomSeed(analogRead(0));

  if (!display.begin(SSD1306_SWITCHCAPVCC, 0x3C)) {
    Serial.println("ERR LOADING LCD SCREEN");
  }

  display.clearDisplay();
  display.display();
}

// --- Loop ---

void loop() {
  if (gameOver) {
    display.clearDisplay();
    display.setTextSize(1);
    display.setTextColor(WHITE);
    display.setCursor(28, 28);
    display.println("GAME OVER");
    display.display();
    return;
  }

  unsigned long now = millis();

  // Input
  bool leftButton  = BTL.CheckPress();
  bool rightButton = BTR.CheckPress();

  if (rightButton) {
    px++;
  }
  else if (leftButton) {
    px--;
  }

  if (px > GRID_W - 1) px = GRID_W - 1;
  if (px < 0) px = 0;

  // Bullet timer
  if (now - lastBulletTick >= BULLET_INTERVAL) {
    lastBulletTick = now;
    spawnBullet();
    updateBullets();
  }

  // Enemy timer
  if (now - lastEnemyTick >= ENEMY_INTERVAL) {
    lastEnemyTick = now;
    spawnEnemy();
    updateEnemies();

    // Makes enemies faster, but prevents interval from going too low
    if (ENEMY_INTERVAL > 300) {
      ENEMY_INTERVAL -= 5;
    }
  }

  checkCollisions();

  // Draw game
  display.clearDisplay();

  display.fillRect(px * 8, py * 8, 8, 8, WHITE);

  drawBullets();
  drawEnemies();

  display.display();
}
How It Works
The game screen is treated as a grid instead of raw pixels. The OLED is 128 pixels wide and 64 pixels high, and the code divides that into 16 columns and 8 rows. Each grid cell is 8×8 pixels, which makes movement simple and predictable. The player position is stored as px and py, then drawn as an 8×8 filled square.
The buttons control only the player’s horizontal movement. Pressing the right button increases px, while pressing the left button decreases px. The code then limits the value so the player cannot move outside the screen. This keeps the player inside the 16-column grid and prevents drawing errors.
The debounce class makes button presses cleaner. Mechanical buttons can bounce, which means one press can look like many quick presses to the microcontroller. The DebounceButton class waits a short time before accepting another change. This makes movement feel controlled and prevents the player from jumping too many cells from one press.
Bullets are managed using a small Bullet class. Each bullet stores its x-position, y-position, and whether it is active. When a new bullet spawns, it starts above the player and moves upward over time. If it reaches the top of the screen, it becomes inactive so that slot can be reused.
Enemies use a similar structure. Each enemy stores its x-position, y-position, and active state. New enemies spawn at a random column on the top row. Then they move downward based on the enemy timer. If any enemy reaches the bottom of the grid, the game changes to game-over state.
The code checks collisions by comparing bullet and enemy grid positions. If a bullet and enemy have the same x and y coordinates, both become inactive. That creates the main shooter mechanic: bullets remove enemies when they meet. This is simple, but it teaches the same collision idea used in larger games.
The game gets harder over time by reducing ENEMY_INTERVAL. At the start, enemies move slowly enough for the player to react. As the interval decreases, enemies update more often and fall faster. The code also prevents the interval from getting too low, so the game stays playable instead of becoming impossible instantly.
Applications & Extensions
This project is useful as a first embedded game. It combines display graphics, buttons, timing, arrays, and game rules in one build. Those ideas also appear in menus, dashboards, robot controls, and interactive displays. That makes the project more useful than it looks at first.
You can extend the gameplay by adding a score counter. Each time a bullet hits an enemy, increase the score and display it on the OLED. You can show the score during gameplay or on the game-over screen. This gives the player a goal beyond simply surviving.
You can also add a restart system. After game over, allow one button to reset the game state without pressing the ESP32 reset button. This would clear bullets and enemies, reset the player position, restore the starting enemy speed, and turn gameOver back to false. That single upgrade makes the game feel much more complete.
For sound feedback, add a small buzzer. A short beep can play when a bullet fires, a different tone can play when an enemy is hit, and a lower tone can play on game over. Sound makes the game easier to understand and more fun to play. It also teaches how to add feedback without changing the main display system.
For hardware polish, place the ESP32, OLED, and buttons in a small 3D-printed case. Put the OLED in front and place the buttons where thumbs can reach them comfortably. Add a switch and battery module if you want the game to be portable. Once enclosed, the project becomes a real mini handheld console.
Watch the Full Demo Video
Here’s the ESP32 OLED Mini Shooter Game.