

The best thing you can learn about Raspberry Pi is Linux. Not only because it is more powerful than commercial operating systems, but it is also found everywhere, from smartwatches to tablet PCs, cars, enterprise servers to full-blown space satellites, making it a highly desired skill in the tech industry. In this tutorial, you will learn how to get started with Linux using the Raspberry Pi. You will be familiar with the environment as a whole by using the most fundamental commands.
Things you need:
- Raspberry Pi
If you are still starting out with the Raspberry Pi, I suggest reading these two articles first: Raspberry Pi Starter 1 and Raspberry Pi Starter 2.
Navigating the Linux File System
The standard Raspbian OS boots you straight to the desktop environment. To enter the command-line environment, you can either start a virtual console or a terminal emulator.
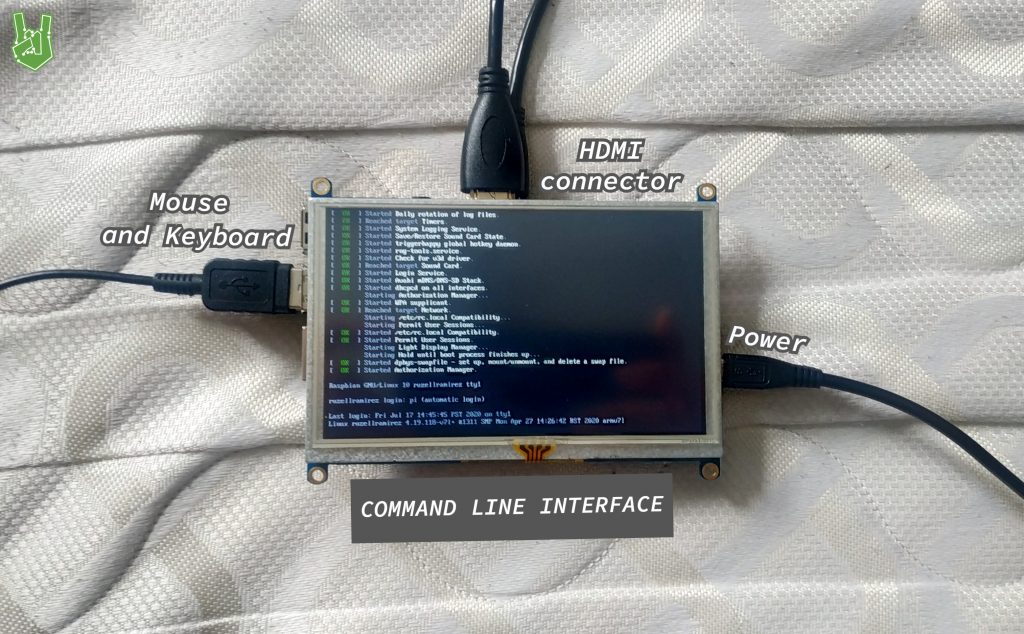
To go to the virtual console, hold down CTRL + ALT and press F1. Here you’ll see the first thing the Raspberry Pi displays when powering on (See Figure 1). Pressing ALT + F2 through to F6 reveals five more consoles you can use.
To go back to the desktop environment, press ALT + F7.
Another way to enter the command-line is by a terminal emulator. To start the terminal emulator, click the blackboard icon on the quick launch toolbar or press CTRL + ALT + T. We will use the emulator in this tutorial for ease of access.
The first thing you need to know when using the command-line is how to navigate the Linux file system. The commands you need to look around are few but there won’t be a day that you won’t use them if ever you start working with a Linux system.
ls (list)
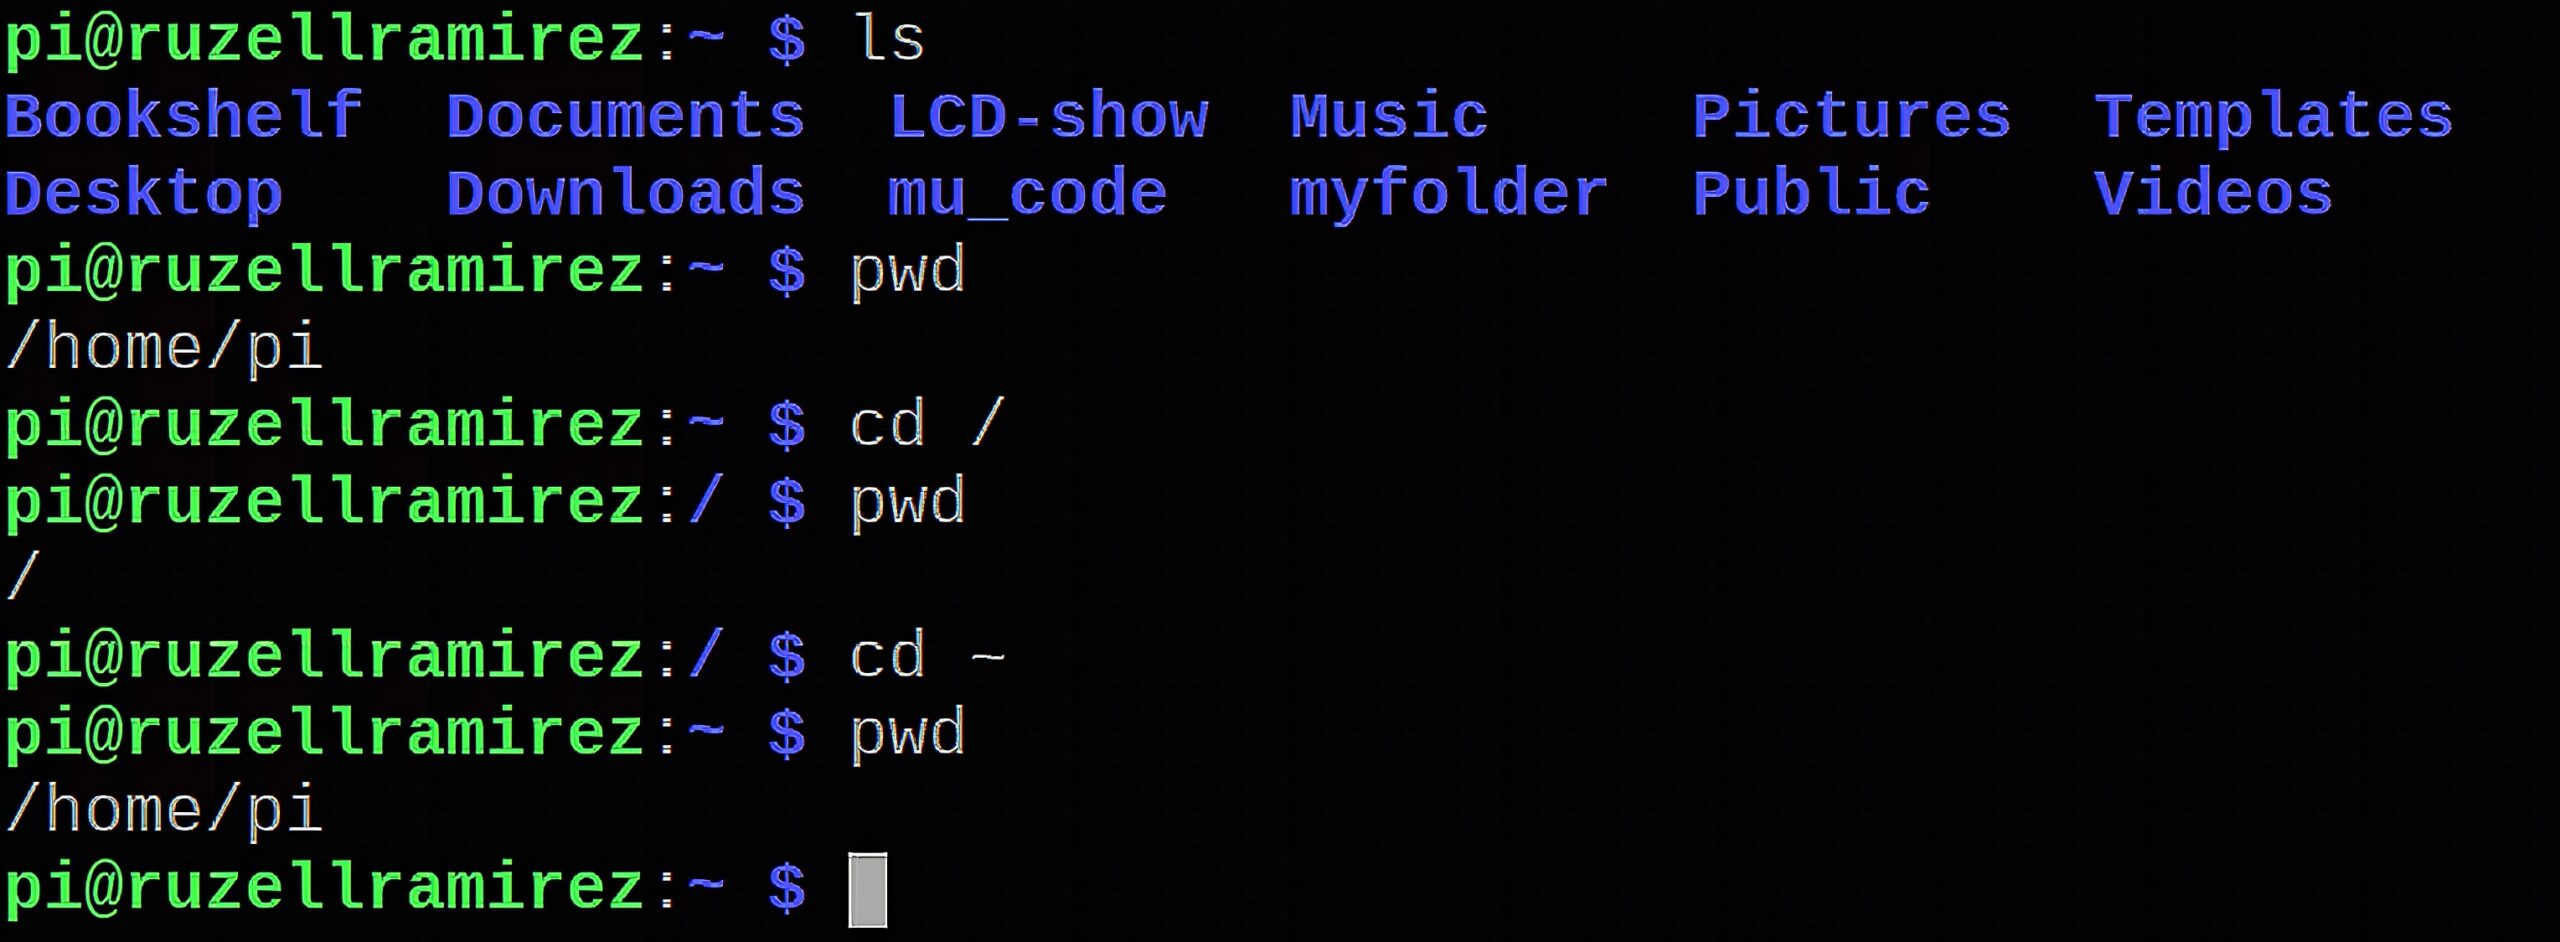
The first command is ls (list). The list command shows the files and folders in the current directory or folder. When you enter ls on a newly opened terminal, it’ll show you the files and folders on your home directory. Alternatively, you can enter ls plus your target directory to instantly move to that location. The shortcut for your home directory is a tilde (~). So entering ls ~, moves you to your home directory. Additionally, you can go one folder up by using ../. Two folders up by using ../../ and so on.
pwd (present working directory)
Next is pwd (present working directory). The present working directory command shows you your current directory, or where you are virtually in the file system. You can use this command to check your location.
Enter ls / to go to root. The root folder is similar to ‘My Computer’ in Windows. This is where all files from all users of the computer are stored. For instance, /bin is where the programs are kept, /dev shows the hardware devices of the pi, and /home lists the users in pi. If your Pi has multiple users, you will see their home directory in /home.
cd (change directory)
Next command is cd (change directory). The change directory command moves your present working directory to a particular path you specify. For example, entering cd / transports you to root while entering cd ~ moves you to your home directory (See Figure 2).
You can supplement the commands by providing command switches. Switches are triggers for further action. They are added after the command and usually starts with a dash. For example, ls -l lists all the files and folders in your current directory plus shows additional details, such as size, modified date and time, and owner of the file. -h changes the unit from bytes to KB, MB, or GB. On the other hand,--all and -a reveals hidden files as well as shortcuts to your current and parent directory respectively. These shortcuts are shown as. and.. and can be exempted by using another switch, -A.
You can also chain switches together. When used alone, -l lists all the files and folders while -h changes units to the nearest KB, MB, or GB. When used as ls -lh ~, files and folders in your home directory are listed with their unit sizes converted to the nearest KB, MB, or GB.
Reading and Writing Text Files
Now that you’ve learned how to look around. Let’s start creating and modifying files and directories. In this section, we are going to learn how to interact with them.
mkdir (make directory)
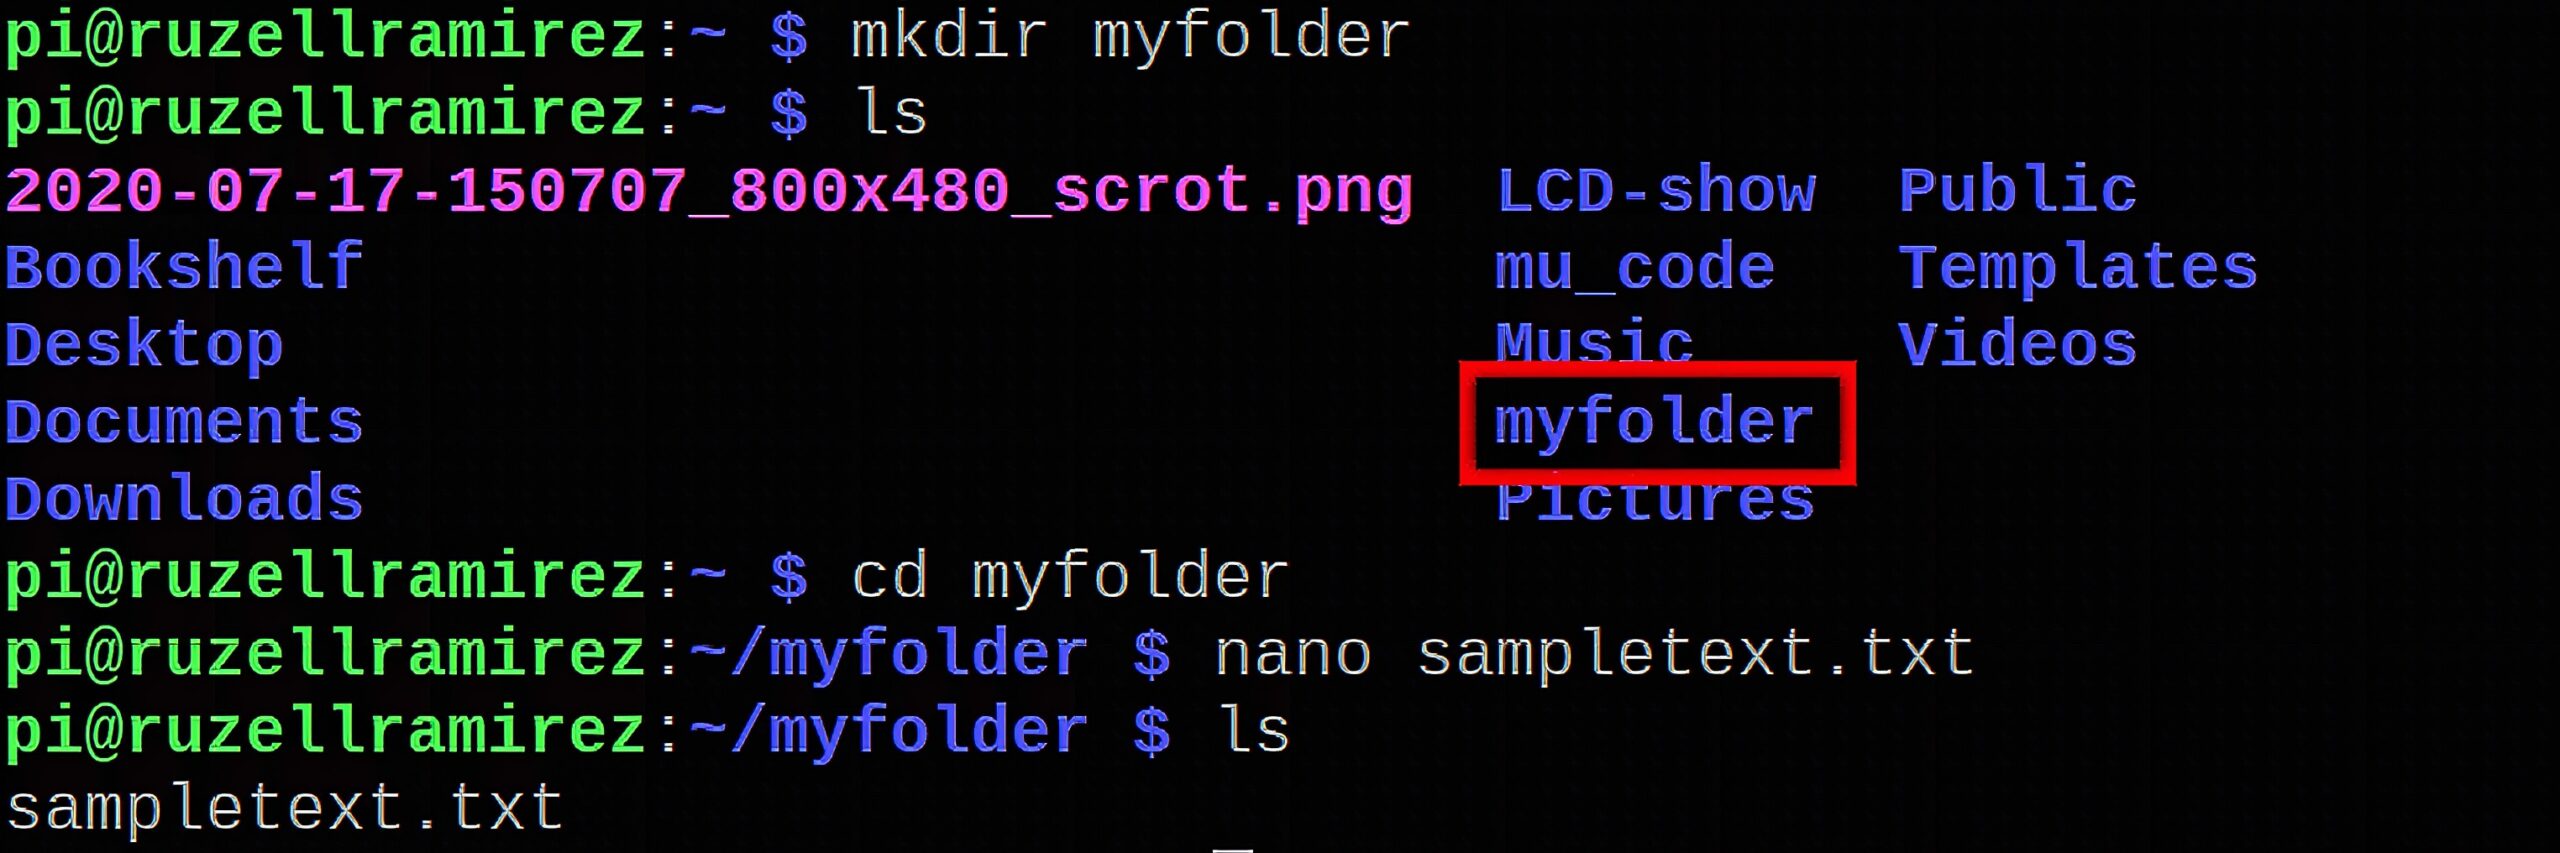
The first command is mkdir (make directory). The make directory command creates a folder on your current location. To demonstrate, enter mkdir myfolder on your terminal. Check using ls. You must see your myfolder directory in blue just like in Figure 3. If it’s in there, you can already go to that folder using the previously discussed cd command.
GNU Nano
To explain the next command better, we are going to use a command-line text editor called Nano. Nano is installed as a default in Raspbian OS. Not just that. Almost all Linux distros have it as well. That is why it is almost imperative to learn how it works. You can open or create a nano file using nano "file name" command. But if you want to open the editor, simply enter nano on the terminal.
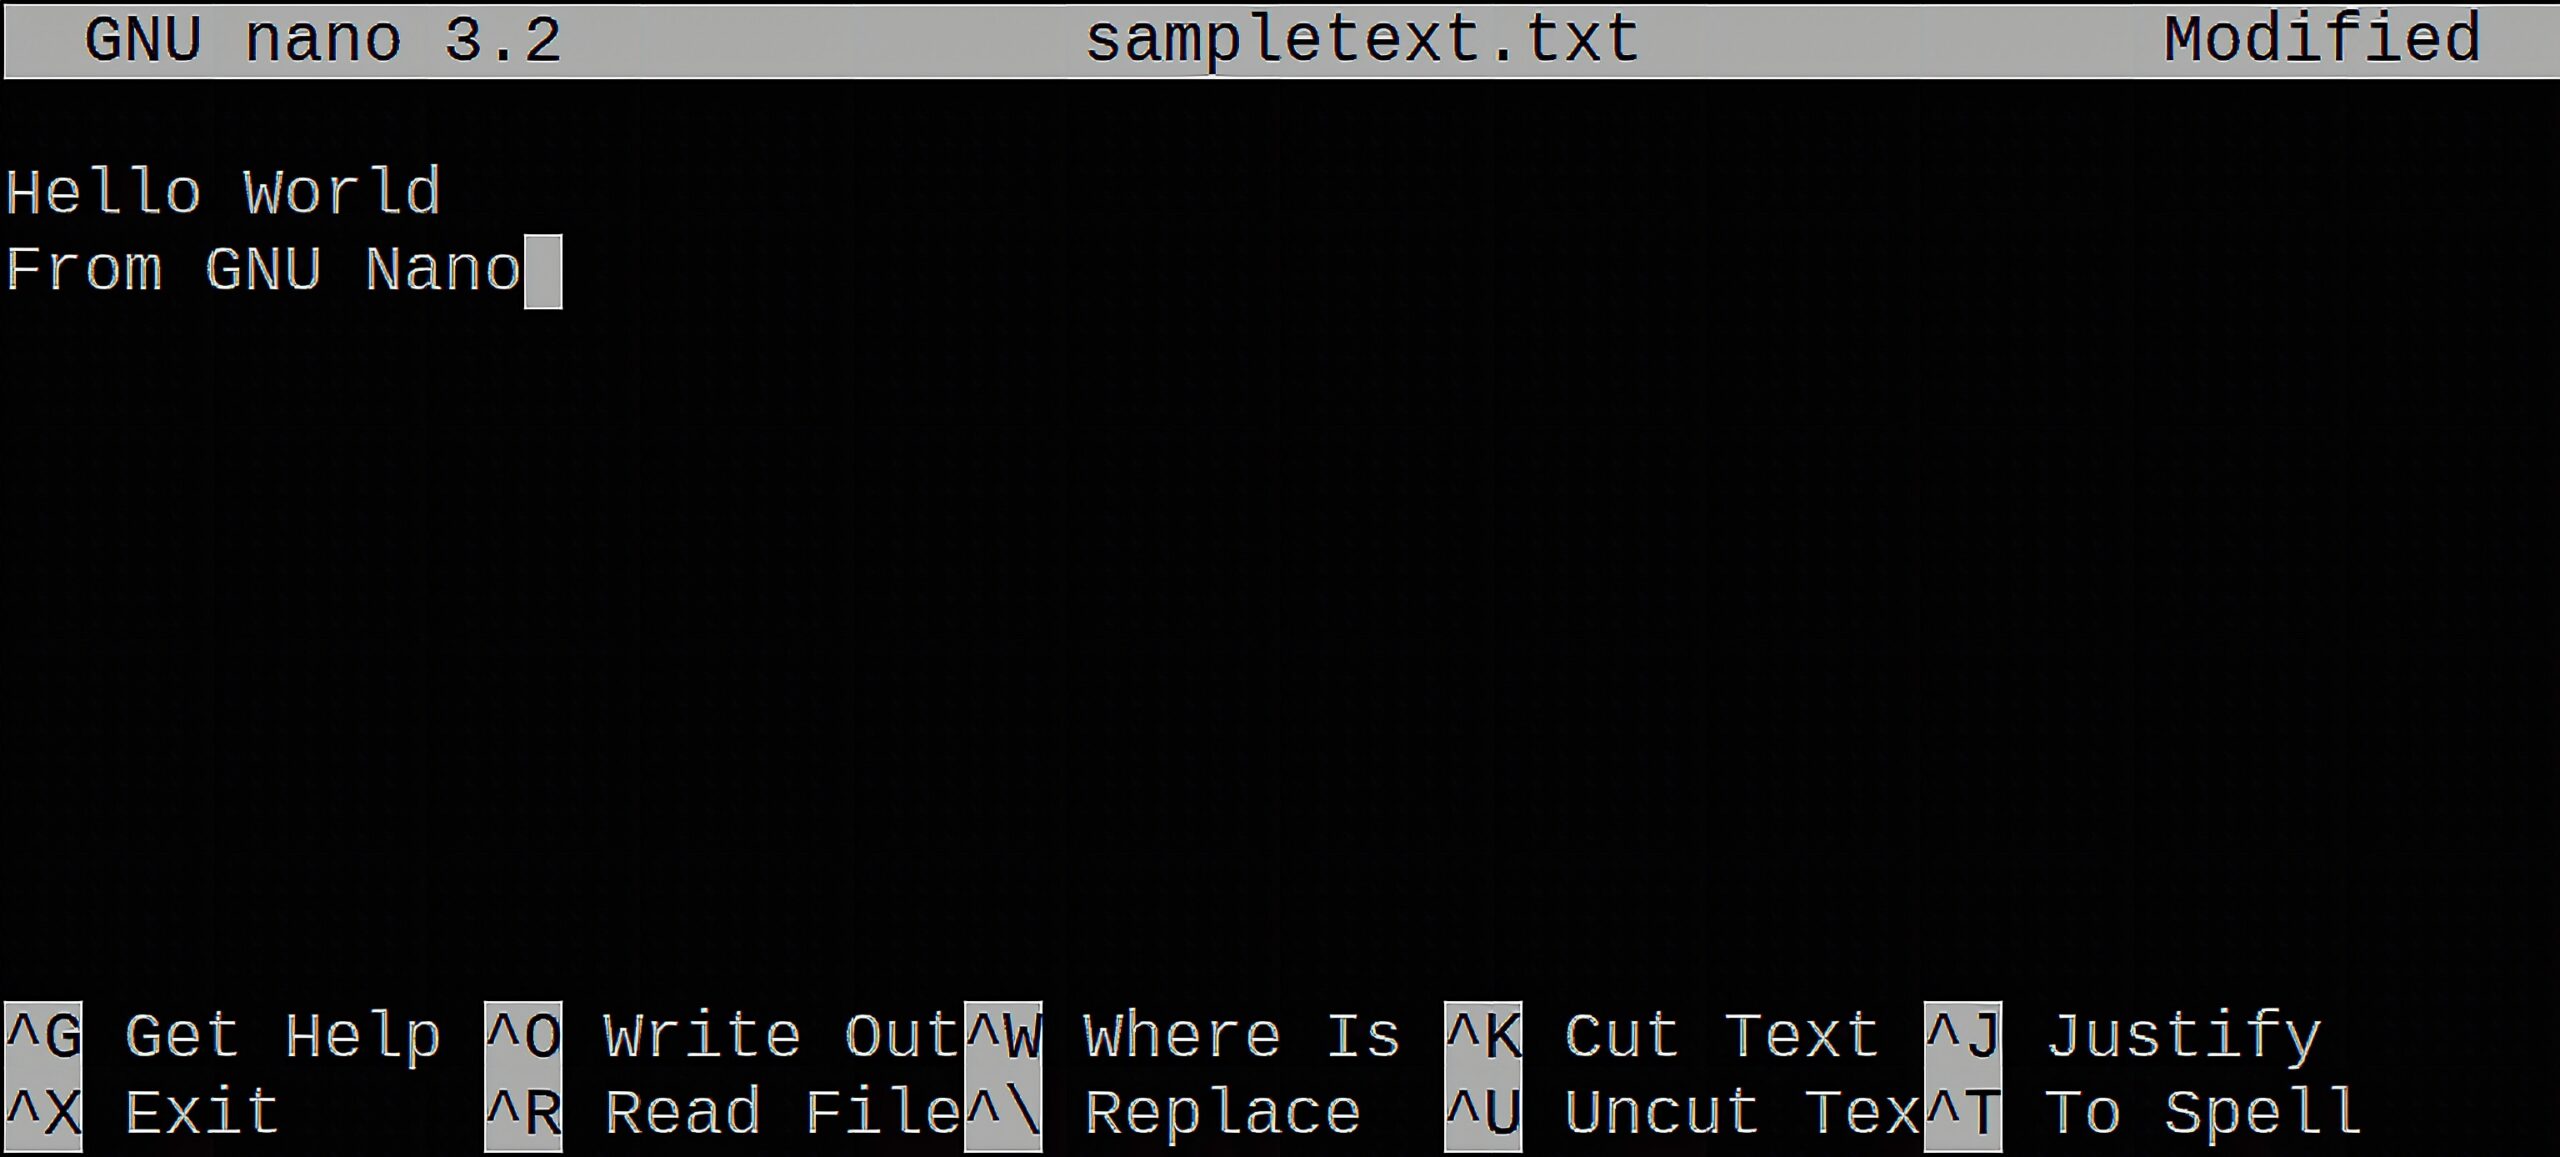
In here, you are going to see the Nano environment. The interface is so elementary that you don’t need to have a mouse to use it properly.
You just type in the text directly. The keyboard shortcuts are always visible as well. The carets on the shortcuts stand for the CTRL button. For example, if you need help, press CTRL + G. Or if you want to save your file, just press CTRL + O. You can cut and paste text within the Nano editor using CTRL + K and CTRL + U. But if you want to get the text in and out of the editor, you need to use your mouse by pressing Shift + Right Click.
Further, a new file will show a “new buffer” on the title bar. After writing the text, you will see Modified at the top right side.
cp (copy)
The second command is cp (copy). The copy command copies the target file or folder to a target directory. Suppose you want to copy sampletext.txt from Figure 3 to /home/pi. All you need to do is enter cp sampletext.txt /home/pi on the terminal. That is if sampletext.txt is in your current directory. If not, you need to specify it for the command: cp /home/pi/myfolder/sampletext.txt /home/pi . Moreover, if you want to copy the file in your present location simply use a. as the target directory: cp /home/pi/myfolder/sampletext.txt..
cat (concatenate)
The third command is cat (concatenate). The concatenate command reads the data from a file then sends it to the standard output stream. You can also use this command to create and copy files.
To read the text file we created before in Nano, enter cat sampletext.txt on the terminal. Notice in Figure 5 that even the spacing in Nano is the same when read using cat.
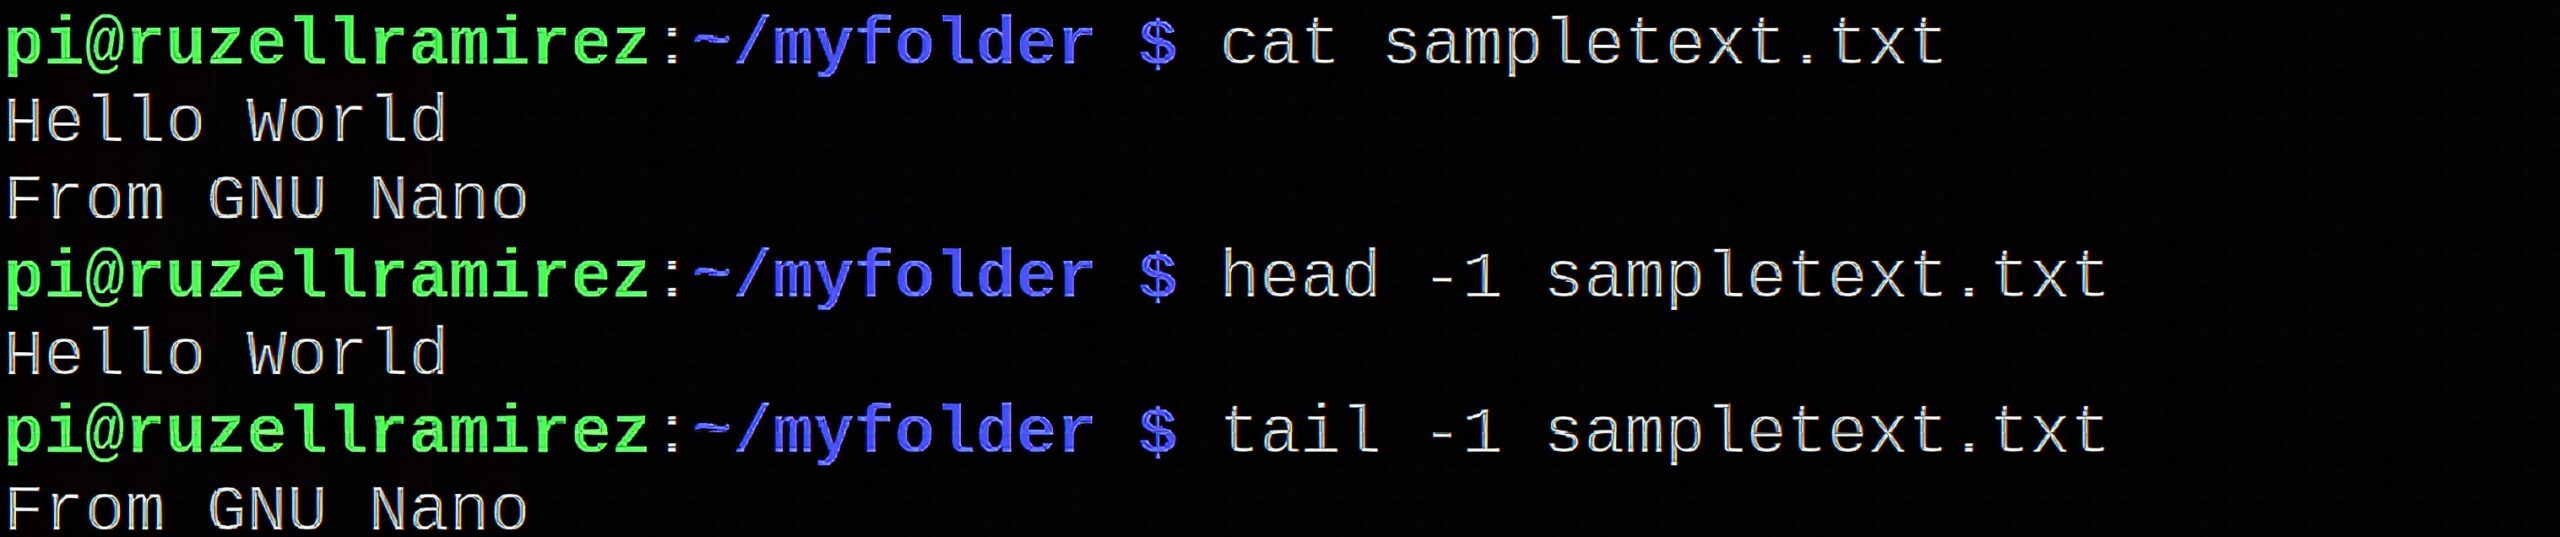
head
Next is the head command. This shows you the first lines of a file. The command is set to 10 lines as default. So if you need only 1 line, add -1 after the command (See Figure 6).
tail
Opposite to head is the tail command. This shows you the last few lines of a file. The command is also set to 10 lines as default. Add -1 to only read the last line just as I did in Figure 5.
more and less
You can also use more and less commands to view the data inside a file. More shows the entire text and lets you scroll down by pressing enter. Meanwhile, less is the improvement of more. Less shows the entire text of any file and lets you scroll up and down through the text.
rm (remove)
Finally, to delete files in the Linux file system, we use the command rm. Rm removes the files and directories you specify after the command. Adding the switch -r sets it to recursive mode which removes all contents that remain to the specified directory. Be wary in using Rm as it deletes files permanently. Accidentally deleting system files may result in a system bug or worse, an unusable system with no chance of recovery.

Installing Software
The two previous sections will help you move around and change things using the command line. In this next part, we will learn how to install software Linux-style.
apt(advanced package tool)
Firstly is apt (advanced package tool). Apt is a command that lets you interact with the dpkg package management system. Think of these two as tools that let you install applications on your Raspberry Pi. Apt is just the friendlier version of Dpkg.
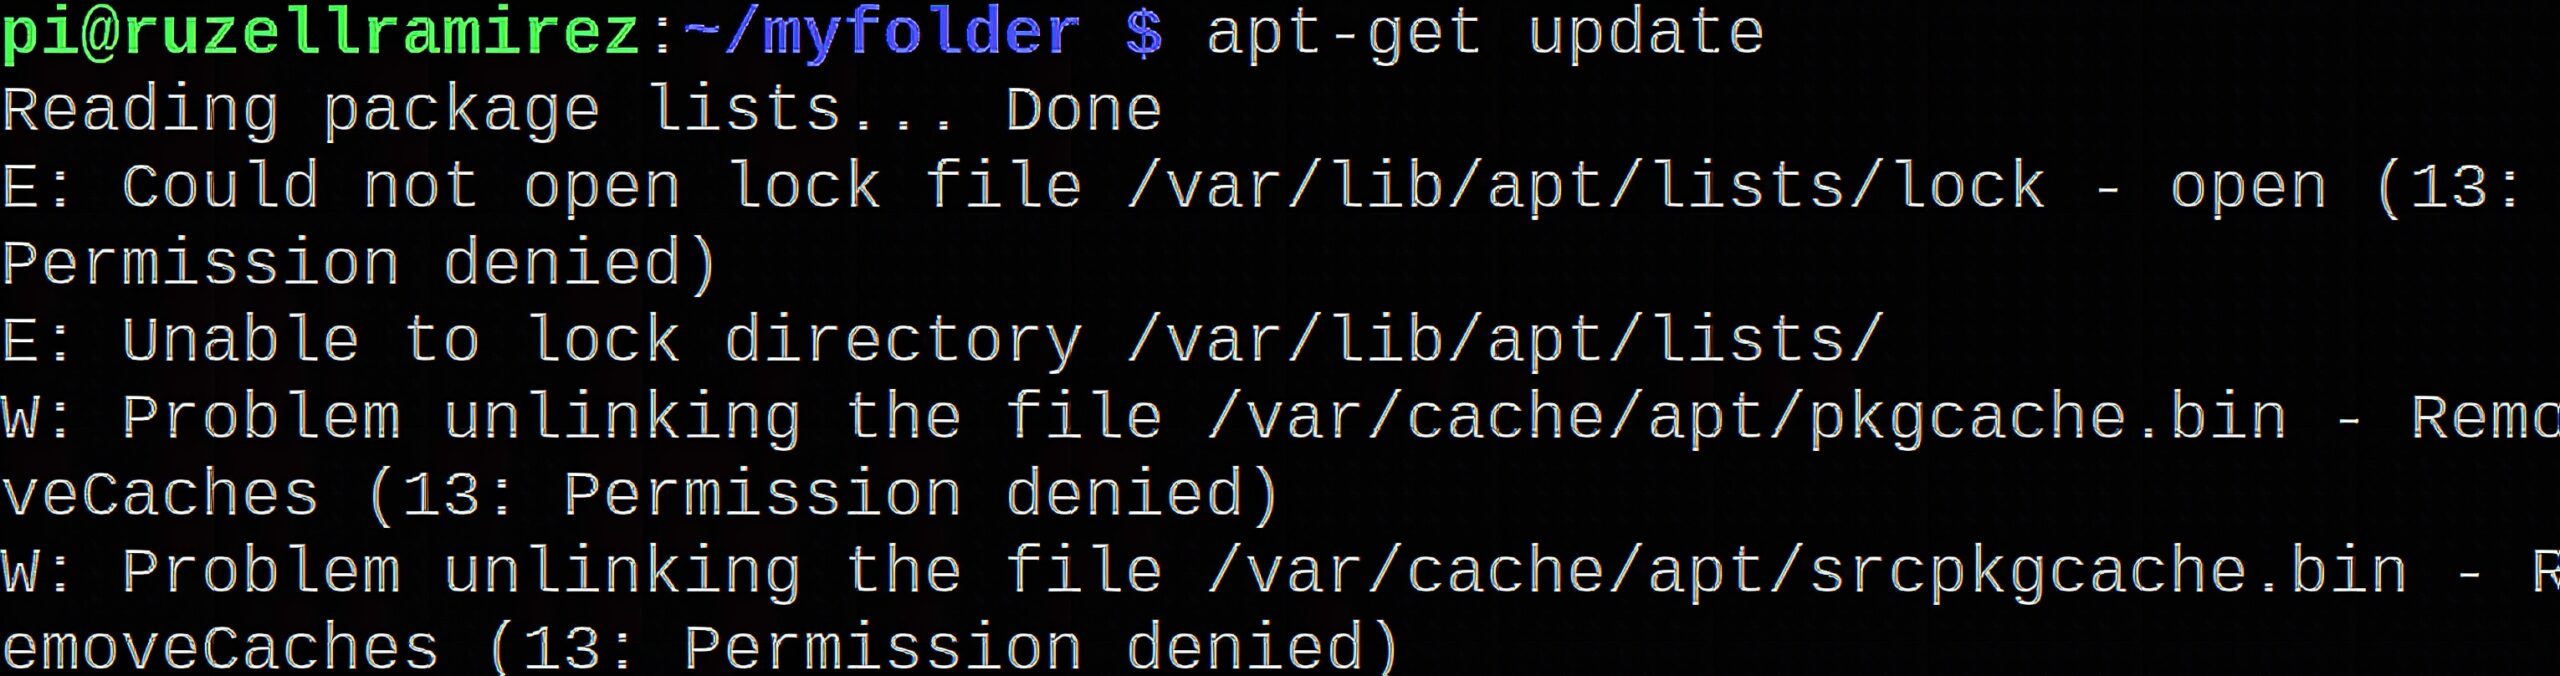
Using Apt requires administrative permissions (See Figure 7). With the pi, you can create a pseudo root, or a fake admin using command sudo. We will talk more about sudo on a later article.
To install the newest Raspbian version enter sudo apt-get update, and sudo apt-get upgrade. You can add the modifier && to issue them to the terminal at the same time.
To install a new software using Apt, enter sudo apt-get install and the name of the application you want to install. Moreover, you can search for an installed package using apt-cache search plus the name of the application. You can also examine individual packages using apt-cache show plus the name of the application. Lastly, you use sudo apt-get clean to free disk space from unused archives without affecting installed packages.
chmod (change the mode)
Next is the chmod (change the mode) command. This is an integral Linux command that lets you change the access permissions of any file or directory inside your system.
To add restrictions to a file, enter sudo chmod a-x plus the file name. To return access, simply change the command to sudo chmod a+x. In this format, a stands for all, meaning all users are restricted or permitted using the a+x or a-x switch. Other options are u (user), g (group), and o (others).
Other related commands are chown (change the owner) and chgrp (change the group). These commands change the owner of the file you specify.
Manipulating Text
So far text-wise we’ve learned how to create and write documents using fundamental Linux commands. In this section, we are going to learn how to turn them into a word count and view them in order. We will also discuss redirection.
Before we tackle these commands, let’s talk about theory.
Theoretically, when you enter a Linux command, it is given three streams: stdin (standard input), stdout(standard output), and stderr(standard error). Stdin is the stream that accepts text as an input. After receiving the text, it then gets delivered to Stdout. While error messages are sent to Stderr.
The reason for their separate existence is for redirection. We need redirection to interlink commands together. For instance, using a command’s output as an input to another.
Redirection is an important feature of Linux’s commands. We will discuss this further using the commands in this section.
wc (word count)
wc stands for word count. The command syntax for it is: wc filename.
When you use the standard syntax, wc simply counts the words inside the file or directory you specify. But you can also use wc to count the files on your current directory.
In order to do that, you need to add a redirected ls command. First, enter ls -l ~ | wc -l on the terminal. ls -l ~, as discussed before, lists all the files and folders in the target directory in detail. So the output of this command lists all the names, sizes, modified dates, and etc. of the directory specified to ls.
The symbol ‘|’ is called a pipe. It connects the output of your first command to the input of the next command you type.
Further, when you use wc with a -l switch, it only counts the lines. So using the stdout of ls as the stdin of wc will count the number of files specified in the target directory.

sort
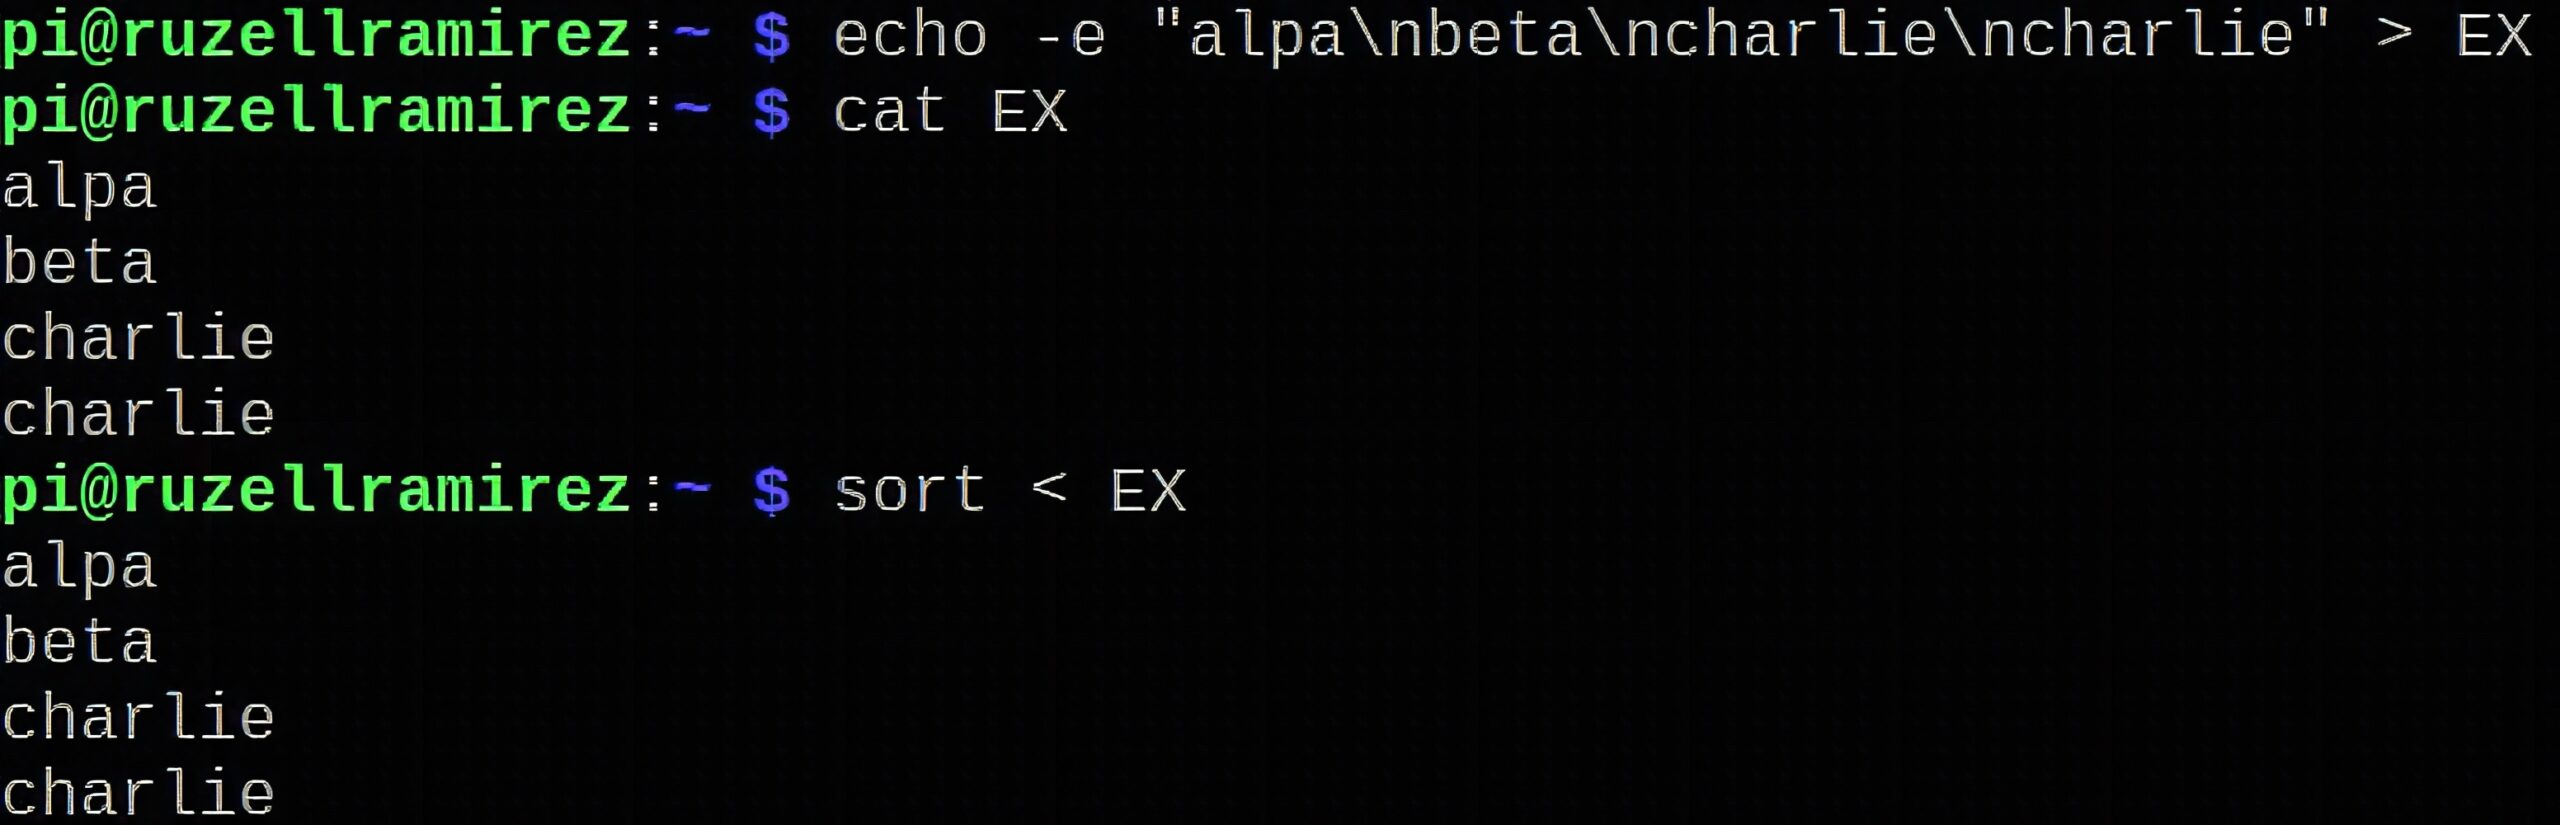
The next command is sort. It prints the lines of an input text in sorted order. Figure 9 below demonstrates how the command works. The first line uses echo and the switch -e to create a text file named EX. The -e switch lets you add special characters, like n for newline, to the content of your file. We will discuss more about echo later.
Next, we use cat to view the content of EX. As you can see everything inside the parentheses on our echo command was written in separate lines (thanks to n). Now, this is kinda embarrassing but I already wrote the names in order so after using sort it didn’t show any changes. Just imagine I wrote beta first then it got transferred to the second line after using sort. That is how it works.
Notice the less then sign ‘<‘. Turns out you can do more redirection other than pipes.
Redirection
Redirection is a Linux feature wherein you can change the flow of the standard input, output, and error streams. We first mentioned it using pipes ‘|’ but there are also other symbols we can use.
First, is less than ‘<‘. This symbol links a command’s stdin to the contents of a file or stream. In our example with the sort command (See Figure 9), we use < to redirect the input of sort to the contents of EX.
Now if there’s a less than symbol, there must be a greater than symbol too, right? The greater than symbol ‘>’ sends the stdout of a program to a text file by either creating a new text file or adding to an existing one.
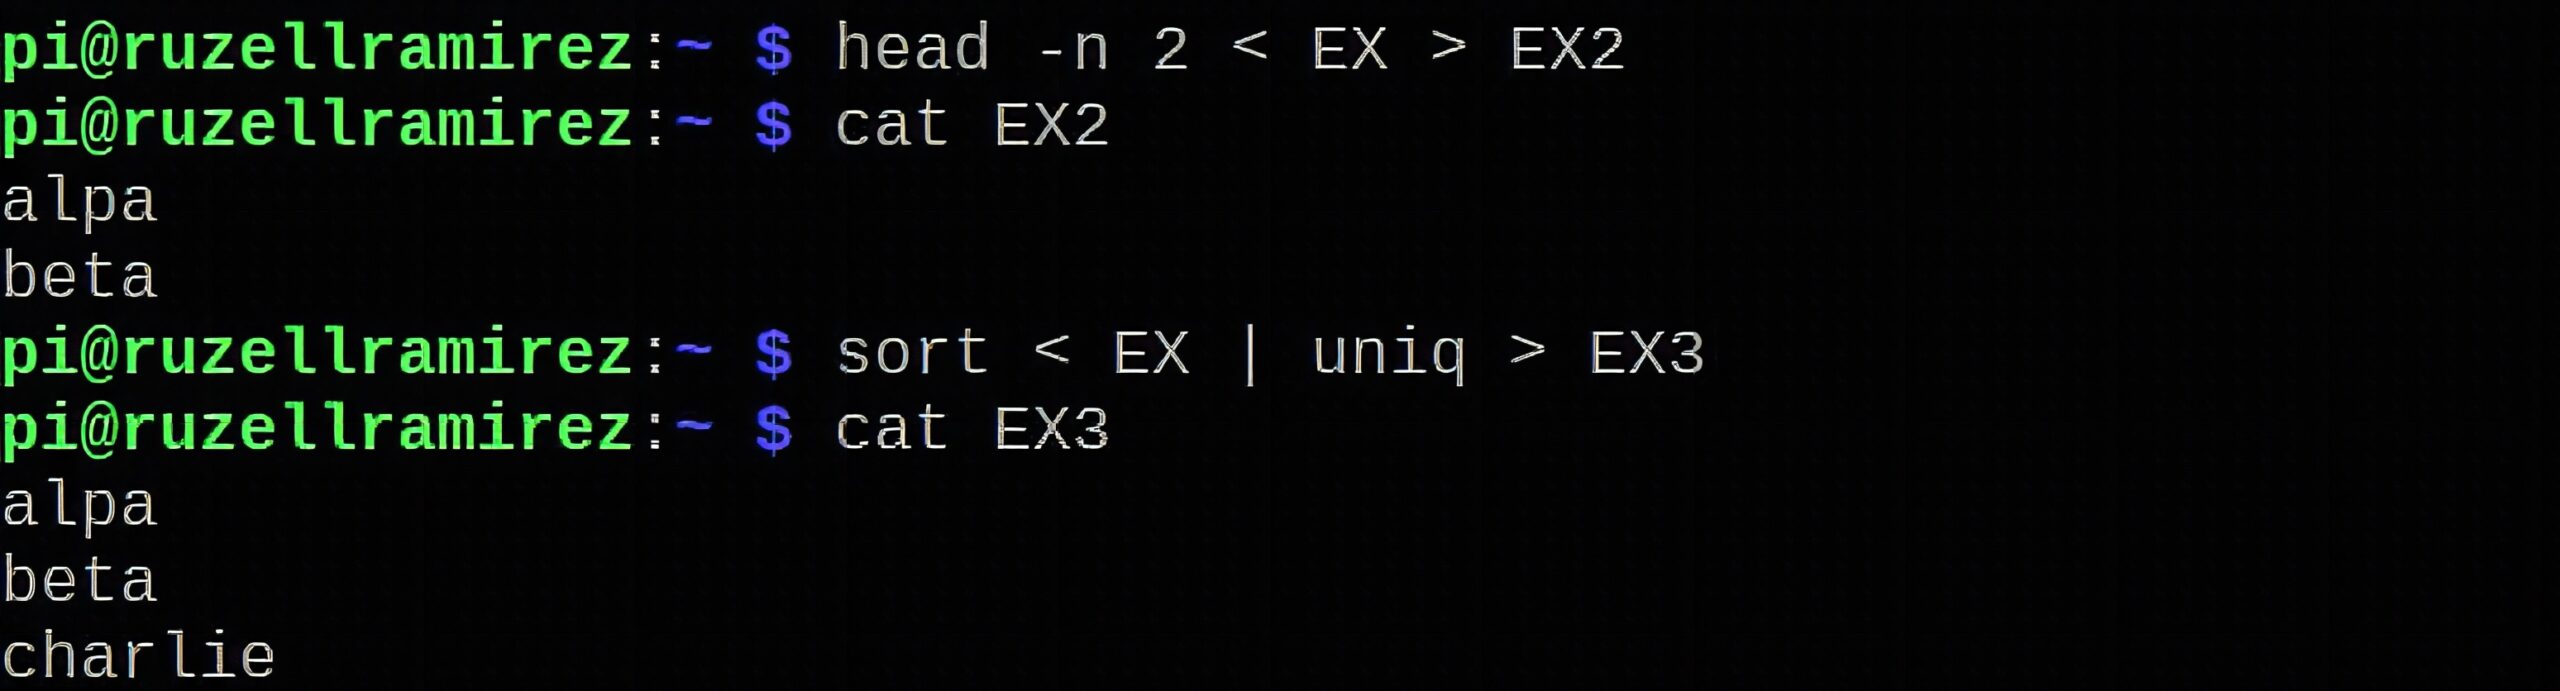
It should be noted that these symbols can be used together. Figure 10 shows a demonstration on how to use redirection with the commands head, cat, and uniq. First, we create a file named EX2. By using head -n 2 < EX, we are telling the computer to get the first 2 lines inside EX then send it to the stdout stream, eventually ending up inside EX2 via the > redirection symbol.
Now to demonstrate all symbols, we create the text file EX3. First, we use sort to put the names in order. Then we use these sorted names as an input to the uniq command. Uniq filters out repeated lines in a file. Since charlie is mentioned twice in EX, one line containing charlie is eliminated from the stdout stream of sort. The output then goes to a new file named EX3, as we can see using cat.
It is important to know that stdin can also be referred to as number 0. Same as stdout with the number 1 and stderr with number 2.
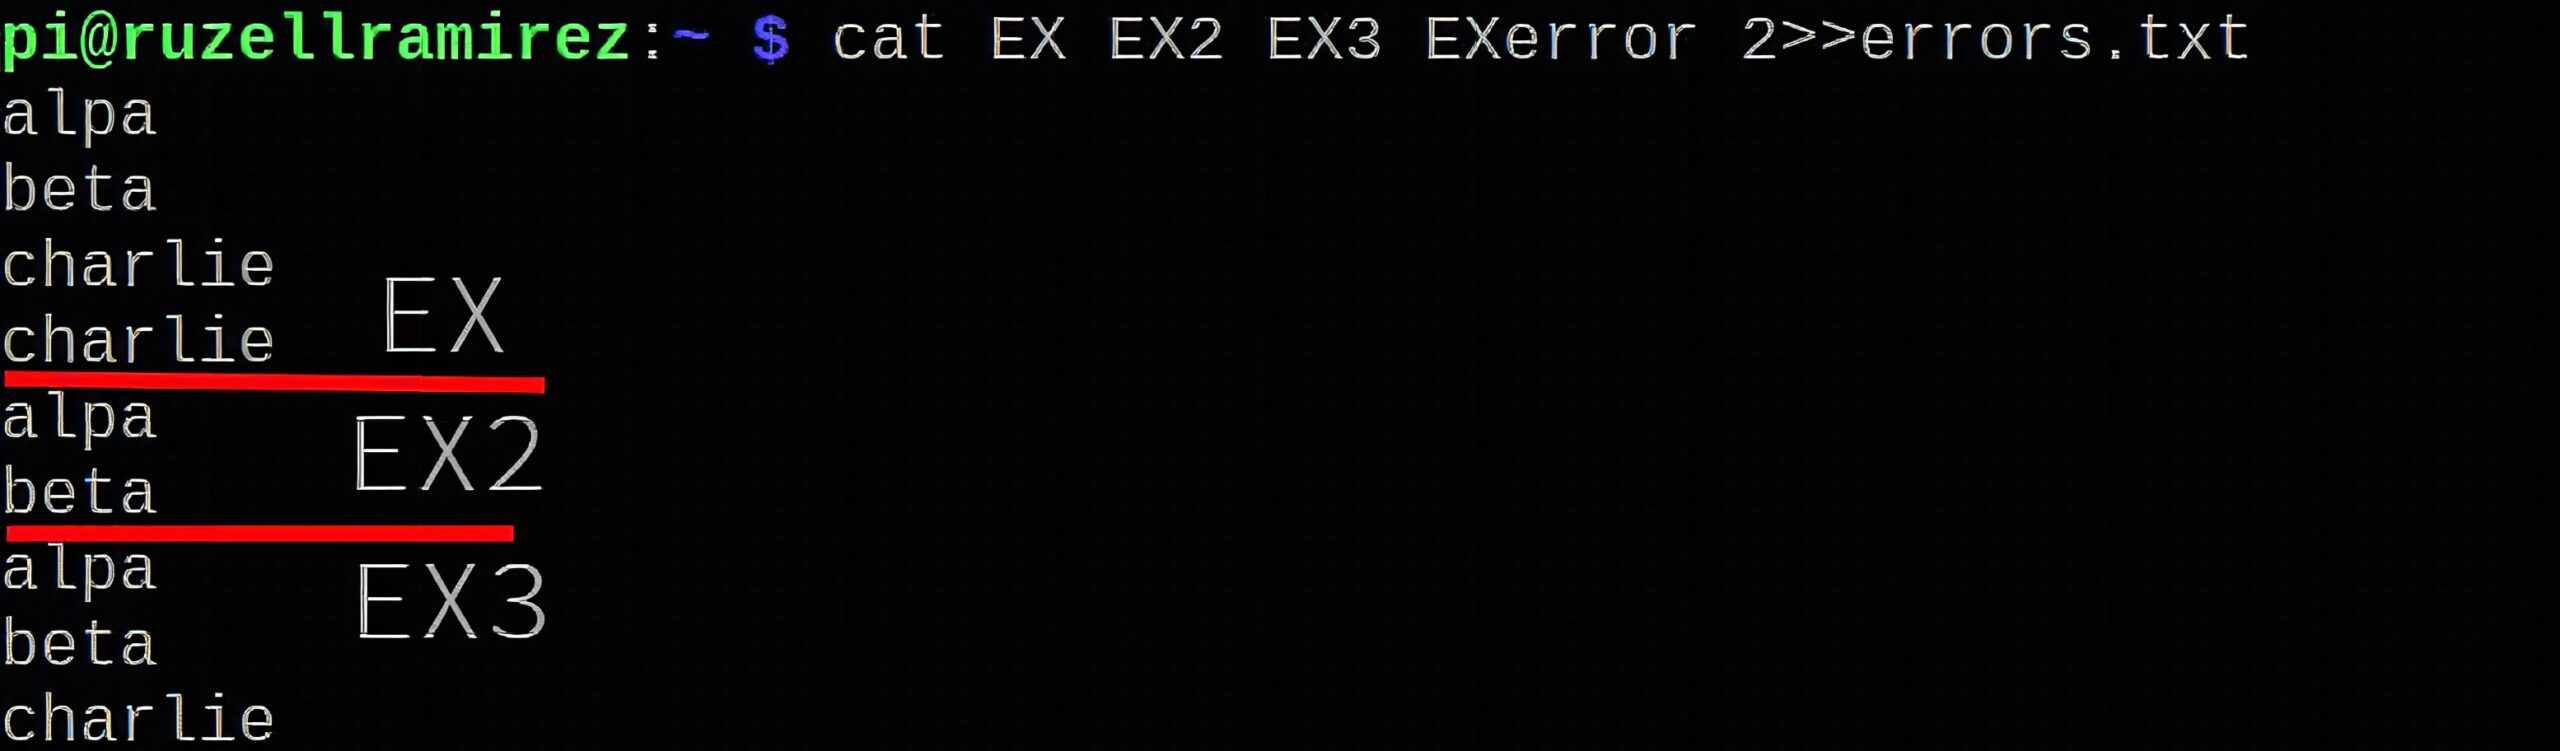
We will use these numbers with a slight modification of greater than ‘>>’. When you redirect using this symbol, you add something to a file without overwriting the contents. Figure 11 shows one way of using the >> symbol. We use cat to show us the contents of files EX, EX2, EX3, and EXerror. Notice that we haven’t created any file named EXerror yet, so our expectation is to see an error message saying there’s no such file. But since we redirected the error message using 2>> to errors.txt, the command will still execute showing us the three files.
grep (global regular expression point)
The grep command searches for a word inside a file and sends it to stdout. It’s useful when debugging programming files as you don’t need to open the entire file to search for a particular keyword.

echo
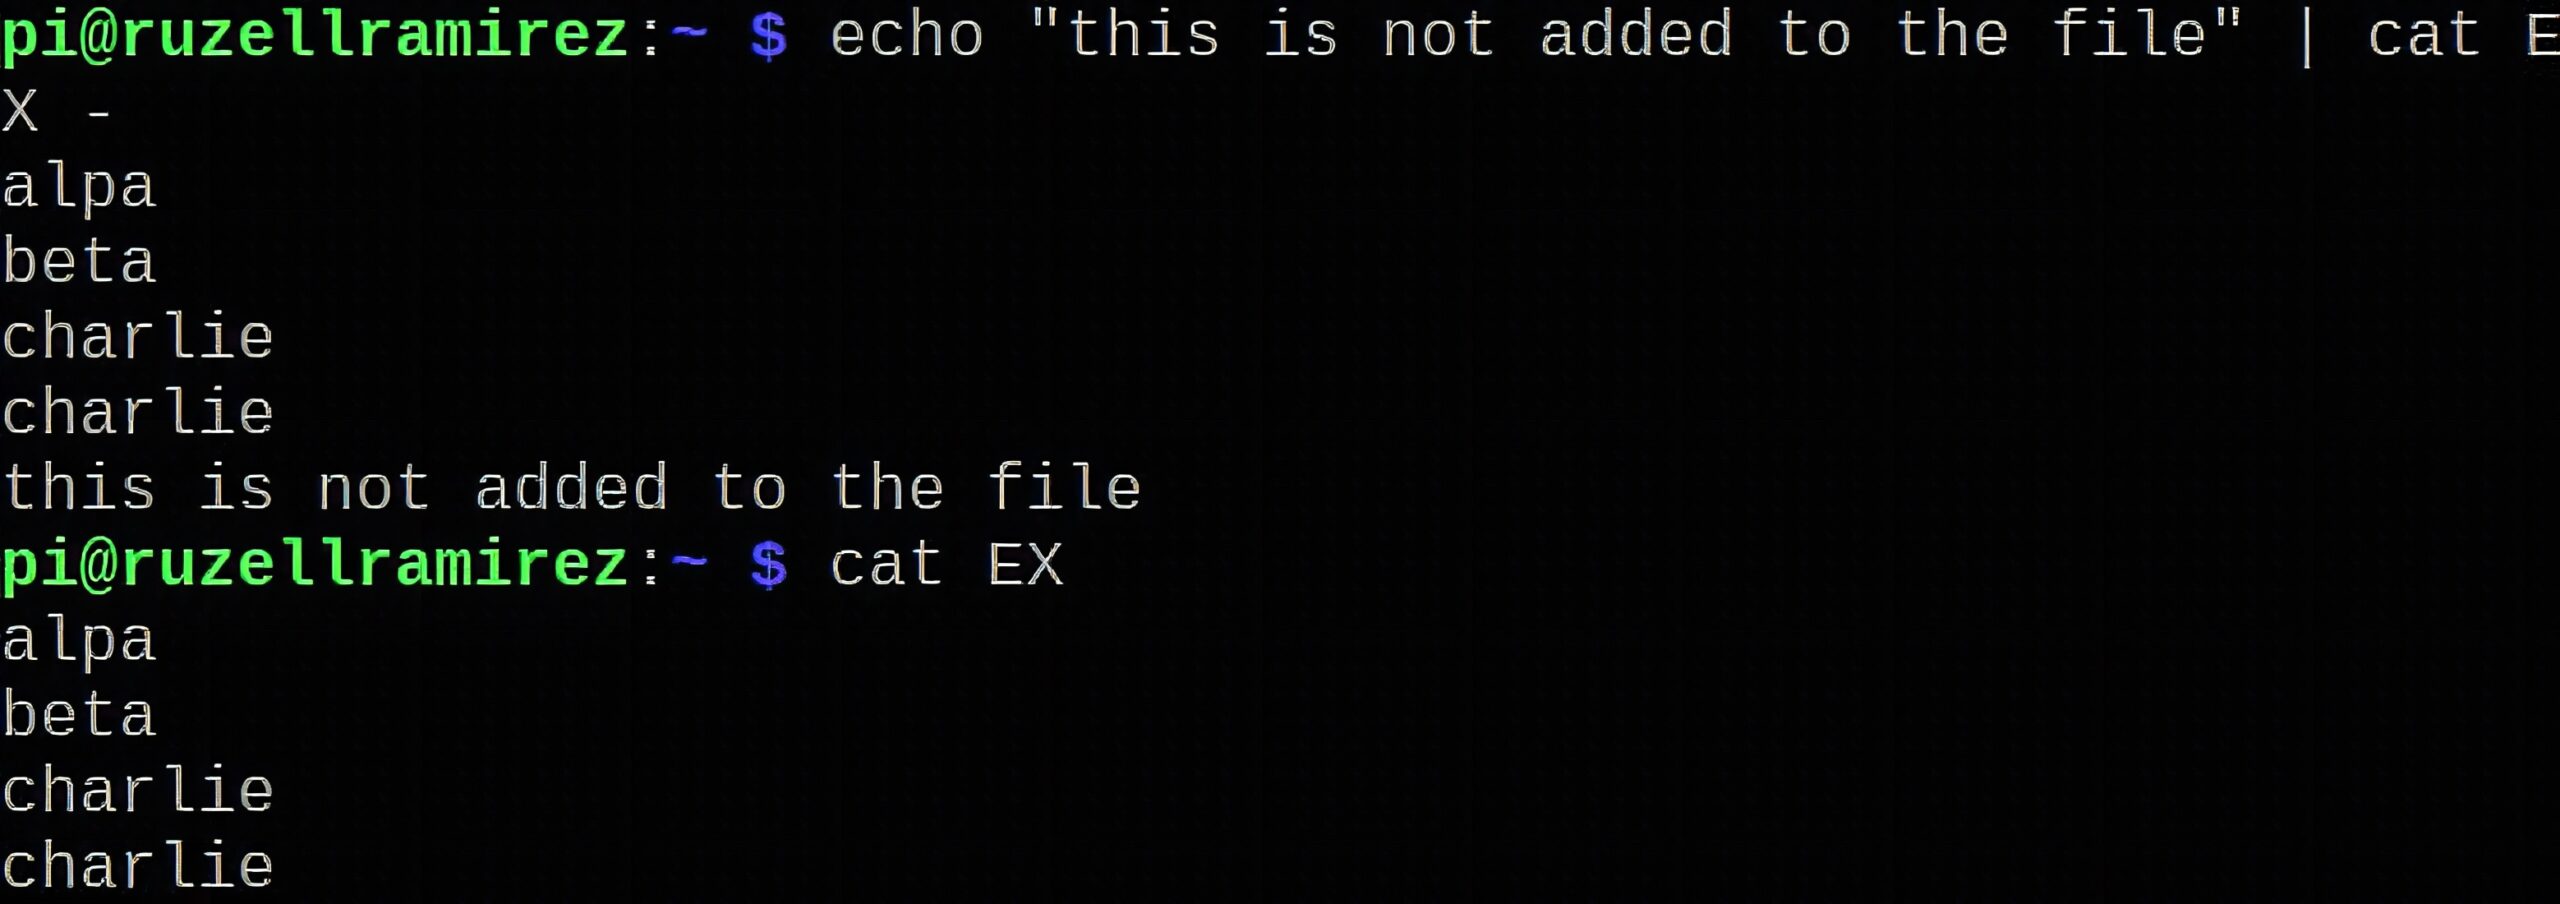
The next command is echo. Previously, we used echo to create a text file and read special characters using the -e switch. The echo command prints the strings from an input argument or a file. Unlike cat, echo does not get data from stdin. It only accepts parameters or a specific set of lines.
However, you can use echo with redirection symbols to temporarily add something to an stdout stream or permanently write on a file. Figure 13 shows how you can add additional text to stdout without writing on a file.
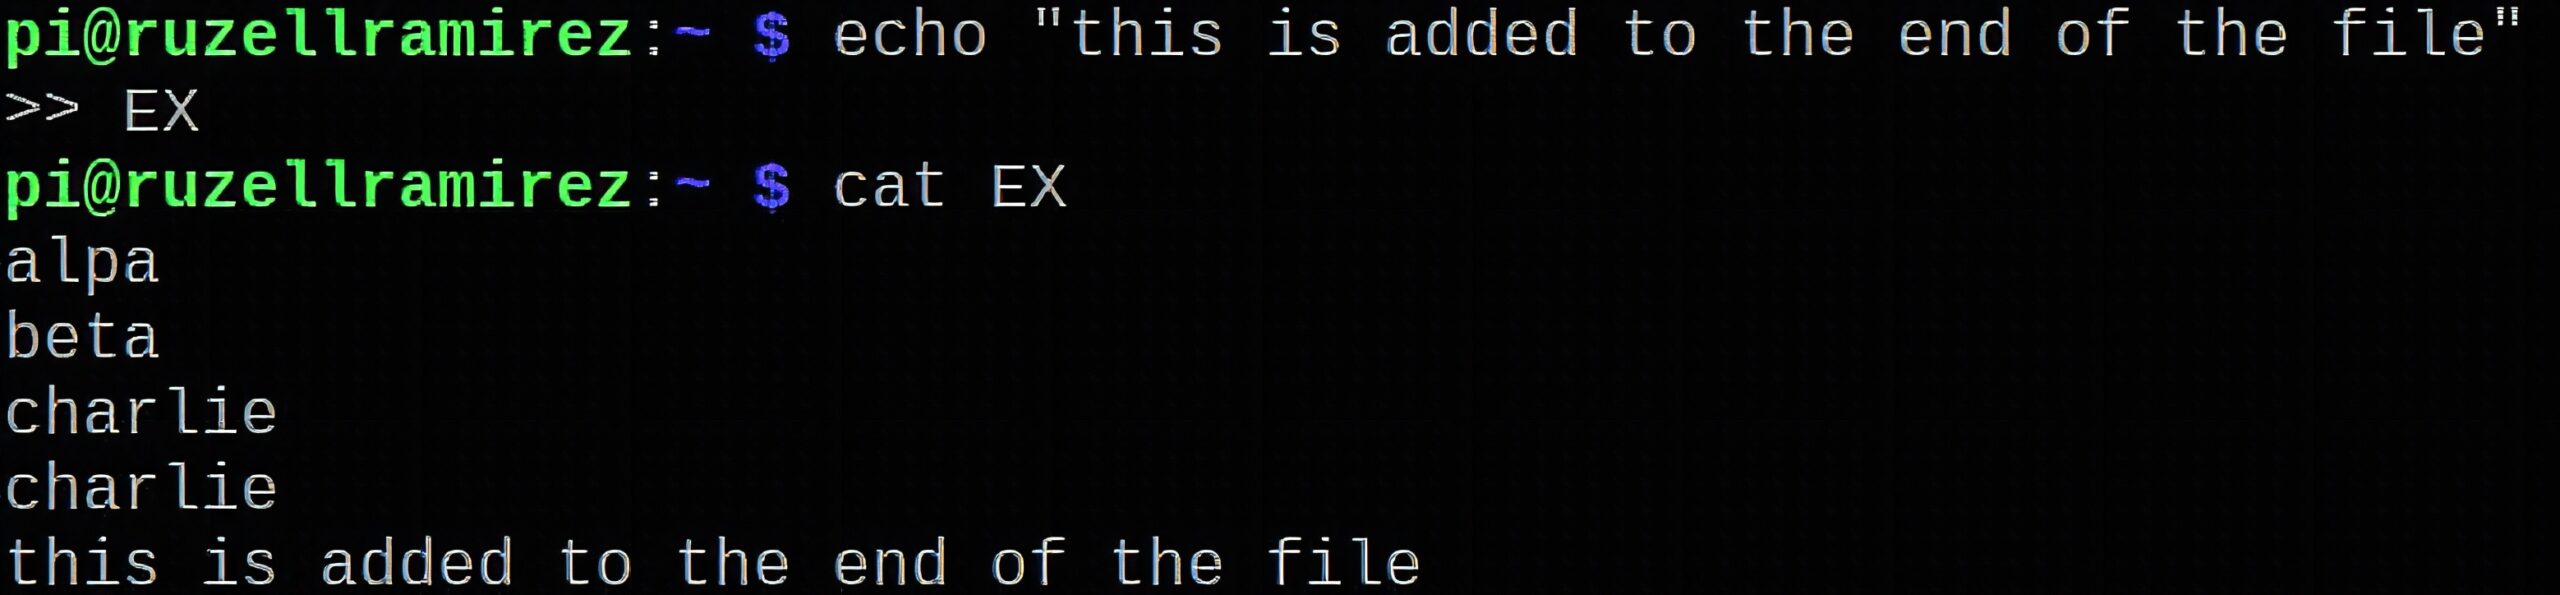
As you may have guessed, we write to a file using the >> symbol. With this, whatever you write to the specified file will forever be there unless modified (See Figure 14).
User Control and Customizing the Terminal
Lastly, we will learn how to create additional users for the Raspberry Pi and customize the terminal to our preferences.
sudo adduser
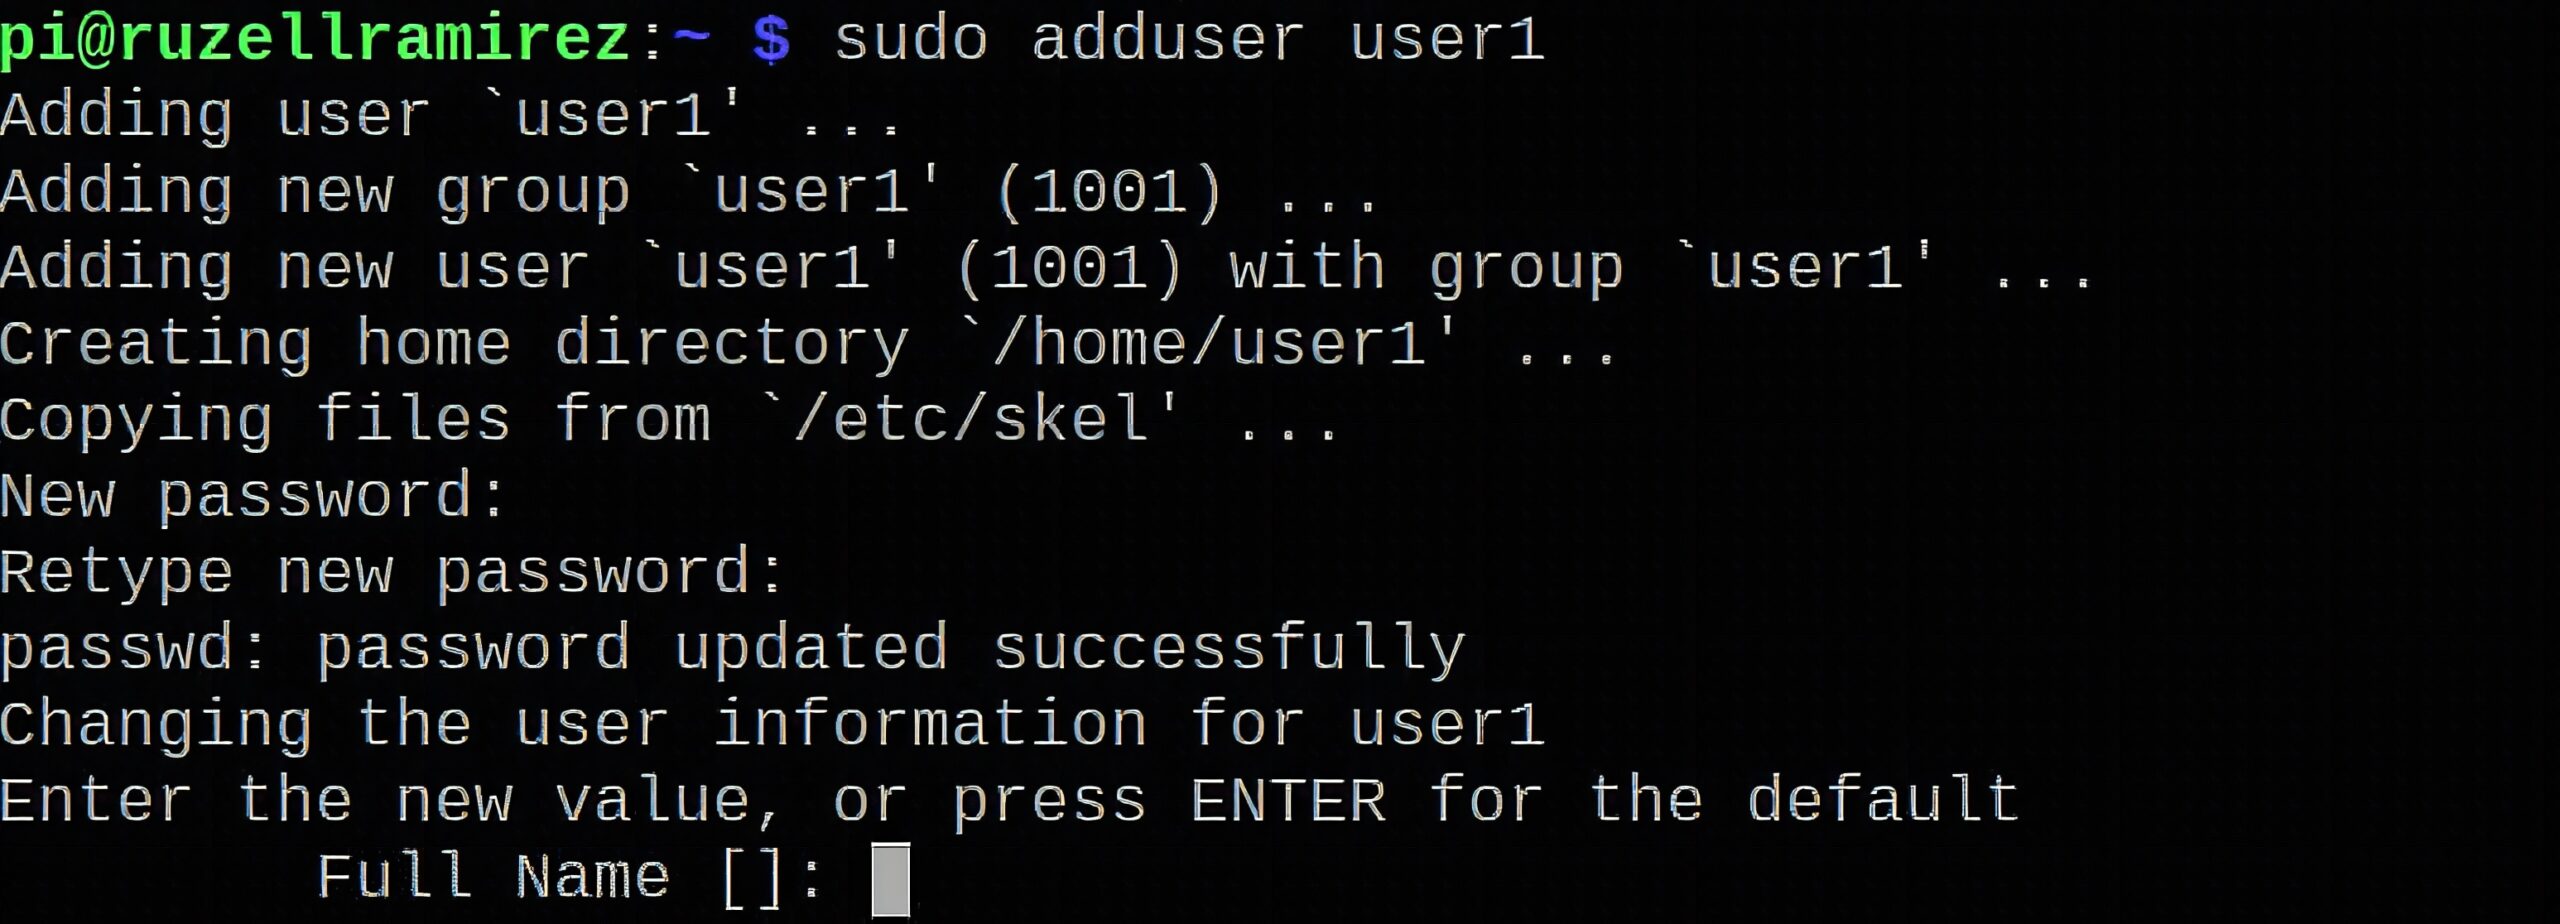
The Raspberry Pi OS is a multi-user operating system. However, by default, only one regular user is created at first boot. In order to create another, you use the command: sudo adduser username. After executing, adduser prompts you for the new user’s details (See Figure 15). You can also leave them blank if you prefer not to have a password or your personal information on your computer.
Adduser automatically takes care of your personal Linux file system, like making a home directory (See Figure 16). If you want to make the directories yourself, you can opt for the useradd command.

sudo passwd
Furthermore, to change a user’s password, enter sudo passwd user. If you want to change the password for the current user, enter the command without specifying the user name.

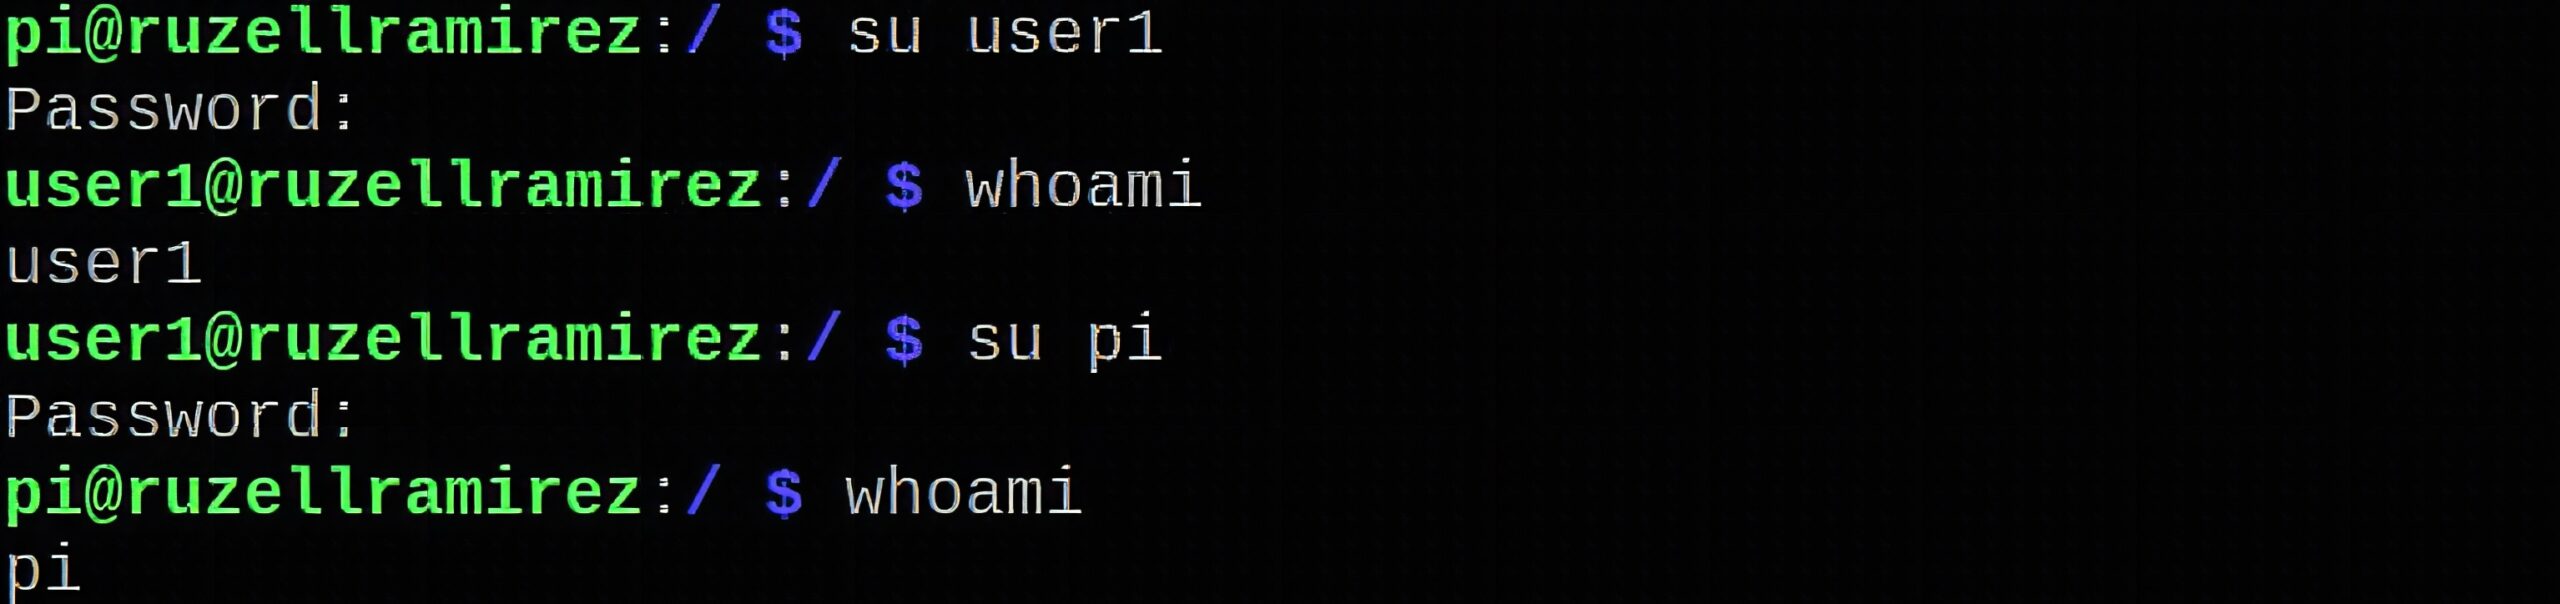
su (switch user)
The su command, also known as switch user, is a powerful command that is used to change to another user’s access and privileges. The command syntax is: su username. When the command is executed, it will ask for the password of your specified user. Moreover, you can use the whoami command to check the current user logged in the terminal.
changing the terminal prompt
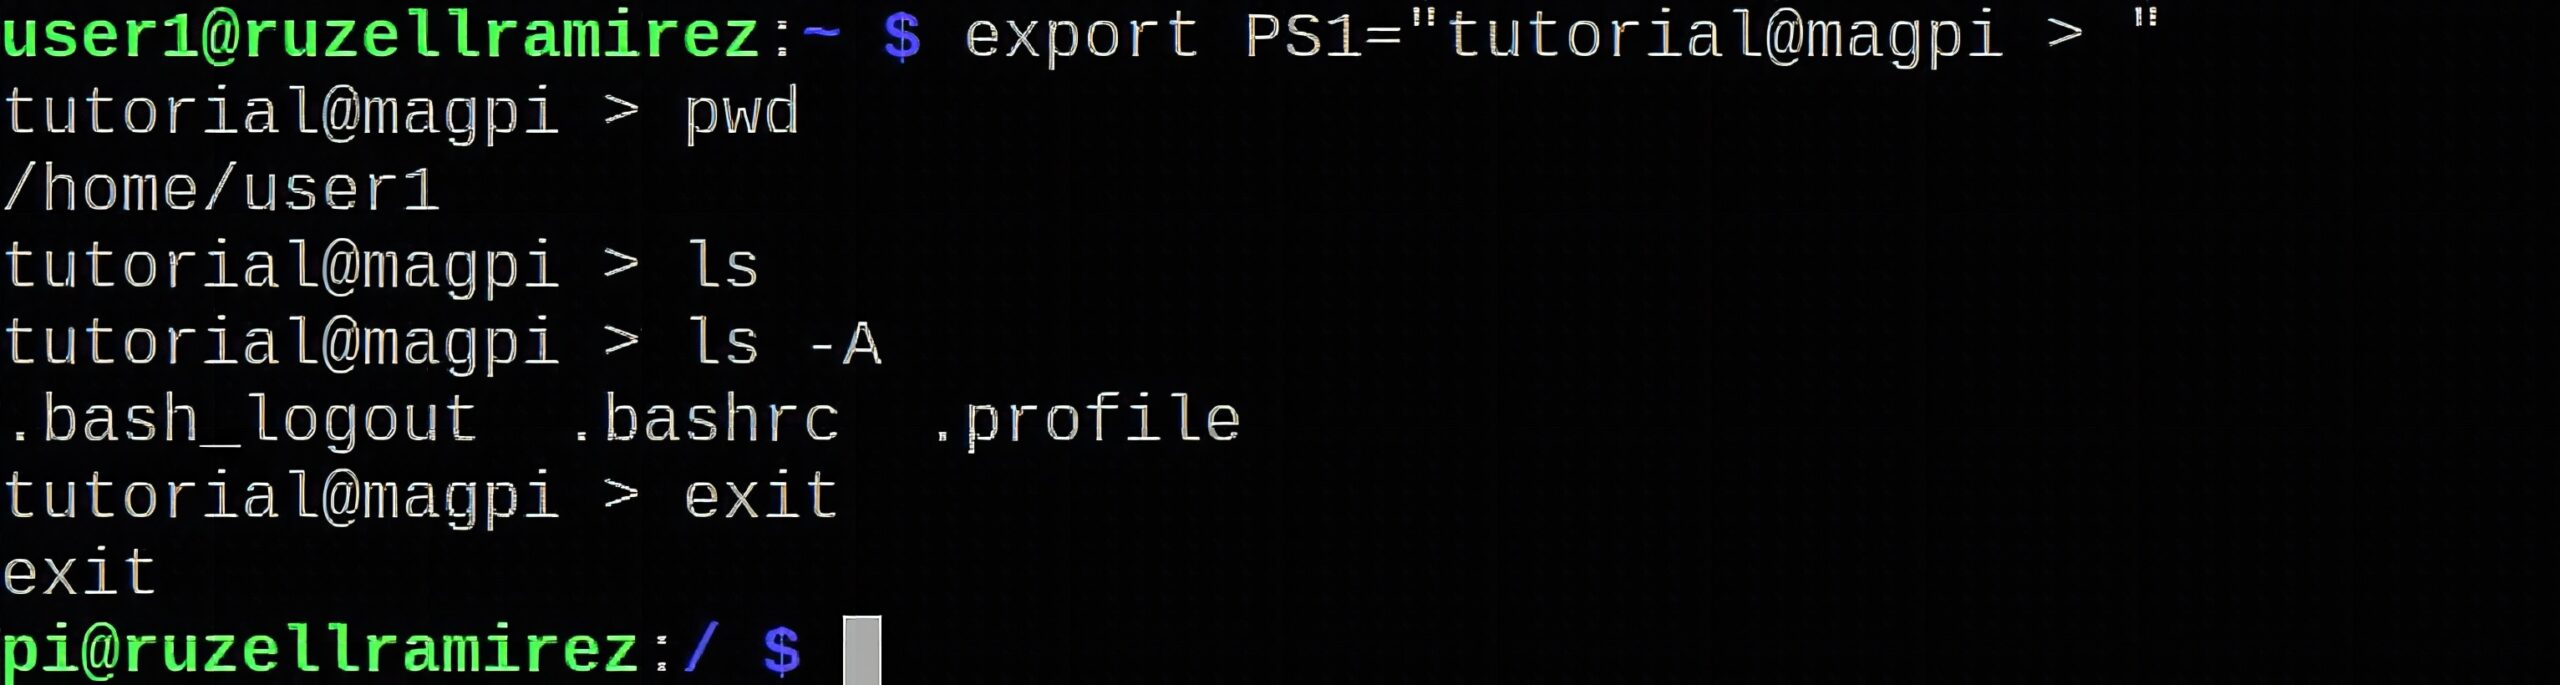
Finally, after getting comfortable with the command line, much like graphical user interfaces, the need for personalization and customization arises. The most basic thing to customize is the prompts. Usually, the prompt consists of the user name, an @ sign, the computer’s name, the current directory, and a $ sign. You can change this syntax by using export PS1="name of your desired prompt". Note that this is only temporary. One way to make it permanent is by configuring the system file named ~/.bashrc. We will discuss system files on a later article.
Frequently Asked Questions
[faq] [faq_q]Is Linux on Raspberry Pi the same as Linux on a regular PC?[/faq_q] [faq_a]Yes for command-line work. Raspberry Pi OS is Debian-based, so commands, package management (apt), and shell scripts behave just like Ubuntu or Debian. Differences are in hardware: ARM vs x86, less RAM, GPIO pins.[/faq_a][faq_q]Do I have to learn the terminal to use Raspberry Pi?[/faq_q] [faq_a]No. Raspberry Pi OS has a desktop environment with a web browser and file manager. But most tutorials assume some terminal use, and it is faster for installs and updates.[/faq_a][faq_q]What is the difference between sudo and root?[/faq_q] [faq_a]sudo runs a single command as root (the admin user). The default Pi user can use sudo for admin tasks without logging in as root. Avoid logging in as root directly: it is safer to prefix commands with sudo.[/faq_a][faq_q]How do I update Raspberry Pi OS?[/faq_q] [faq_a]Run sudo apt update && sudo apt upgrade from the terminal. The first refreshes the package list, the second installs available updates. Reboot after kernel updates.[/faq_a][faq_q]What is the difference between apt and apt-get?[/faq_q] [faq_a]apt is the newer, more user-friendly command. apt-get is older and is still used in scripts. Both manage packages, but apt shows progress bars and clearer output.[/faq_a][/faq]Frequently Asked Questions
What does this How to Get Started with Linux Using the Raspberry Pi tutorial cover?
The best thing you can learn about Raspberry Pi is Linux.
Which Raspberry Pi model fits the How to Get Started with Linux Using the Raspberry Pi project?
Pi 4 (4GB) or Pi 5 for desktop apps and AI workloads. Pi Zero 2 W is enough for headless / sensor builds. Pi 3 B+ works but is slower for camera or ML.
How do I auto-start the How to Get Started with Linux Using the Raspberry Pi script on boot?
Use systemd. Create /etc/systemd/system/myproject.service with ExecStart=/usr/bin/python3 /home/pi/script.py and Restart=always. sudo systemctl enable myproject.