
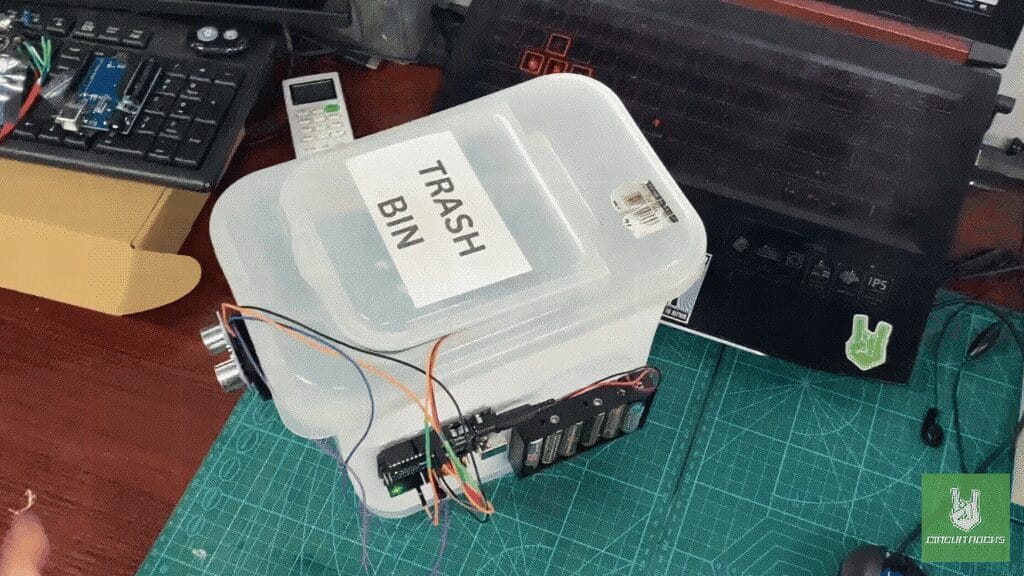
Keeping your surroundings clean has never been easier with an Automated Trash Bin! In this tutorial, we’ll guide you through building a touch-free waste disposal system. Using an Arduino Uno and a SG92R micro servo motor.
The system is powered by a 6xAA battery holder and programmed via a USB Type-B cable. Essential components such as jumper wires ensure secure connections, while a glue gun or Mighty Bond helps attach the setup to a DIY trash bin. Using an Arduino for control and programmed with optimized code, making the system responsive and efficient. By integrating it, you can build a smart trash bin that enhances cleanliness and convenience.
The Automated Trash Bin isn’t just about convenience. By eliminating the need to touch the lid, it helps prevent the spread of germs and encourages better hygiene in waste disposal. Plus, you can customize it to fit your needs. By adjusting the sensor sensitivity, lid opening time, or adding sound alerts for extra features. Perfect for home or shared spaces, this project makes cleanliness easy and hassle-free!
Components
For the connection setup of your Automated Trash Bin using an Arduino Uno, ultrasonic sensor, and servo motor, follow this wiring guide:
Connection:
HC-SR04:
- VCC → 5V on Arduino
- GND → GND on Arduino
- Trig → Digital Pin 9
- Echo → Digital Pin 10
SG92R Servo:
- VCC (Red) → 3.3V on Arduino
- GND (Brown/Black) → GND on Arduino
- Signal (Yellow/White) → Digital Pin 6
Power Supply:
- 6xAA Battery Holder → Connects to Arduino’s Vin & GND (if using external power).
Codes:
The system ensures a touch-free operation, making waste disposal more hygienic and convenient. When an object, such as a hand, is detected within 20 cm, the servo motor rotates 90 degrees, opening the lid automatically. If no object is detected for 3 seconds, the lid closes on its own, preventing unnecessary exposure.
#include <Servo.h> // Define pins for the ultrasonic sensor
const int trigPin = 9;
const int echoPin = 10; // Define the servo object
Servo servoMotor; // Define distance threshold (in cm)
const int distanceThreshold = 20; // Adjust this to your desired detection range // Timer to track how long the object is detected
unsigned long objectDetectedTime = 0;
// Time to keep the servo open if no object is detected (in milliseconds)
const unsigned long noObjectCloseDelay = 3000; void setup() { // Initialize the servo servoMotor.attach(6); // Attach the servo to pin 6 servoMotor.write(0); // Start with the servo closed (angle 0 degrees) // Initialize the ultrasonic sensor pins pinMode(trigPin, OUTPUT); pinMode(echoPin, INPUT); // Begin serial communication for debugging (optional) Serial.begin(9600);
} void loop() { // Get the distance measurement from the ultrasonic sensor long distance = getDistance(); // Debugging: Print the distance to the Serial Monitor Serial.print("Distance: "); Serial.print(distance); Serial.println(" cm"); // Check if the distance is below the threshold if (distance > 0 && distance < distanceThreshold) { // If an object is detected, keep the servo open servoMotor.write(90); // Open the lid (90 degrees) objectDetectedTime = millis(); // Update the time the object was detected } else { // If no object is detected and 5 seconds have passed, close the lid if (millis() - objectDetectedTime >= noObjectCloseDelay) { servoMotor.write(0); // Close the lid (0 degrees) } } delay(100); // Short delay to avoid rapid triggering
} // Function to measure distance using the ultrasonic sensor
long getDistance() { // Send a 10-microsecond pulse to trigger the sensor digitalWrite(trigPin, LOW); delayMicroseconds(2); digitalWrite(trigPin, HIGH); delayMicroseconds(10); digitalWrite(trigPin, LOW); // Measure the time it takes for the echo to return long duration = pulseIn(echoPin, HIGH); // Calculate the distance in cm long distance = duration * 0.034 / 2; return distance;
}
QUICK LINK
Frequently Asked Questions
What does this Automated Trash Bin tutorial cover?
Keeping your surroundings clean has never been easier with an Automated Trash Bin! In this tutorial, we’ll guide you through building a touch-free waste disposal system .
Can I use an Arduino Nano or Mega instead of UNO for the Automated Trash Bin build?
Yes. Nano shares the same ATmega328P and pinout. Mega has more I/O if you outgrow UNO. The code stays the same — just match the pin numbers used in the Sample Code section.
Why does my Automated Trash Bin sketch fail to upload?
Usually wrong COM port, missing CH340/CH341 driver for clone boards, or another program holding the serial port. Disconnect the board, install the driver, reselect the port, retry.