
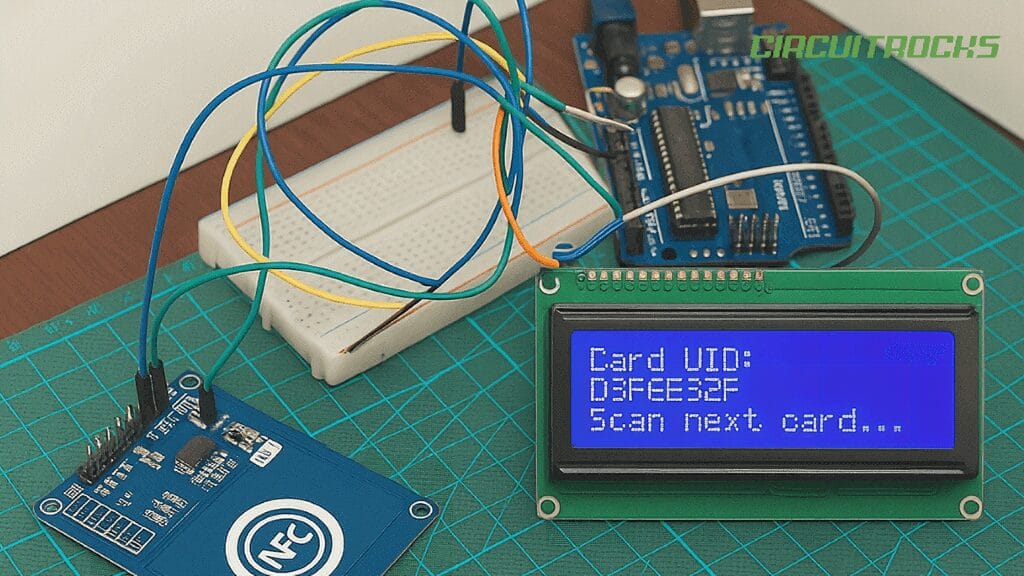
Ever wish your project could recognize a tap – then greet a student by name or unlock a box? That’s exactly Arduino NFC RFID PN532 do. With one quick tap, a card’s unique ID (UID) is read and instantly shown on a 20×4 I²C LCD. It feels like magic, but it’s just clean Arduino code plus a solid sensor.
The PN532 is an NFC/RFID reader that talks over I²C. In this build, your Arduino initializes the PN532, waits for a tag, grabs its UID, formats it to uppercase HEX, then prints it to both Serial and the LCD. It’s a perfect first step toward attendance systems, access control, or simple automation – fast, contactless, and beginner-friendly.
Hardware-wise, you only need an Arduino (Uno/Nano works), a PN532 breakout set to I²C mode, and a 20×4 I²C LCD (address usually 0x27 or 0x3F). Power the modules, connect SDA/SCL to the Arduino’s I²C pins, and you’re ready. The included sketch already handles setup, scanning, and display so you can focus on trying your cards and planning features.
When you’re ready to go beyond showing the UID, level up with our ESP8266 RFID-Based Security System with Servo tutorial – learn how to authorize specific cards, trigger a servo to lock/unlock, add feedback (LCD/buzzer), and even prep it for Wi-Fi features. It’s the perfect follow-up once your PN532 + LCD reader is working.
Circuit Diagram
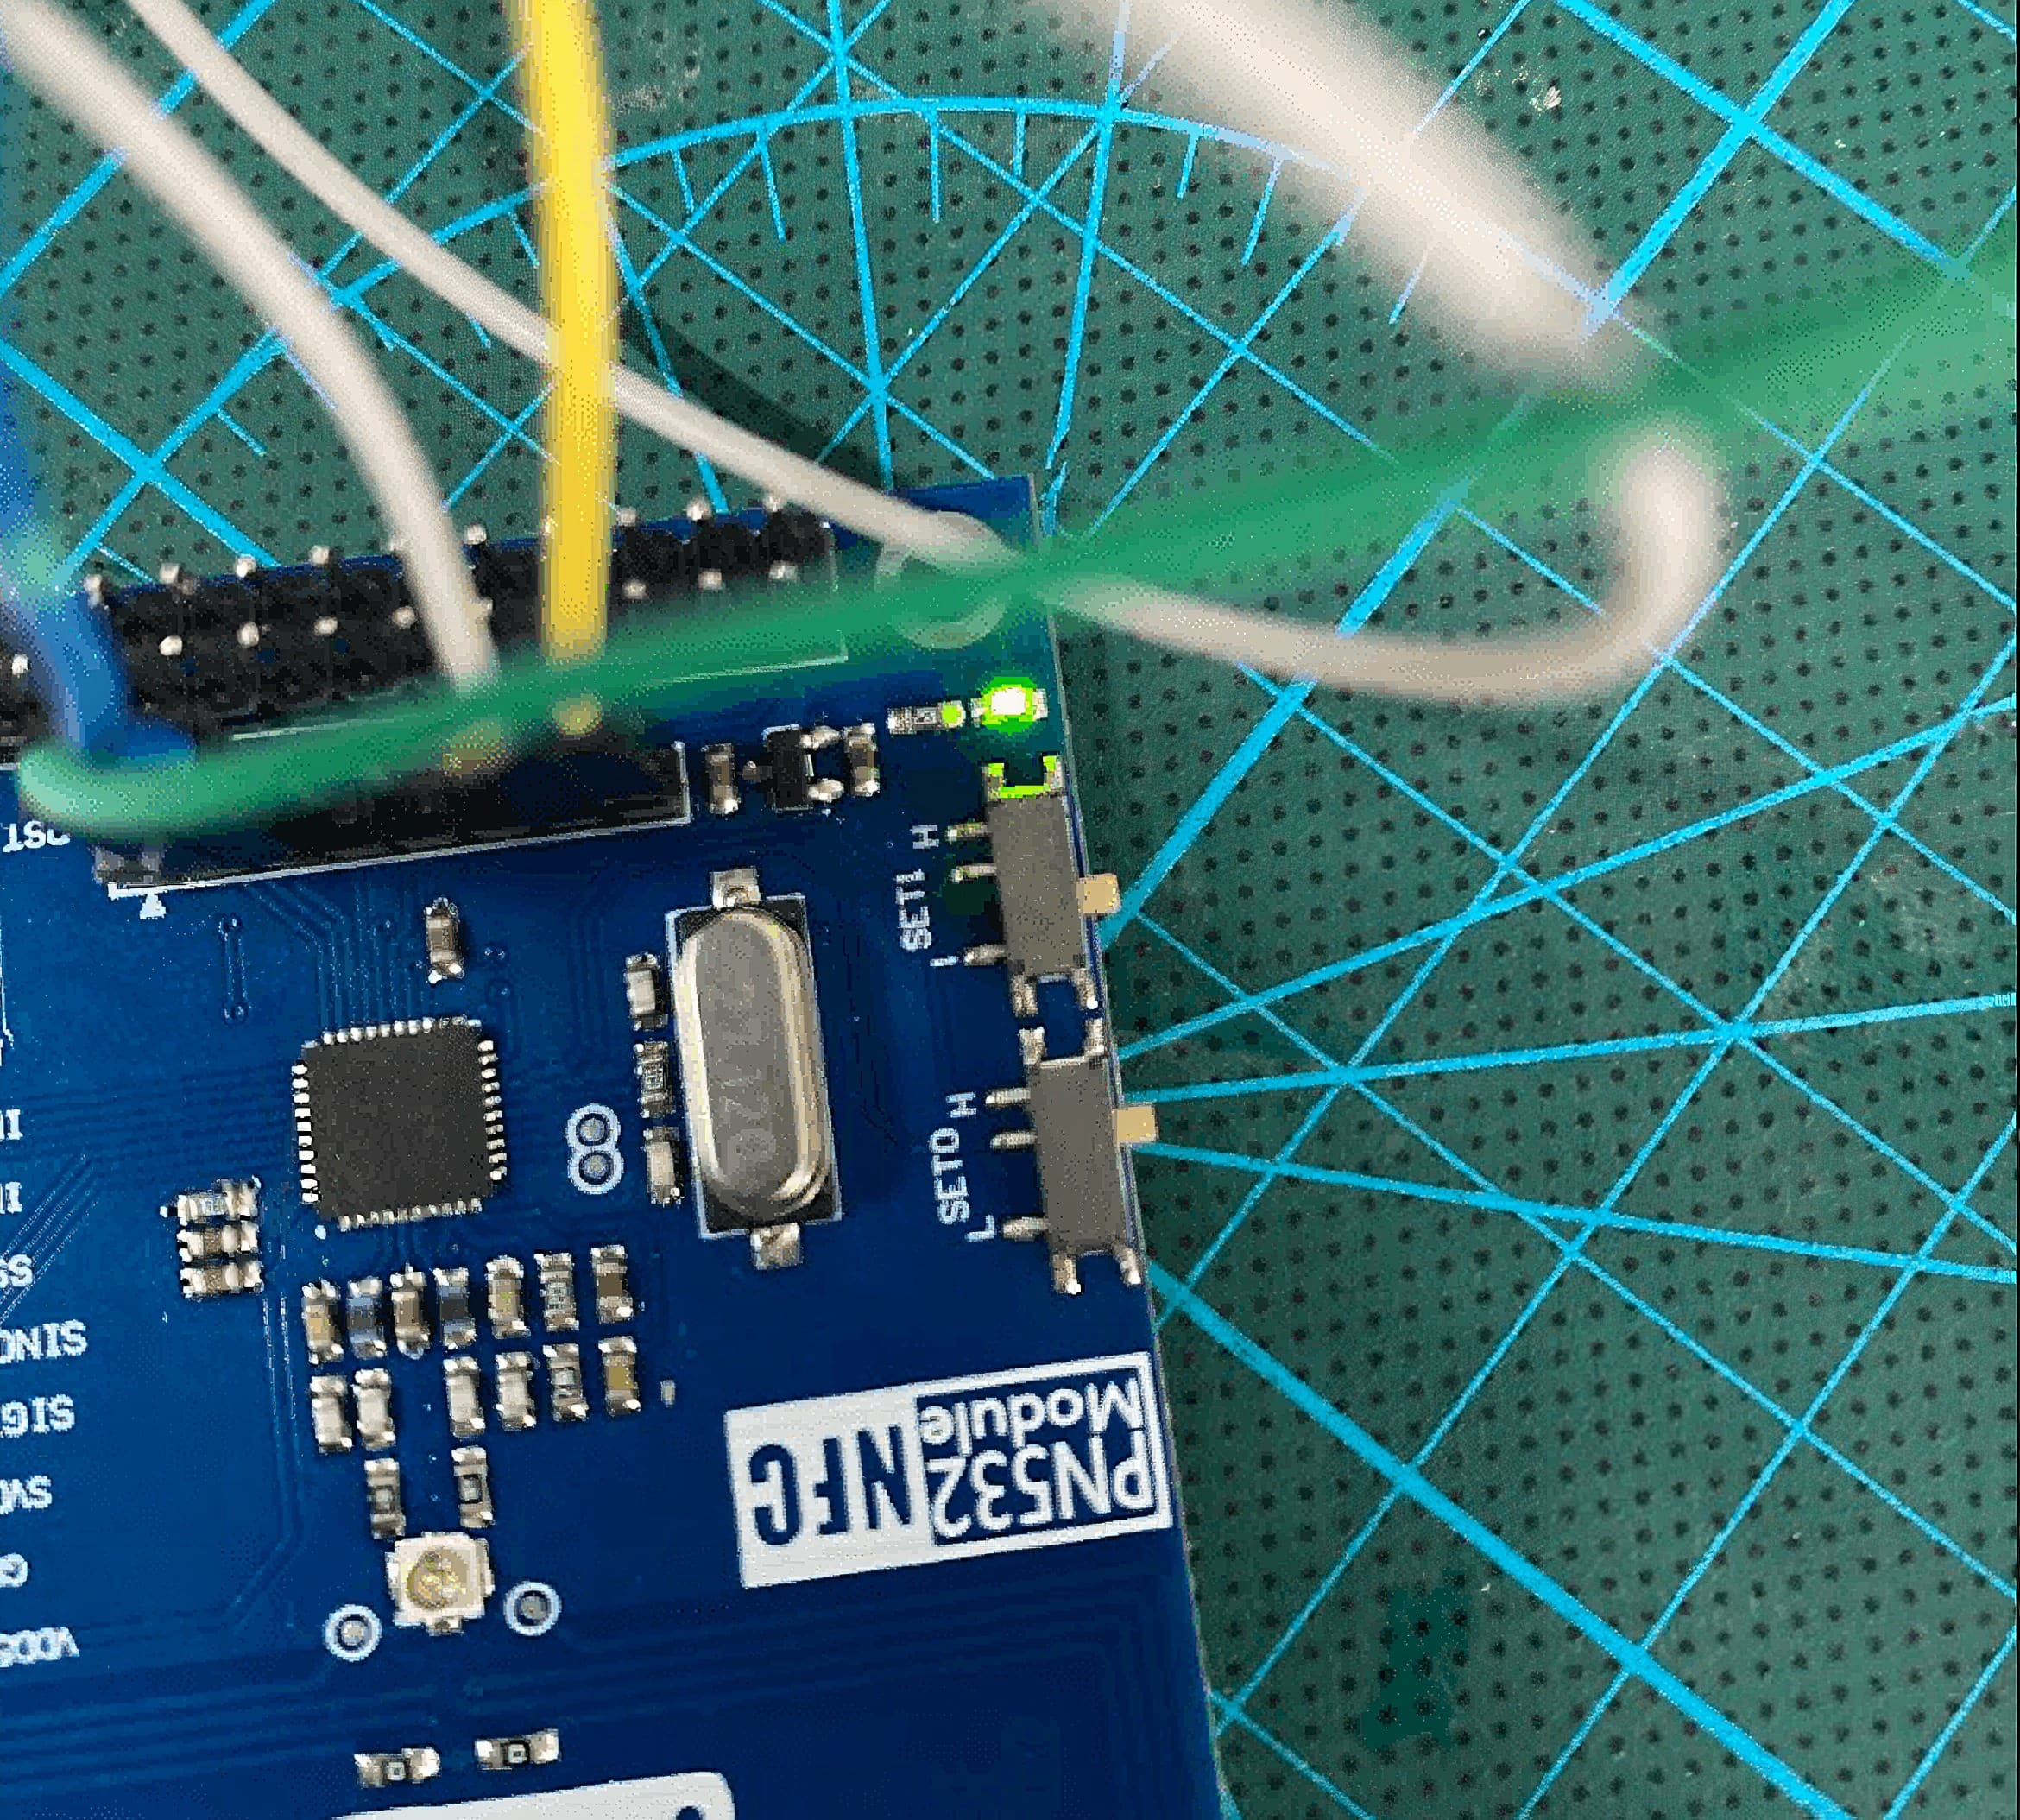
Before connecting the PN532 module, you need to make sure it’s properly configured for I2C mode.
From the image:
- SET0 = H (switch is ON)
- SET1 = L (switch is OFF)
PN532 must be in I2C mode:
- SDA → Mega pin 20
- SCL → Mega pin 21
- 5V → Mega 5V
- GND → Mega GND
LCD to Mega:
- SDA → Pin 20
- SCL → Pin 21
- VCC → 3.3v
- GND → GND
Notes:
- Both LCD and PN532 must share the same SDA/SCL lines – use a breadboard to split them.
- Don’t connect anything to IRQ or RESET physically – they’re only needed in the constructor.
- Install the Adafruit PN532 by Adafruit and LiquidCrystal I2C by Frank de Brabander.
Sample Code
#include <Wire.h>
#include <Adafruit_PN532.h>
#include <LiquidCrystal_I2C.h> // PN532 setup (dummy IRQ/RESET for I2C)
#define PN532_IRQ 2
#define PN532_RESET 3
Adafruit_PN532 nfc(PN532_IRQ, PN532_RESET, &Wire); // LCD setup: change 0x27 to 0x3F if needed
LiquidCrystal_I2C lcd(0x27, 20, 4); // address, columns, rows void setup() { Serial.begin(115200); // LCD init lcd.begin(20, 4); lcd.backlight(); lcd.setCursor(0, 0); lcd.print("PN532 + LCD Ready"); // PN532 init nfc.begin(); uint32_t versiondata = nfc.getFirmwareVersion(); if (!versiondata) { lcd.setCursor(0, 1); lcd.print("PN532 not found!"); Serial.println("PN532 not found"); while (1); } nfc.SAMConfig(); lcd.setCursor(0, 1); lcd.print("Scan a card...");
} void loop() { uint8_t uid[7]; // UID buffer uint8_t uidLength; if (nfc.readPassiveTargetID(PN532_MIFARE_ISO14443A, uid, &uidLength)) { lcd.clear(); lcd.setCursor(0, 0); lcd.print("Card UID:"); String uidString = ""; for (uint8_t i = 0; i < uidLength; i++) { if (uid[i] < 0x10) uidString += "0"; uidString += String(uid[i], HEX); } uidString.toUpperCase(); lcd.setCursor(0, 1); lcd.print(uidString); Serial.print("Card UID: "); Serial.println(uidString); delay(2000); lcd.setCursor(0, 2); lcd.print("Scan next card..."); }
}
How It Works
Setup phase. The NFC RFID PN532 includes Wire.h, Adafruit_PN532.h, and LiquidCrystal_I2C.h. We construct the PN532 object for I²C (Adafruit_PN532 nfc(PN532_IRQ, PN532_RESET, &Wire);) – IRQ/RESET are dummies in I²C mode but kept for compatibility. In setup(), we start Serial, initialize the LCD (lcd.begin(20, 4) and lcd.backlight()), then call nfc.begin(). nfc.getFirmwareVersion() confirms communication; if it fails, we print an error and halt. nfc.SAMConfig() switches the reader into normal mode so it can look for passive ISO14443A tags.
Scan loop. Sa loop(), may buffer tayong uid[7] at uidLength. Tumatawag tayo ngnfc.readPassiveTargetID(PN532_MIFARE_ISO14443A, uid, &uidLength). Kapag may card, ito’y nagre-return ng true at napupuno ang uid + uidLength. Iko-convert natin bawat byte: kung mas mababa sa 0x10, dinadagdagan ng leading 0 para laging two-digit hex; pagkatapos ginagawa nating uppercase. Ipi-print ang UID sa LCD (line 1) at sa Serial para madali ring i-debug.
User feedback & small details. May delay(2000) para mabasa mo ang UID sa LCD, then we print “Scan next card…”. Kung walang card, tahimik lang itong naghihintay sa susunod na tap. If your LCD shows nothing, double-check the I²C address (0x27 vs 0x3F) and wiring of SDA/SCL. Optional improvements include removing the blocking delay, adding a buzzer/LED blink on successful read, or debouncing repeated reads while the same card stays on the antenna.
Applications & Extensions
This Arduino RFID PN532 is a great base for attendance (log UIDs with timestamps), access control (compare UID against an allow-list), or kiosk modes that trigger actions – start a game, show a personalized message, or dispense a ticket – whenever a known tag is tapped. For classrooms, it’s an engaging demo of contactless tech that students can try instantly.
You can extend it by mapping UIDs to friendly names in code, EEPROM, or SD card; driving relays/servos for door locks; or pushing logs to the cloud via ESP8266/ESP32 (Google Sheets API, simple webhooks). Add a buzzer and RGB LED for clearer feedback, or a 13.56 MHz sticker on student IDs so the same tap works across projects.
Security note: a plain UID can be cloned on some tags. For serious access systems, move beyond UID-only checks – use MIFARE Classic/Ultralight authentication and store encrypted data on the tag, or pair each tap with server-side verification. For school, hobby, and prototyping use, UID-based flows are fast, simple, and plenty effective.
Watch the Full Demo Video
Here’s the NFC RFID PN532 in action
Frequently Asked Questions
What does this Arduino RFID PN532 tutorial cover?
Ever wish your project could recognize a tap—then greet a student by name or unlock a box? That’s exactly Arduino NFC RFID PN532 do.
What Arduino library does the Arduino RFID PN532 tutorial use?
The sketch uses standard Wire.h (I2C) or SPI.h plus a part-specific library installable via Arduino IDE → Sketch → Include Library → Manage Libraries. See the Sample Code section.
Why does the Arduino RFID PN532 act differently on USB power vs battery?
Battery voltage sags under load. Add a 100uF cap across the rails, use a 5V/2A regulator-backed pack, and never power motors from the Arduino's onboard regulator.