
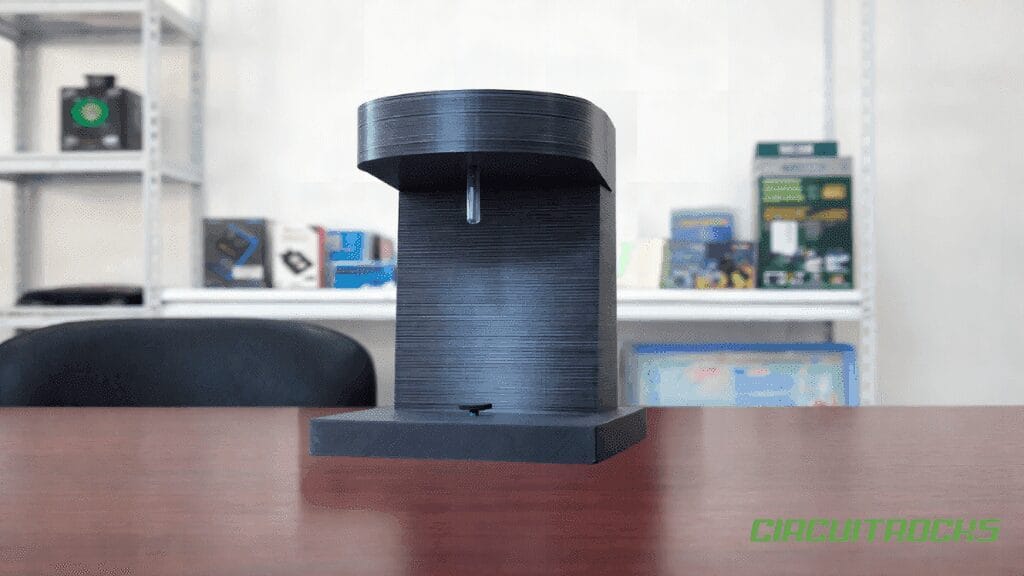
Ever get thirsty, then skip water because the dispenser feels too far? The 3D Mini Water Dispenser solves that by bringing a small “tap” right to your desk. Instead of standing up, walking, and waiting in line, you just place your cup under the spout and press a button. Water flows instantly, and it stops the moment you release. It’s a tiny habit upgrade that makes drinking water feel effortless.
This3D Mini Water Dispenser is made for real desk use, not just a quick bench demo. The spout sits at a comfortable height for a mug or glass, and the body stays stable when you press the button quickly. Because the whole shell is 3D-printed, you can shape it like a clean desktop appliance instead of a messy prototype. You can also hide the wiring inside and keep only the button and spout visible, which makes the unit look neat on a table.
The main goal here is to prototype the casing and layout first, then refine the experience. You’ll decide where the button feels natural, how the bottle or reservoir mounts, and how the tubing routes without kinks. You can print a few versions to adjust fit and balance until it feels “just right.” That iterative approach is what turns a simple pump idea into something you actually want to keep on your desk.
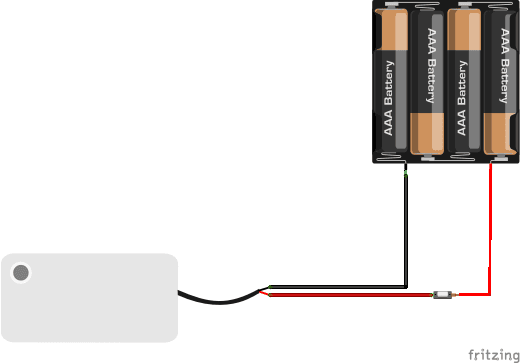
To keep iteration fast, the electronics stay simple on purpose. The core circuit uses only a 6V battery, a small DC pump, and a push-button switch in series. With fewer parts, you spend less time debugging and more time improving the enclosure and flow. Once this base version works reliably, you can add upgrades later – without changing the concept that makes it useful.
Why Build?
This 3D Mini Water Dispenser solves a small daily problem in a practical way. You can refill a cup in seconds without leaving your desk. That makes it easier to drink water more often. It also keeps your work rhythm intact.
It is also a great first step in functional 3D prototyping. You will design around real parts, not just shapes. You will learn how to fit a pump, route a tube, and place a button. Each print teaches you what to change next.
Finally, it is a safe way to learn basic load control. A pump is a real load that pulls real current. A simple button lets you test behavior without extra boards. You can confirm the pump, battery, and wiring work together cleanly.
What You’ll Learn
- Prototype workflow – turn a simple idea into a usable desk gadget fast.
- Basic pump wiring – series switch control, clean polarity, and solid connections.
- Power planning – why pumps need stable power and short, secure wires.
- Tube routing – keep bends gentle and flow smooth, without kinks. Prime and flow habits – quick checks to avoid dry runs and weak output.
- Case layout – stable base, clean spout alignment, and easy button access.
- Wet vs dry zones – keep battery and switch away from splashes.
- Service access – design so you can replace the pump or battery easily.
- Simple upgrades – add a check valve, fuse, LED, or timed dispense later.
What You'll Need
Fritzing Diagram
How It Works
Electrically, the circuit is straight series control. The push-button sits on the positive lead from the 6 V source to the DC pump; pressing it closes the loop so the motor spins and water flows. Releasing the button opens the circuit and the motor stops instantly, giving you natural “press-to-pour” control without extra boards.
Mechanically, a short length of food-grade silicone tubing connects the pump outlet to your printed spout. Keep bends gentle and the run short to reduce losses, and avoid kinks that collapse under suction. If you want the line to stay primed between presses, a tiny inline check valve near the outlet prevents back-drain into the reservoir.
Inside the 3D Water Dispenser case, separate wet and dry zones. The pump and tube live behind splash guards, while the battery holder and switch cavity stay dry with a lip or gasket. Provide strain relief where wires pass through, and leave service clearance so you can replace the pump or battery without cracking the print.
Applications & Extensions
Use it as a desk-side drink helper, a bench rinse tool for prints, or a mini plant-watering wand for succulents. Because it’s self-contained and quiet, it works well in classrooms, booths, and small workshops. The one-hand operation is also handy in tight spaces.
Add quality-of-life upgrades without changing the core layout. A small inline fuse protects the wiring, a power LED confirms readiness, and a flyback diode/MOSFET tames motor spikes if you later drive the pump from a board. Swapping the alkaline pack for a rechargeable Li-ion with a USB-C charger makes it travel-friendly.
For dosing or hands-free tasks, layer in timing or sensing. A 555-based pulse, a touch sensor, or a float switch can automate short bursts or prevent dry runs. You can also design quick-swap fronts for different bottle sizes or move to a peristaltic pump when you need a food-safe, sealed fluid path.
Watch the Full Demo Video
Here’s the 3D Mini Water Dispenser.
Frequently Asked Questions
What does this 3D Mini Water Dispenser tutorial cover?
Bring the faucet to your desk.
What filament works best for the 3D Mini Water Dispenser build?
PLA for cosmetic/indoor parts (cheap, easy to print). PETG for parts that flex or live near heat. ABS only if you have an enclosure — it warps in open air.
What slicer settings work for this build?
0.2mm layer height, 20% gyroid infill, 3 perimeters, supports only where the model needs them. PLA: 200°C nozzle, 60°C bed. 50-60 mm/s on most desktop FDMs.