
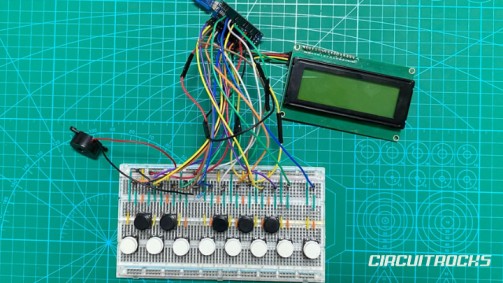
Want to build a small piano using Arduino buttons, a speaker, and an LCD display? 🎹🎼This Arduino Mini Piano project is a fun beginner-friendly build that turns simple push buttons into musical keys. Each button plays a different note, and the LCD shows the recent notes pressed while the user is playing. It is a simple project, but it already feels interactive because the sound and display respond immediately.
This version of the mini piano is called PIANOVA in the code. It uses 13 buttons to play notes from C up to C2, including sharps such as C#, D#, F#, G#, and A#. A speaker or passive buzzer is connected to the Arduino so the board can generate tones using the tone() function. The 20×4 I2C LCD adds a polished touch by showing the title screen, playing screen, recent notes, and inactivity messages.
This project is a good next step after basic button and buzzer projects. Instead of only turning a buzzer on and off, the Arduino produces specific frequencies for each note. The project also introduces simple user interface behavior, such as a start screen and automatic return to the title after no activity. This makes the build more complete and easier to present as a mini musical instrument.
Why Build?
This project is worth building because it combines music, buttons, display output, and Arduino logic in one simple setup. Beginners can clearly see how each input creates a different sound. When a button is pressed, the Arduino reads the input, plays the matching frequency, and updates the LCD. This makes the connection between hardware and code easy to understand.
It is also a fun way to learn how musical notes work in electronics. Each note is represented by a frequency value, such as 262 Hz for C and 440 Hz for A. By assigning each button to a frequency, the Arduino can act like a simple electronic keyboard. This helps learners understand that music can be generated through timed electrical signals.
The LCD makes the project more engaging than a normal buzzer piano. It does not only play sound; it also shows the project name, recent notes, and status messages. The recent notes display helps users see what they played, making the project feel more like a real mini instrument. It also gives the build a cleaner presentation for school projects, demos, or content.
Another reason to build this project is that it can be expanded easily. You can add more notes, create song modes, add LEDs for each key, or include a recording feature. You can also design a custom enclosure or 3D-printed piano body. Once the basic piano works, there are many ways to make it more creative and personal.
What You’ll Learn
- How to use push buttons as piano keys.
- How to wire 13 buttons using
INPUT_PULLUP. - How Arduino can use analog pins A0 and A1 as digital button inputs.
- How the
tone()function plays different note frequencies. - How a piezo buzzer can produce simple piano sounds.
- How to use a 2N2222 transistor as a buzzer driver.
- Why a 1K-ohm resistor is placed between the Arduino pin and transistor base.
- How to use a 20×4 I2C LCD with the
LiquidCrystal_I2Clibrary.How to show a title screen, playing screen, and status messages. - How to store and display the last 5 notes pressed.How to use
millis()to detect inactivity. - How to stop the buzzer using
noTone(). - How arrays can organize button pins, note frequencies, and note names.
What You'll Need
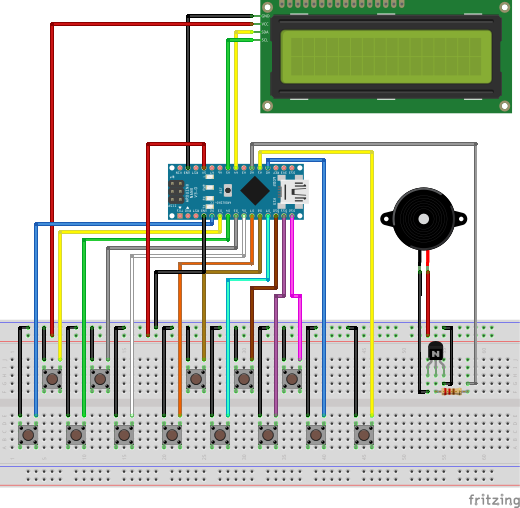
Fritzing Diagram
Wiring Connections
Arduino Nano Piano Connections
- C4 Button → D2 and GND
- C#4 Button → D3 and GND
- D4 Button → D4 and GND
- D#4 Button → D5 and GND
- E4 Button → D6 and GND
- F4 Button → D7 and GND
- F#4 Button → D8 and GND
- G4 Button → D9 and GND
- G#4 Button → D10 and GND
- A4 Button → D11 and GND
- A#4 Button → D12 and GND
- B4 Button → A0 and GND
- C5 Button → A1 and GND
20×4 I2C LCD
- VCC → 5V
- GND → GND
- SDA → A4
- SCL → A5
Buzzer + 2N2222
- A2 → 1kΩ resistor → Base
- Emitter → GND Collector → Buzzer negative
- Buzzer positive → 5V
Library Setup
Install the LiquidCrystal_I2C library before uploading the code. Open the Arduino IDE, then go to Sketch → Include Library → Manage Libraries. Search for LiquidCrystal_I2C and install a compatible version. This library lets the Arduino control the 20×4 I2C LCD.
The code also includes the Wire library. Wire handles I2C communication between the Arduino and the LCD. You do not need to install Wire separately because the Arduino IDE already includes it. The LCD will not display correctly if the I2C wiring or address does not match the code.
The project code uses this LCD setup: LiquidCrystal_I2C lcd(0x27, 20, 4);. This means the display has 20 columns, 4 rows, and address 0x27. Some LCD modules use 0x3F instead. Run an I2C scanner if the screen lights up but does not show text.
After installing the library, select the correct board and port. Upload the sketch and wait for the PIANOVA title screen. Once the title appears, test each button one by one. If a key fails, check the button wiring before changing the code.
Sample Code
#include <Wire.h>
#include <LiquidCrystal_I2C.h>

LiquidCrystal_I2C lcd(0x27, 20, 4);

const int speakerPin = A2;

// Piano Buttons
const int buttons[13] = {
  2,   // C4
  3,   // C#4
  4,   // D4
  5,   // D#4
  6,   // E4
  7,   // F4
  8,   // F#4
  9,   // G4
  10,  // G#4
  11,  // A4
  12,  // A#4
  A0,  // B4
  A1   // C5
};

// Piano Frequencies
const int notes[13] = {
  262,  // C4
  277,  // C#4
  294,  // D4
  311,  // D#4
  330,  // E4
  349,  // F4
  370,  // F#4
  392,  // G4
  415,  // G#4
  440,  // A4
  466,  // A#4
  494,  // B4
  523   // C5
};

// Piano Note Names
const char* noteNames[13] = {
  "C", "C#", "D", "D#", "E", "F", "F#",
  "G", "G#", "A", "A#", "B", "C5"
};

// Stores last 5 notes pressed
String recentNotes[5] = {"", "", "", "", ""};

unsigned long lastPressedTime = 0;
bool showingPlaying = false;

// Keeps track of held key
int currentNote = -1;

// Show Title Screen
void showTitle() {

  lcd.clear();

  lcd.setCursor(2, 0);
  lcd.print("* P I A N O V A *");

  lcd.setCursor(3, 2);
  lcd.print("Press any key");

  lcd.setCursor(2, 3);
  lcd.print("to start playing.");
}

// Clear Recent Notes
void clearRecentNotes() {

  for (int i = 0; i < 5; i++) {
    recentNotes[i] = "";
  }
}

// Add Note to Recent Notes
void addRecentNote(const char* note) {

  // Shift old notes to the left
  for (int i = 0; i < 4; i++) {
    recentNotes[i] = recentNotes[i + 1];
  }

  // Add newest note
  recentNotes[4] = note;
}

// Display Recent Notes
void displayRecentNotes() {

  // Clear third row
  lcd.setCursor(0, 2);
  lcd.print("                    ");

  String noteLine = "";

  // Display last 5 notes
  for (int i = 0; i < 5; i++) {

    if (recentNotes[i] != "") {

      if (noteLine.length() > 0) {
        noteLine += " ";
      }

      noteLine += recentNotes[i];
    }
  }

  // Calculate center position
  int startColumn = (20 - noteLine.length()) / 2;

  if (startColumn < 0) {
    startColumn = 0;
  }

  lcd.setCursor(startColumn, 2);
  lcd.print(noteLine);
}

// Show Playing Screen
void showPlayingScreen() {

  lcd.clear();

  lcd.setCursor(5, 0);
  lcd.print("Playing...");

  displayRecentNotes();
}

void setup() {

  lcd.init();
  lcd.backlight();

  pinMode(speakerPin, OUTPUT);

  // Configure piano buttons
  for (int i = 0; i < 13; i++) {
    pinMode(buttons[i], INPUT_PULLUP);
  }

  showTitle();
}

void loop() {

  bool playing = false;

  // Check all 13 piano keys
  for (int i = 0; i < 13; i++) {

    // Button pressed
    if (digitalRead(buttons[i]) == LOW) {

      playing = true;
      lastPressedTime = millis();

      // First key press
      if (!showingPlaying) {

        clearRecentNotes();
        showPlayingScreen();

        showingPlaying = true;
      }

      // Play only once per new key press
      if (currentNote != i) {

        tone(speakerPin, notes[i]);

        addRecentNote(noteNames[i]);
        displayRecentNotes();

        currentNote = i;
      }

      // Only play one key at a time
      break;
    }
  }

  // No key pressed
  if (!playing) {

    noTone(speakerPin);

    // Allow same key to trigger again
    currentNote = -1;

    // 10 seconds inactivity
    if (
      showingPlaying &&
      millis() - lastPressedTime >= 10000
    ) {

      lcd.clear();

      lcd.setCursor(2, 0);
      lcd.print("* P I A N O V A *");

      lcd.setCursor(3, 2);
      lcd.print("Piano stopped.");

      delay(2000);

      lcd.clear();

      lcd.setCursor(2, 0);
      lcd.print("* P I A N O V A *");

      lcd.setCursor(4, 2);
      lcd.print("Restarting..");

      delay(2000);

      showTitle();

      clearRecentNotes();

      showingPlaying = false;
    }
  }
}
How It Works
The Arduino starts by setting up the LCD, speaker pin, and button pins. It turns on the LCD backlight and shows the PIANOVA title screen. All 13 buttons use INPUT_PULLUP, so each key reads HIGH when idle. A pressed key connects the pin to GND and reads LOW.
Three arrays keep the piano organized. The buttons[] array stores the pin numbers. The notes[] array stores the frequencies. The noteNames[] array stores the labels for the LCD. Because the arrays use the same order, each button matches one note and one display name.
During each loop, the Arduino checks the buttons from C to C2. When it finds a pressed key, it plays the matching frequency with tone(). Pin A2 sends the tone signal to the 2N2222 base through the 1K-ohm resistor. The transistor switches the buzzer path to ground, so the buzzer plays the note.
The code plays one note at a time. After it detects the first pressed key, it stops checking the remaining keys for that loop. This keeps the piano simple and prevents mixed sounds. For a beginner project, single-note playback makes the behavior easier to follow.
The LCD shows the last 5 notes pressed. When a new note plays, the code shifts the older notes to the left. Then it places the newest note at the end of the list. The display centers the note line on the third row for a cleaner look.
When no button gets pressed, the Arduino stops the sound with noTone(). It also resets currentNote, so the same key can trigger again after release. If the piano stays inactive for 10 seconds, the screen shows “Piano stopped.” After that, it shows “Restarting..” and returns to the title screen.
Applications and Extensions
This Arduino Mini Piano works well as a beginner music project. It teaches button input, sound output, LCD control, and transistor switching in one build. The result also gives users something fun to play. That makes it useful for school projects, workshops, and maker demos.
You can add a song mode for a stronger project output. The Arduino can play stored melodies such as “Twinkle Twinkle Little Star” or “Happy Birthday.” The LCD can show the song title while the buzzer plays. This upgrade turns the mini piano into a small music player.
LED key indicators can make the build more visual. Each key can have a matching LED that lights when the user presses it. This helps viewers see which note plays. It also makes the project easier to present during demos.
The sound section can also improve with extra hardware. A small amplifier module can make the output louder and clearer. A potentiometer can add volume control. These upgrades make the piano more comfortable to use in a room or classroom.
A recording feature can make the project more interactive. The Arduino can save a short note sequence and replay it later. This upgrade helps learners practice arrays, timing, and playback logic. It also gives users a way to create their own short melodies.
For a finished version, place the buttons, LCD, buzzer, transistor circuit, and Arduino inside a custom enclosure. A 3D-printed case can make the piano easier to play and safer to handle. The LCD can sit at the top, while the buttons can line up like piano keys. With a clean case, PIANOVA becomes a complete mini electronic keyboard.
Watch the Full Demo Video
Here’s the Arduino Mini Piano.
