
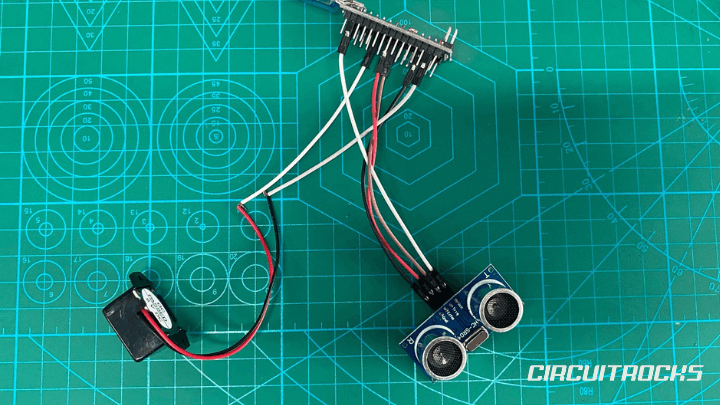
Need a simple way to make your Arduino “sense” if something is in front of it? 🔊⚡️The HC-SR04 Ultrasonic Sensor is a beginner-friendly module that measures distance without touching the object. It is commonly used in robot cars, obstacle alerts, parking sensor demos, and automation projects where distance matters.
In this project, the HC-SR04 is paired with a buzzer to create a basic proximity alert. When an object comes within the set detection range, the buzzer turns on. When the object moves away, the buzzer turns off. This makes the project easy to test because the output is not only visible in the Serial Monitor, but also noticeable through sound.
This guide is a good starting point for beginners who want to move beyond simple LED and button projects. It introduces sensing, timing, distance calculation, and automatic response in one compact setup. By the end, you will understand how the Arduino can measure distance and use that reading to trigger an output.
Why Build?
This project is useful because it shows how an Arduino can react to the surrounding environment. Instead of waiting for a button press, the system checks if an object is nearby and responds automatically. That makes the build feel more practical because it behaves like a simple warning device.
It is also a good introduction to distance-based decision making. The code does not only read a sensor value; it compares the measured distance to a set limit. In this example, the limit is 20 cm, so the buzzer only activates when the object is close enough. This kind of threshold logic is used in many real projects, from safety alarms to robot navigation.
Another reason to build it is that the parts are simple and easy to expand. The HC-SR04 gives the distance data, the Arduino handles the logic, and the buzzer provides the alert. Once this basic version works, you can replace the buzzer with an LED, relay, display, motor stop command, or another output depending on your project idea.
What You’ll Learn
- How to use the HC-SR04 Ultrasonic Sensor with an Arduino-compatible board.
- How the TRIG and ECHO pins work together during distance measurement.
- How to use
pulseIn()to measure the return time of the ultrasonic signal. - How to convert travel time into distance using the speed of sound.How to set a detection threshold such as 20 cm.
- How to activate a buzzer only when an object is within range.
- How to use Serial Monitor to check live distance readings.
- How to handle a “no object detected” reading safely in code.How this setup can become the base for obstacle detection and alert systems.
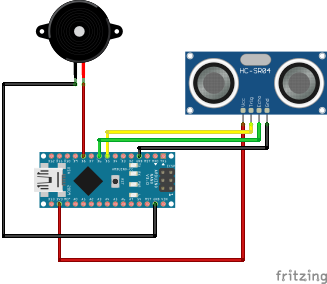
Fritzing Diagram
What You’ll Need
Wiring Connections
Arduino + HC-SR04
- 5V → HC-SR04 VCC
- GND → HC-SR04 GND
- D5 → HC-SR04 TRIG
- D6 → HC-SR04 ECHO
Arduino + Buzzer
- D8 → Buzzer positive (+)
- GND → Buzzer negative (-)
Sample Code
#define TRIG_PIN 5
#define ECHO_PIN 6
#define BUZZER_PIN 8

long duration;
float distance;

void setup() {
  pinMode(TRIG_PIN, OUTPUT);
  pinMode(ECHO_PIN, INPUT);
  pinMode(BUZZER_PIN, OUTPUT);

  Serial.begin(9600);
}

void loop() {
  digitalWrite(TRIG_PIN, LOW);
  delayMicroseconds(2);

  digitalWrite(TRIG_PIN, HIGH);
  delayMicroseconds(10);

  digitalWrite(TRIG_PIN, LOW);

  duration = pulseIn(ECHO_PIN, HIGH, 30000);

  if (duration == 0) {
    digitalWrite(BUZZER_PIN, LOW);
    Serial.println("No echo detected");
    delay(200);
    return;
  }

  distance = duration * 0.0343 / 2;

  Serial.print("Distance: ");
  Serial.print(distance);
  Serial.println(" cm");

  if (distance <= 20) {
    digitalWrite(BUZZER_PIN, HIGH);
  } else {
    digitalWrite(BUZZER_PIN, LOW);
  }

  delay(200);
}
How It Works
The HC-SR04 has two main signal pins: TRIG and ECHO. The Arduino sends a short pulse to the TRIG pin to start a measurement. After that, the sensor sends out an ultrasonic sound wave. If the sound wave hits an object, it bounces back to the sensor.
The ECHO pin tells the Arduino how long the sound took to travel out and return. The Arduino measures that time using pulseIn(). Since the sound travels to the object and back, the measured time is divided by two. The code then uses the speed of sound to estimate the distance in centimeters.
In this setup, the trigger pin is connected to D5, the echo pin is connected to D6, and the buzzer is connected to D8. The code constantly checks the measured distance and compares it with the detection limit. If the object is within 20 cm, the buzzer turns on. If the object is farther than 20 cm, the buzzer stays off.
The code also includes a timeout when reading the echo signal. This prevents the Arduino from waiting too long if no object is detected. When no valid echo returns, the buzzer is turned off and the Serial Monitor prints a message. This makes the project safer and easier to debug during testing.
Applications & Extensions
This project can be used as a simple obstacle warning system. For example, a robot car can use the HC-SR04 to check if something is in front of it before moving forward. If an object is too close, the robot can stop or turn in another direction. This makes the sensor useful for beginner robotics projects.
It can also be turned into a basic parking sensor demo. The buzzer can warn the user when an object or wall is getting too close. A good upgrade is to make the buzzer beep faster as the distance gets shorter. This gives the project a more realistic warning effect instead of only using ON and OFF.
Another possible application is a simple security or object detection alert. You can place the sensor near a doorway, box, shelf, or restricted area. When something enters the detection range, the buzzer can activate. For a cleaner version, you can add LEDs to show safe, warning, and danger distances.
You can also extend the project by adding a display. An LCD or OLED can show the live distance reading so the project does not depend on the Serial Monitor. This is useful for standalone builds where the Arduino is not connected to a computer. You can also log values, control a relay, or combine the sensor with motors for a more complete automation project.
For more advanced builds, try using multiple HC-SR04 sensors. One sensor can check the front, while others can check the sides. This is helpful for robot cars, small obstacle maps, or safety systems. Once you understand one sensor, expanding to more sensors becomes much easier.
Watch the Full Demo Video
Here’s the HC-SR04 Ultrasonic Sensor