
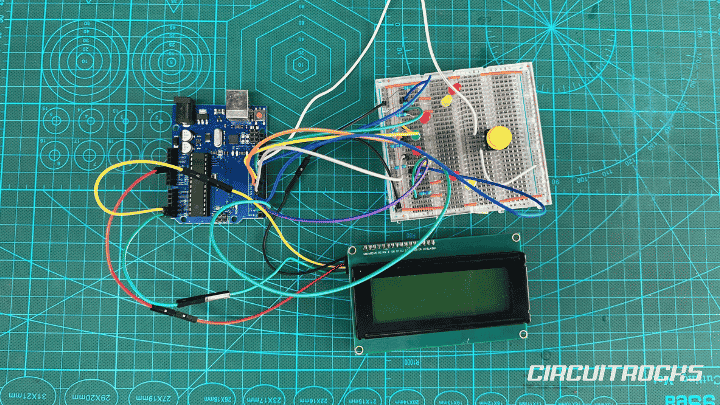
Want to build a simple prize wheel using Arduino, LEDs, a button, and an LCD? ⚙️⚡️ This Wheel of Fortune project creates a mini electronic spinning wheel that randomly selects a winning LED. When the user presses the button, the LEDs run in a spinning animation, slow down, and stop on one final result. The LCD then shows whether the player won a prize or landed on a “No Prize” slot.
This project is a fun way to make an interactive game using basic Arduino parts. The 8 LEDs act as the wheel segments, while the push button starts the spin. The 20×4 I2C LCD shows the start screen, spinning message, and final prize result. Because the output uses both lights and text, the project feels more exciting than a simple random number generator.
The code also gives the wheel a more realistic effect by slowing down the LED animation before it stops. Instead of instantly choosing a result, the LEDs move step by step and gradually delay longer between each step. This makes the game feel like a real spinning wheel. It is a good project for booths, classroom demos, mini games, and beginner Arduino practice.
Why Build
This project is worth building because it turns basic Arduino output into a fun and playable game. Each LED represents one possible wheel result, and the LCD gives clear feedback to the player. When the button starts the spin, users can watch the animation and wait for the final result. This makes the project easy to understand and enjoyable to demonstrate.
It also teaches useful beginner concepts without making the circuit too complicated. The project uses digital output for the LEDs, digital input for the button, and I2C communication for the LCD. These are common skills in many Arduino builds. Once learners understand this project, they can apply the same ideas to other games, counters, menus, and interactive displays.
The random winner feature makes the project more interesting. The Arduino selects a result from 0 to 7, then the LED animation lands on that selected position. The code also randomizes the number of rotations before stopping. This makes each button press feel different and less predictable.
The LCD adds a better user experience. It does not only show numbers or raw values. It displays a start screen, a spinning message, and a prize message after the wheel stops. This gives the project a more complete arcade-style feel and makes it easier to present to other people.
What You’ll Learn
By building this Wheel of Fortune project, you’ll learn:
- How to use 8 LEDs as a simple electronic prize wheel.
- How to start an action using a push button.
- How to control multiple LEDs using an array.
- How to use a 20×4 I2C LCD with Arduino.
- How to display a start screen, spinning screen, and prize result.
- How to use
random()to choose a winner. - How
randomSeed()helps make results less predictable. - How to slow down an animation using increasing delay time.
- How to prevent repeated button triggers while the wheel is spinning.
What You'll Need
Fritzing Diagram
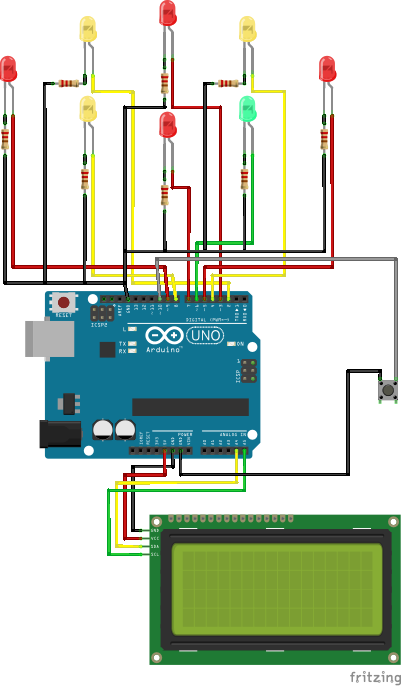
Wiring Connections
Arduino + LCD
- Arduino UNO 5V → LCD I2C
VCC - Arduino UNO GND → LCD I2C
GND - Arduino UNO A4 → LCD I2C
SDA - Arduino UNO A5 → LCD I2C
SCL
8 LEDs
- D2 → Resistor → LED 1 positive
- D3 → Resistor → LED 2 positive
- D4 → Resistor → LED 3 positive
- D5 → Resistor → LED 4 positive
- D6 → Resistor → LED 5 positive
- D7 → Resistor → LED 6 positive
- D8 → Resistor → LED 7 positive
- D9 → Resistor → LED 8 positive
- All LED negative legs → GND
Push Button
- One button pin → D10
- Other button pin → GND
Library Setup
Before uploading the code, install the LiquidCrystal_I2C library in the Arduino IDE. Open Sketch → Include Library → Manage Libraries, then search for LiquidCrystal_I2C. Install a compatible version so the Arduino can control the I2C LCD. The code also includes the Wire library, which is already built into the Arduino IDE.
The LCD line in the code is LiquidCrystal_I2C lcd(0x27, 20, 4);. This means the project expects a 20×4 LCD using address 0x27. Some I2C LCD modules use 0x3F, so change the address if the display does not show text. You can run an I2C scanner sketch to confirm the correct address.
After installing the library, select the correct Arduino board and port. Upload the sketch and wait for the start screen to appear. If the LCD shows “SPIN THE WHEEL,” the display section is working. After that, you can test the button and LED animation.
Sample Code
#include <Wire.h>
#include <LiquidCrystal_I2C.h>

LiquidCrystal_I2C lcd(0x27, 20, 4);

//PINS
const int ledPins[8] = {
  2, 3, 4, 5, 6, 7, 8, 9
};

const int buttonPin = 10;

bool spinning = false;

//PRIZES
void setup() {

  for (int i = 0; i < 8; i++) {
    pinMode(ledPins[i], OUTPUT);
    digitalWrite(ledPins[i], LOW);
  }

  pinMode(buttonPin, INPUT_PULLUP);

  lcd.init();
  lcd.backlight();

  showStartScreen();

  randomSeed(analogRead(A0));
}


void loop() {

  if (!spinning && digitalRead(buttonPin) == LOW) {

    delay(50); // Button debounce

    if (digitalRead(buttonPin) == LOW) {

      spinning = true;

      spinWheel();

      // Wait until button is released
      while (digitalRead(buttonPin) == LOW) {
        delay(10);
      }

      delay(50);

      spinning = false;
    }
  }
}

// START SCREEN
void showStartScreen() {

  lcd.clear();

  lcd.setCursor(0, 0);
  lcd.print("<>================<>");

  lcd.setCursor(3, 1);
  lcd.print("SPIN THE WHEEL");

  lcd.setCursor(5, 2);
  lcd.print("Win Prizes");

  lcd.setCursor(0, 3);
  lcd.print("<>================<>");
}

// SPIN THE WHEEL
void spinWheel() {

  lcd.clear();

  lcd.setCursor(0, 0);
  lcd.print("<>================<>");

  lcd.setCursor(6, 1);
  lcd.print("Spinning");

  lcd.setCursor(8, 2);
  lcd.print("....");

  lcd.setCursor(0, 3);
  lcd.print("<>================<>");

  // Random winner
  int winner = random(0, 8);

  // Random number of rotations
  int rotations = random(3, 6);

  int totalSteps = (rotations * 8) + winner;

  int delayTime = 40;

  int currentLED = 0;


  //PIN ANIMATION
  for (int step = 0; step <= totalSteps; step++) {

    // Turn OFF all LEDs
    for (int i = 0; i < 8; i++) {
      digitalWrite(ledPins[i], LOW);
    }

    // Turn ON current LED
    digitalWrite(ledPins[currentLED], HIGH);

    delay(delayTime);

    // Slow Down
    if (delayTime < 220) {
      delayTime += 4;
    }

    currentLED++;

    if (currentLED >= 8) {
      currentLED = 0;
    }
  }


  // Turn everything OFF first
  for (int i = 0; i < 8; i++) {
    digitalWrite(ledPins[i], LOW);
  }


  // SHOW PRIZE
  showPrize(winner);

  delay(500);


  // BLINK LED OF WINNER
  for (int blinkCount = 0; blinkCount < 4; blinkCount++) {

    digitalWrite(ledPins[winner], HIGH);
    delay(400);

    digitalWrite(ledPins[winner], LOW);
    delay(400);
  }


  // Keep winner ON briefly
  digitalWrite(ledPins[winner], HIGH);

  delay(5000);

  digitalWrite(ledPins[winner], LOW);

  // -------------------- RETURN TO START --------------------
  showStartScreen();
}

// DISPLAY WINNING PRIZE
void showPrize(int winner) {

  lcd.clear();

  switch (winner) {

    // LED 1
    case 0:
      lcd.setCursor(0, 0);
      lcd.print("<>================<>");

      lcd.setCursor(6, 1);
      lcd.print("YOU WON:");
      lcd.setCursor(3, 2);
      lcd.print("Realme Note 50");

      lcd.setCursor(0, 3);
      lcd.print("<>================<>");
      break;


    // LED 2
    case 1:
      lcd.setCursor(0, 0);
      lcd.print("<>================<>");

      lcd.setCursor(7, 1);
      lcd.print("SORRY!");
      lcd.setCursor(5, 2);
      lcd.print("No Prize:(");

      lcd.setCursor(0, 3);
      lcd.print("<>================<>");
      break;


    // LED 3
    case 2:
      lcd.setCursor(0, 0);
      lcd.print("<>================<>");

      lcd.setCursor(6, 1);
      lcd.print("YOU WON:");
      lcd.setCursor(1, 2);
      lcd.print("Keyboard and Mouse");

      lcd.setCursor(0, 3);
      lcd.print("<>================<>");
      break;


    // LED 4
    case 3:
      lcd.setCursor(0, 0);
      lcd.print("<>================<>");

      lcd.setCursor(7, 1);
      lcd.print("SORRY!");
      lcd.setCursor(5, 2);
      lcd.print("No Prize:(");

      lcd.setCursor(0, 3);
      lcd.print("<>================<>");
      break;


    // LED 5
    case 4:
      lcd.setCursor(0, 0);
      lcd.print("<>================<>");

      lcd.setCursor(6, 1);
      lcd.print("JACKPOT! YOU WON");
      lcd.setCursor(4, 2);
      lcd.print("₱100,000,000");

      lcd.setCursor(0, 3);
      lcd.print("<>================<>");
      break;


    // LED 6
    case 5:
      lcd.setCursor(0, 0);
      lcd.print("<>================<>");

      lcd.setCursor(7, 1);
      lcd.print("SORRY!");
      lcd.setCursor(5, 2);
      lcd.print("No Prize:(");

      lcd.setCursor(0, 3);
      lcd.print("<>================<>");
      break;


    // LED 7
    case 6:
      lcd.setCursor(0, 0);
      lcd.print("<>================<>");

      lcd.setCursor(6, 1);
      lcd.print("YOU WON:");
      lcd.setCursor(2, 2);
      lcd.print("Arduino Nano Kit");

      lcd.setCursor(0, 3);
      lcd.print("<>================<>");
      break;


    // LED 8
    case 7:
      lcd.setCursor(0, 0);
      lcd.print("<>================<>");

      lcd.setCursor(7, 1);
      lcd.print("SORRY!");
      lcd.setCursor(5, 2);
      lcd.print("No Prize:(");

      lcd.setCursor(0, 3);
      lcd.print("<>================<>");
      break;
  }
}
How It Works
The project starts by setting all 8 LED pins as outputs. The Arduino also sets the button pin as INPUT_PULLUP, which means the button connects to GND when pressed. After that, the LCD turns on and shows the start screen. The game then waits for the player to press the button.
When the button gets pressed, the code checks it again after a short delay. This acts as a simple debounce method, so one button press does not trigger the game many times. Once the press is accepted, the spinning variable becomes true. This stops the project from starting another spin while the current spin is still running.
The spinWheel() function handles the full game round. It first clears the LCD and shows the spinning message. Then the Arduino chooses a random winner from 0 to 7. It also chooses a random number of rotations, so the animation does not feel exactly the same every time.
The LED animation works by turning off all LEDs, then turning on only the current LED. After a short delay, the code moves to the next LED. This creates a chase effect that looks like a spinning wheel. When the delay time increases, the animation slows down before landing on the winner.
After the wheel stops, the LCD shows the prize connected to the winning LED. Some LED slots show prizes, while others show “No Prize.” The winning LED blinks four times to highlight the result. Then it stays on briefly before the project returns to the start screen.
The showPrize() function uses switch case to choose the correct message for each result. Each case represents one LED slot. This makes it easy to change the prize list later. You only need to edit the text inside the case for the prize slot you want to update.
Applications and Extensions
This Wheel of Fortune project works well as a mini arcade game for beginners. It can be used for school projects, classroom activities, booth games, or simple electronics demos. The project gives users a clear action and result: press the button, watch the LEDs spin, then read the prize on the LCD. That makes it fun to use and easy to explain.
You can improve the project by arranging the LEDs in a real wheel shape. Place the 8 LEDs around a printed circle or acrylic panel. Label each LED with its matching prize or result. This makes the game look more like an actual prize wheel.
A buzzer can also make the game more exciting. You can add a ticking sound while the LEDs spin and a different sound when the winner appears. This gives the project a more arcade-like feel. It also helps users follow the spinning action even without watching the LEDs closely.
You can add more prize options by using more LEDs or a different display system. For example, a 16-LED version can create more wheel slots. You can also use an LED ring to make the spinning effect smoother. The same random winner logic can still work with more outputs.
Another upgrade is adding a score or play counter. The LCD can show how many times the wheel has been played. You can also count how many wins and no-prize results happened. This makes the game more useful for events where you want to track player activity.
For a finished version, mount the Arduino, LCD, button, and LEDs inside a box or stand. Put the button in front and the LCD where players can easily read it. Arrange the LEDs in a circle to make the wheel effect clear. With a clean enclosure, this project can become a reusable prize game for events and displays.
Watch the Full Demo Video
Here’s the Wheel of Fortune.
