
One touch can replace keys. This project uses an optical fingerprint sensor to enroll users and then grant access with a quick scan. When a finger is recognized, the LCD shows a friendly “Welcome” message and you can trigger an unlock action later. When it fails, the LCD clearly shows “Access denied,” so the user understands the result right away. That instant feedback makes the build feel like a real access system, not just a sensor test.
You will build this in two stages so everything stays organized. Enroll mode is where you save a fingerprint into the sensor’s memory using an ID number you type in the Serial Monitor. Access mode is where the Arduino scans a finger, searches the stored database, and displays the matched ID or a deny message on the LCD. Keeping these stages separate makes troubleshooting much easier because you always know which part of the system you are testing.
This tutorial uses SoftwareSerial on pins 2 and 3, plus the Adafruit Fingerprint library to talk to the sensor at 57600 baud. It also uses a 16×2 I2C LCD (commonly 0x27) to show prompts like “Place finger” and status results. By the end, you will have a working demo that can recognize enrolled users and respond consistently. From there, adding a relay, solenoid, or servo is a straightforward next step.
Why Build?
First, it creates a security demo that feels practical and impressive. Fingerprint access is fast for users and removes the need for keys or PIN codes during testing. It is also a strong project for school presentations because people can try it instantly and see the result on the screen. Even a simple “Welcome” message makes the system feel complete.
Second, you learn a clean workflow that mirrors real biometric systems. Enrollment and verification are different jobs, and mixing them in one sketch often causes confusion. With a dedicated enroll sketch, you focus on storing templates properly and confirming that the sensor memory works. With a dedicated access sketch, you focus on scan quality, search results, and consistent user feedback.
Third, this build teaches you how to debug both hardware and user experience at the same time. Serial output tells you what the sensor is doing step-by-step, which is useful when scans fail or IDs do not match. The LCD guides the user so they place their finger correctly and do not get lost during retries. That combination makes your project easier to demo, easier to test, and easier to improve later.
What You’ll Learn
- Two-mode workflow – Separate “Enroll” and “Access” sketches so each job is simple to test.
- Sensor communication – Using SoftwareSerial (pins 2/3) and the sensor baud rate (57600).
- Enrollment steps – Capture first image, convert, remove finger, capture second image, convert, match, then store.
- ID storage – Using IDs 1 – 127 as user slots inside the sensor’s memory.
- Fast search – Quickly comparing a scanned finger to stored templates and returning a match result.
- User feedback – Clear LCD prompts for ready, success, deny, and retry states.
- Error handling – Understanding common fail cases: no finger, image fail, comm error, mismatch, not found.
What You'll Need
Fritzing Diagram
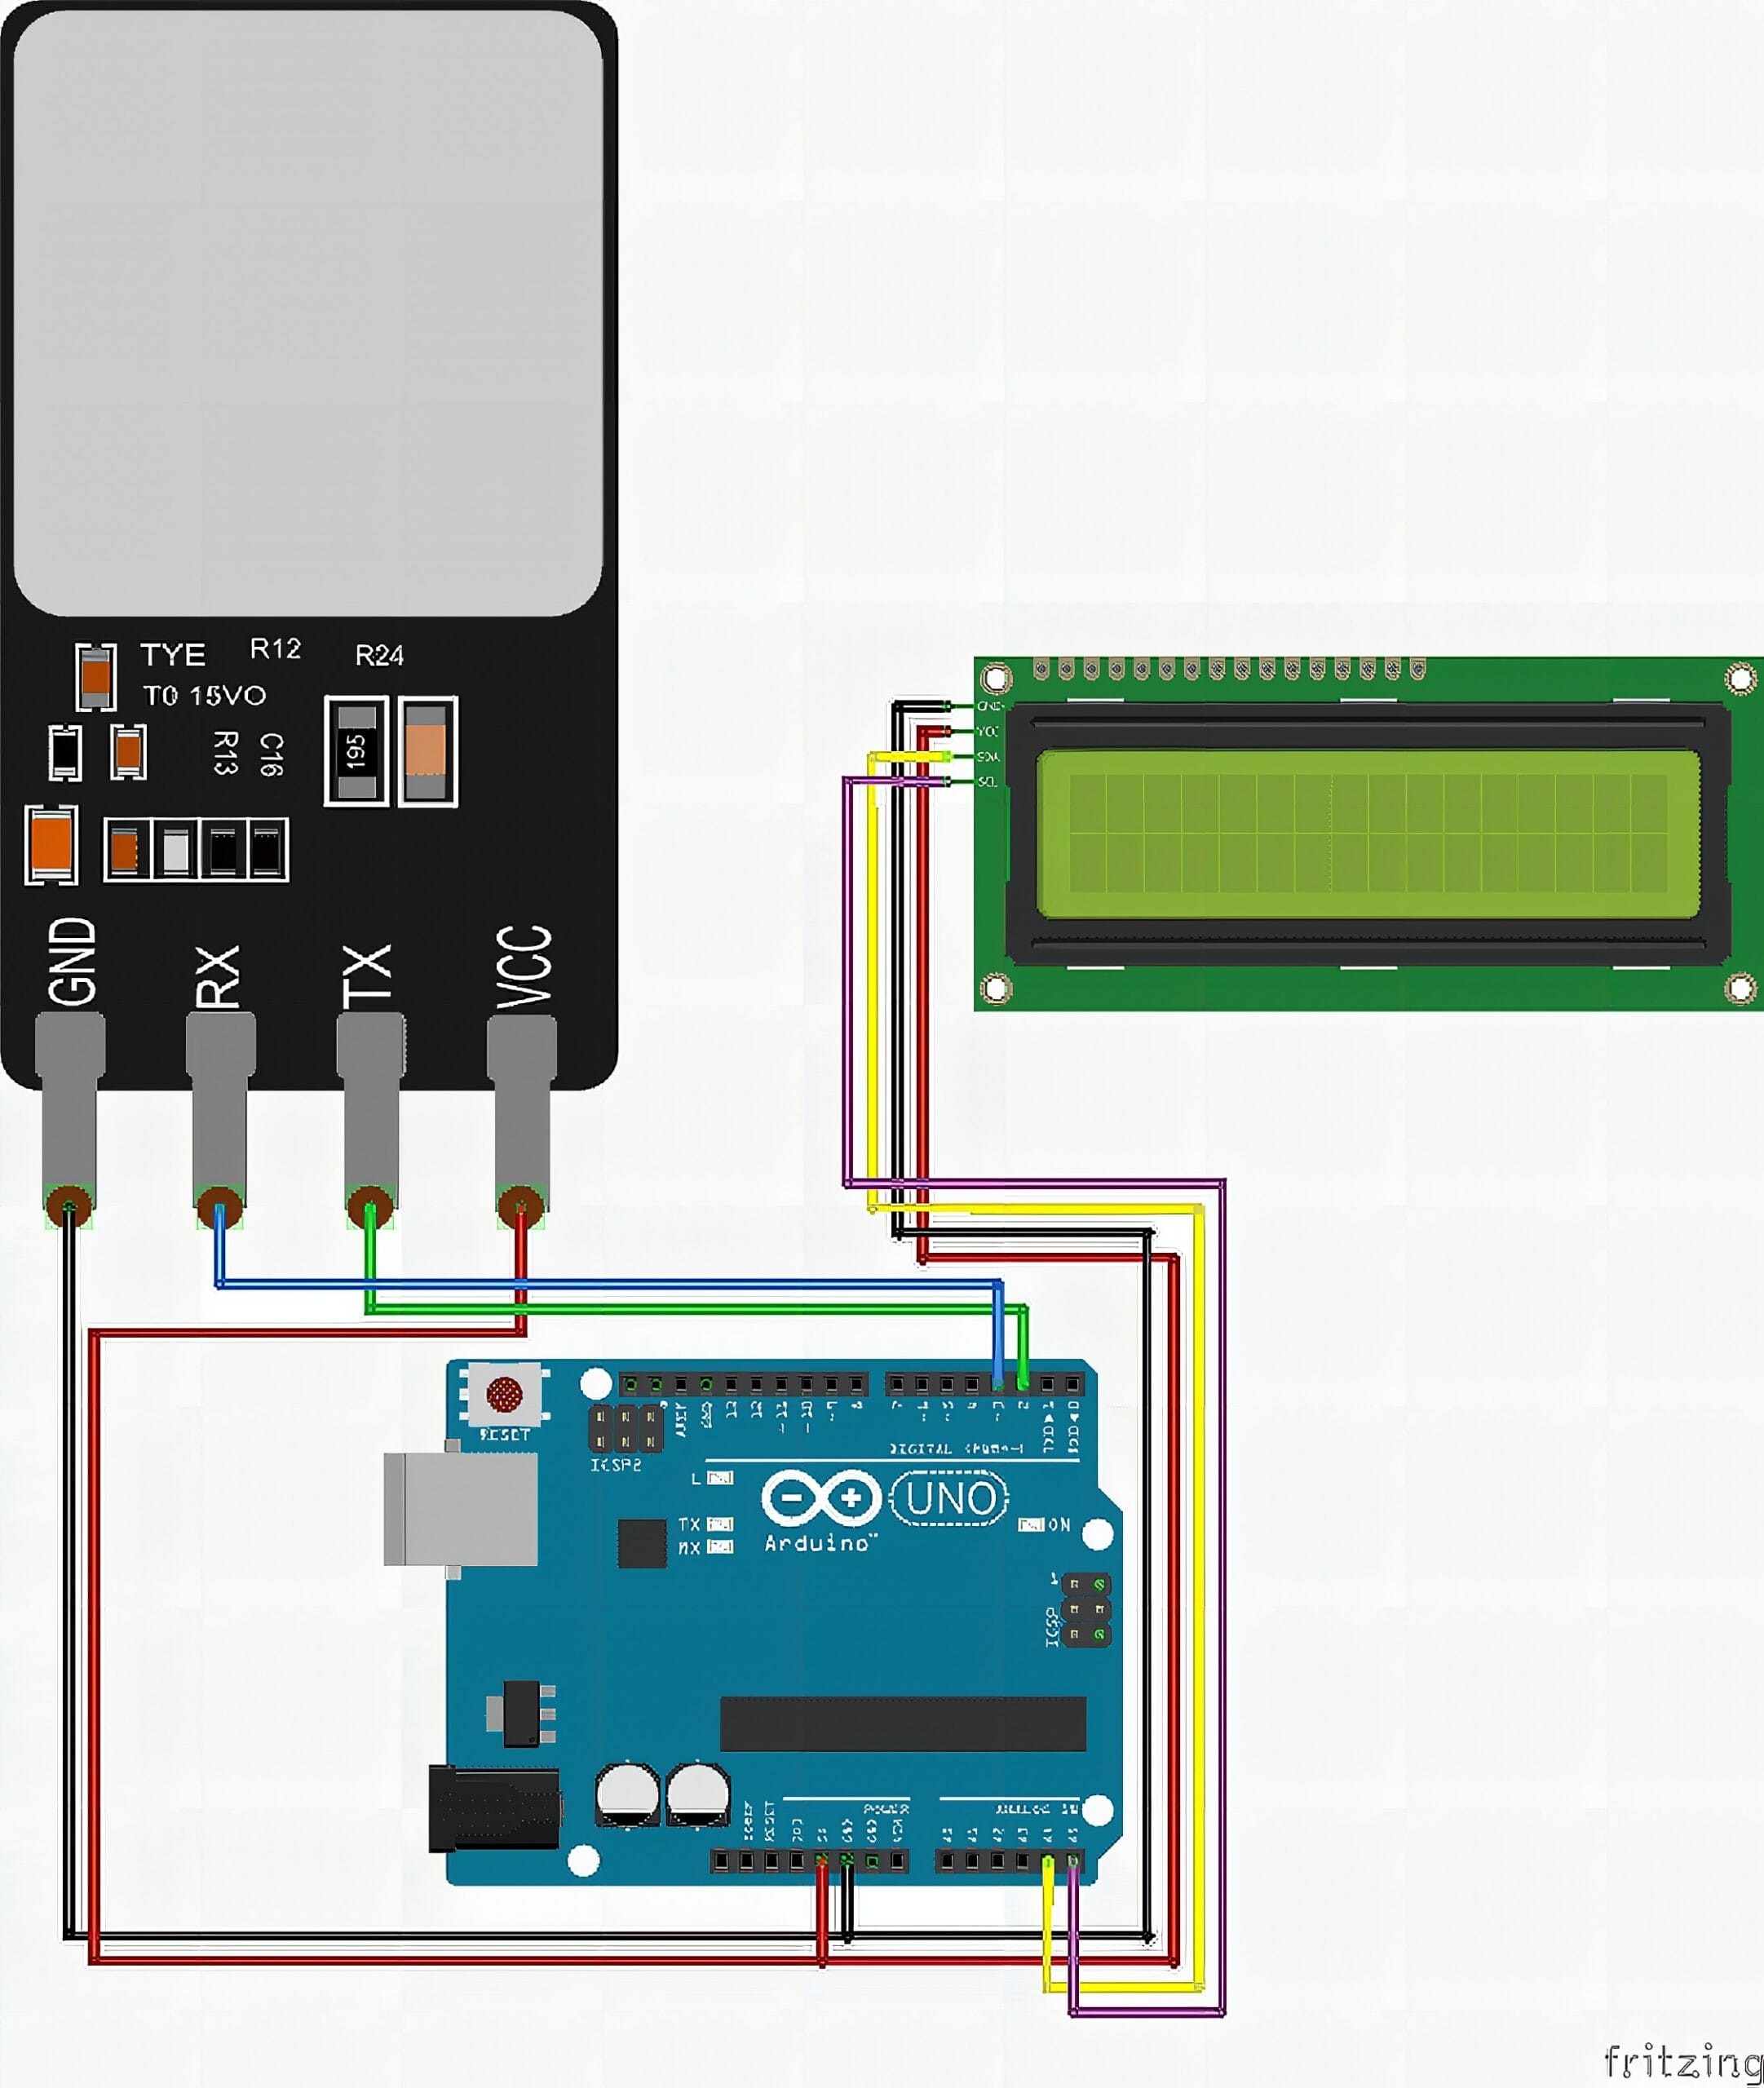
Wiring Connections
Fingerprint AS608 Sensor to Arduino
- AS608 VCC → Arduino 5V
- AS608 GND → Arduino GND
- AS608 TX → Arduino D2
- AS608 RX → Arduino D3
LCD I2C to Arduino
- LCD VCC → Arduino 5V
- LCD GND → Arduino GND
- LCD SDA → Arduino A4 / SDA
- LCD SCL → Arduino A5 / SCL
Code
Fingerprint Enrollment Code for AS608 Using Arduino
#include <SoftwareSerial.h>
#include <Adafruit_Fingerprint.h>

// Fingerprint sensor pins
// Sensor TX -> Arduino D2
// Sensor RX -> Arduino D3
SoftwareSerial mySerial(2, 3); // Arduino RX, Arduino TX

Adafruit_Fingerprint finger = Adafruit_Fingerprint(&mySerial);

uint8_t id;

void setup() {
  Serial.begin(9600);
  delay(100);

  Serial.println("Fingerprint Enroll Test");

  finger.begin(57600);

  if (finger.verifyPassword()) {
    Serial.println("Sensor found");
  } else {
    Serial.println("Sensor not found");
    while (1) {
      delay(1);
    }
  }

  Serial.println("Type ID number from 1 to 127");
}

void loop() {
  if (Serial.available() > 0) {
    id = Serial.parseInt();

    if (id != 0) {
      Serial.print("Enrolling ID #");
      Serial.println(id);

      while (!getFingerprintEnroll());
    }
  }
}

uint8_t getFingerprintEnroll() {
  int p = -1;

  Serial.print("Waiting for valid finger to enroll as #");
  Serial.println(id);

  // First scan
  while (p != FINGERPRINT_OK) {
    p = finger.getImage();

    switch (p) {
      case FINGERPRINT_OK:
        Serial.println("Image taken");
        break;

      case FINGERPRINT_NOFINGER:
        Serial.println("Place your finger...");
        delay(500);
        break;

      case FINGERPRINT_PACKETRECIEVEERR:
        Serial.println("Communication error");
        return p;

      case FINGERPRINT_IMAGEFAIL:
        Serial.println("Imaging error");
        return p;

      default:
        Serial.println("Unknown error");
        return p;
    }
  }

  // Convert first image
  p = finger.image2Tz(1);

  if (p == FINGERPRINT_OK) {
    Serial.println("Image converted");
  } else {
    Serial.println("Image convert error");
    return p;
  }

  Serial.println("Remove finger");
  delay(2000);

  p = 0;

  while (p != FINGERPRINT_NOFINGER) {
    p = finger.getImage();
  }

  Serial.println("Place same finger again");

  p = -1;

  // Second scan
  while (p != FINGERPRINT_OK) {
    p = finger.getImage();

    switch (p) {
      case FINGERPRINT_OK:
        Serial.println("Image taken");
        break;

      case FINGERPRINT_NOFINGER:
        Serial.println("Waiting for same finger...");
        delay(500);
        break;

      case FINGERPRINT_PACKETRECIEVEERR:
        Serial.println("Communication error");
        return p;

      case FINGERPRINT_IMAGEFAIL:
        Serial.println("Imaging error");
        return p;

      default:
        Serial.println("Unknown error");
        return p;
    }
  }

  // Convert second image
  p = finger.image2Tz(2);

  if (p == FINGERPRINT_OK) {
    Serial.println("Second image converted");
  } else {
    Serial.println("Second image convert error");
    return p;
  }

  // Create fingerprint model
  p = finger.createModel();

  if (p == FINGERPRINT_OK) {
    Serial.println("Prints matched");
  } else if (p == FINGERPRINT_ENROLLMISMATCH) {
    Serial.println("Fingerprints did not match");
    return p;
  } else {
    Serial.println("Model creation error");
    return p;
  }

  // Save fingerprint model
  p = finger.storeModel(id);

  if (p == FINGERPRINT_OK) {
    Serial.println("Stored!");
  } else {
    Serial.println("Store error");
    return p;
  }

  return true;
}
Fingerprint Access System with I2C LCD Using AS608 and Arduino
#include <Wire.h>
#include <LiquidCrystal_I2C.h>
#include <SoftwareSerial.h>
#include <Adafruit_Fingerprint.h>

// LCD I2C address
LiquidCrystal_I2C lcd(0x27, 16, 2);

// Fingerprint sensor pins
// Sensor TX -> Arduino D2
// Sensor RX -> Arduino D3
SoftwareSerial mySerial(2, 3); // Arduino RX, Arduino TX

Adafruit_Fingerprint finger = Adafruit_Fingerprint(&mySerial);

void setup() {
  Serial.begin(9600);
  delay(100);

  // LCD setup
  lcd.init();
  lcd.backlight();
  lcd.clear();

  lcd.setCursor(0, 0);
  lcd.print("Starting...");

  // Fingerprint setup
  finger.begin(57600);

  if (finger.verifyPassword()) {
    Serial.println("Sensor found");

    lcd.clear();
    lcd.setCursor(0, 0);
    lcd.print("Sensor ready");
    lcd.setCursor(0, 1);
    lcd.print("Place finger");

    delay(2000);
    lcd.clear();
  }
  else {
    Serial.println("Sensor not found");

    lcd.clear();
    lcd.setCursor(0, 0);
    lcd.print("Sensor not");
    lcd.setCursor(0, 1);
    lcd.print("found");

    while (1) {
      delay(1);
    }
  }
}

void loop() {
  checkFingerprint();
}

void checkFingerprint() {
  uint8_t p = finger.getImage();

  // No finger detected
  if (p == FINGERPRINT_NOFINGER) {
    lcd.setCursor(0, 0);
    lcd.print("Place finger    ");
    lcd.setCursor(0, 1);
    lcd.print("                ");
    delay(300);
    return;
  }

  // Image capture failed
  if (p != FINGERPRINT_OK) {
    Serial.println("Image capture error");

    lcd.clear();
    lcd.setCursor(0, 0);
    lcd.print("Scan error");

    delay(1000);
    lcd.clear();
    return;
  }

  // Convert fingerprint image
  p = finger.image2Tz();

  if (p != FINGERPRINT_OK) {
    Serial.println("Could not read fingerprint");

    lcd.clear();
    lcd.setCursor(0, 0);
    lcd.print("Try again");

    delay(1000);
    lcd.clear();
    return;
  }

  // Search fingerprint database
  p = finger.fingerFastSearch();

  if (p == FINGERPRINT_OK) {
    Serial.print("Access granted. ID #");
    Serial.println(finger.fingerID);

    lcd.clear();
    lcd.setCursor(1, 0);
    lcd.print("You may enter");
    lcd.setCursor(4, 1);
    lcd.print("Welcome");

    delay(2000);
    lcd.clear();
  }
  else if (p == FINGERPRINT_NOTFOUND) {
    Serial.println("Access denied");

    lcd.clear();
    lcd.setCursor(1, 0);
    lcd.print("Access denied");
    lcd.setCursor(2, 1);
    lcd.print("Try again");

    delay(2000);
    lcd.clear();
  }
  else {
    Serial.println("Search error");

    lcd.clear();
    lcd.setCursor(2, 0);
    lcd.print("Search error");

    delay(1000);
    lcd.clear();
  }
}
How It Works
In Enroll mode, the Arduino first waits for you to enter a number in the Serial Monitor, and that number becomes the user’s fingerprint ID. Once an ID is provided, the sensor asks for a scan and keeps polling until it captures a usable fingerprint image. The code then converts that image into a template that the sensor can compare and store. This is important because raw images are not saved; the sensor stores processed fingerprint features instead.
Next, the enroll flow requires a second scan of the same finger. The code tells you to remove your finger, waits until the sensor detects “no finger,” and then asks you to place the same finger again. This second scan is used to confirm that the enrollment is consistent and not a random partial read. After converting the second scan, the sensor compares the two templates and creates a single model if they match well.
Finally, the sensor stores the model into its internal memory under the chosen ID. If the two scans do not match, the code reports a mismatch and the ID is not saved, which protects your database from bad enrollments. If storing succeeds, the Serial Monitor prints “Stored!” and that user is now registered for later access checks. At this point, you can unplug the computer and switch to the access sketch for real-world use.
In Access mode, the Arduino runs a continuous loop that waits for a finger to be placed on the Fingerprint Sensor AS608 . When a finger is detected, it captures an image and converts it into a template, then performs a fast search against every saved ID slot. If a match is found, the code prints the matching ID and shows a “You may enter / Welcome” message on the LCD for a short time. If no match is found, it shows “Access denied / Try again,” then returns to the ready prompt so the next scan is smooth.
Applications & Extensions
This Fingerprint Sensor AS608 is great for a door access demo, a lockbox prototype, or a “scan to unlock” drawer for a school exhibit. Because the sensor stores IDs internally, it can keep working even without a connected PC once enrollment is done. The LCD makes the demo friendly because it tells users exactly what to do and what result they got. You can also reuse the ID value as a “user number” for logging or role-based actions.
To turn it into a real lock system, add a relay module, solenoid lock, servo latch, or electromagnetic lock that activates only on a successful match. Use a short unlock timer so the output turns off automatically after a few seconds. Add a buzzer or LED indicator for clearer feedback in noisy places. A manual override button is also a good safety feature for demos.
You can improve enrollment and management as your project grows. Add a keypad so you can choose IDs and enroll without Serial, or define an “admin finger” that enables enrollment mode only when authorized. For tracking, send events to a computer, SD card, or Wi-Fi logger with timestamps. Once the core enroll-and-search flow is stable, these upgrades are easy to add without rewriting everything.
Watch the Full Demo Video
Here’s the Fingerprint Sensor AS608.
Frequently Asked Questions
What does this Fingerprint Sensor AS608 tutorial cover?
One touch can replace keys.
What's the working voltage of the Fingerprint Sensor AS608?
Check the Sample Code section for the exact pinout — most maker-grade sensors run on 3.3V or 5V. Wire VCC to the matching rail, GND common with your MCU, data to a digital or analog pin.
Why does the Fingerprint Sensor AS608 read garbage or saturated values?
Three usual causes: wrong voltage rail, missing pull-up resistor on I2C lines (4.7k–10k to VCC), or a floating data pin. Double-check wiring against the diagram, then probe with a multimeter.