
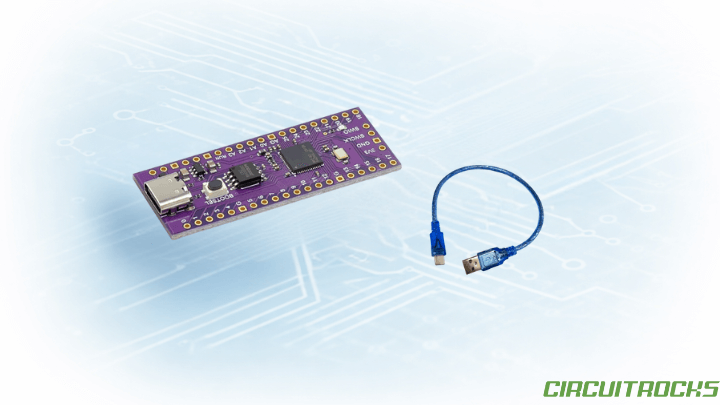
 | A Beginner’s Guide")
If you’re coming from Arduino Uno, the Raspberry Pi Pico can feel confusing at first—especially when it doesn’t immediately show a COM port. ✨🧐 Sometimes it appears as a USB drive or a UF2 board, and beginners assume something is broken. In reality, this is normal behavior for the Pico and is part of how it uploads code.
The Pico uses the RP2040 microcontroller with a UF2 bootloader, so uploading can involve a mode that looks like storage rather than serial. That’s different from the Arduino Uno, which uses a dedicated USB-to-serial chip and usually stays visible as a stable port. Because the Pico’s USB serial is software-based, resets can also affect what the PC sees.
This tutorial is focused on the practical workflow: how to upload successfully even when no port appears, and how to reliably view output in Serial Monitor. You’ll learn what UF2 mode means, when the port should show up, and what to do when Serial output doesn’t appear right away. The goal is to make Pico uploads feel consistent and predictable inside Arduino IDE.
WHY BUILD?
Many beginner Pico problems happen because people expect the same upload behavior as the Arduino Uno. With the Uno, you plug it in, select the port, upload, and the Serial Monitor usually works without extra steps. With the Pico, it can start as a UF2 device first, then switch into serial mode only after it runs your program.
Learning this properly prevents wasted time doing unnecessary fixes like reinstalling drivers repeatedly or changing random settings. Once you understand the UF2 → reboot → serial sequence, the “missing port” issue becomes easy to diagnose. You stop guessing and start following a repeatable process that works on any computer.
This setup is also the foundation for debugging almost every Pico project. If you can upload and read Serial output reliably, you can test sensors, verify logic, and confirm wiring with confidence. That makes later projects—motors, displays, or automation builds—much easier to build and troubleshoot.
WHAT YOU LEARN
- How the Pico switches between UF2 (bootloader) mode and normal run mode
- The correct Arduino IDE flow to upload even when no Port appears
- How to write a sketch that reliably prints to Serial Monitor after resets
- Why the Pico often needs Serial Monitor reopen or replug after upload
- The key difference between Pico USB Serial and Arduino Uno USB-to-Serial
What You’ll Need:
Setup for Raspberry Pi Pico (RP2040)
- Open Arduino IDE
- Go to File → Preferences
- In Additional Boards Manager URLs, paste this link:
- https://github.com/earlephilhower/arduino-pico/releases/download/global/package_rp2040_index.json
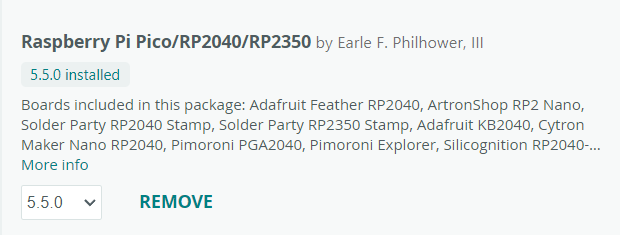
- Go to Tools → Board → Boards Manager
- Install “Raspberry Pi Pico/RP2040 by Earle Philhower”
Sample Code
void setup() {
  Serial.begin(115200);
  delay(2000);
  Serial.println("HELLO WORLD");
}
void loop() {}
- Copy the code above into Arduino IDE
- Make sure Raspberry Pi Pico is selected as the board
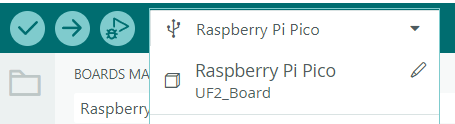
- Click Upload while the Pico appears as UF2_Board
- Wait for the upload to complete
- Unplug the Pico, then plug it back in normally
- Open Tools → Serial Monitor
- Set the baud rate to 115200
- Wait for the upload to complete
- Note: If you don’t see “HELLO WORLD” immediately, close and replug the Pico. This is normal behavior for RP2040 boards.

HOW IT WORKS
The Pico has a UF2 bootloader that allows firmware to be transferred through USB like copying a file. When the Pico is in BOOTSEL/UF2 mode, your computer sees it as a storage device (often labeled UF2_Board or RPI-RP2). In this mode, the Pico is ready to receive a program, but it does not expose a serial COM port.
After the upload completes, the Pico reboots and runs the program you uploaded. In normal run mode, the board can register as a USB serial device, which is when the COM port may appear in Arduino IDE. This is where Serial Monitor output becomes available, because Serial over USB is only active while your program is running.
Because the USB serial connection is software-based, it can disconnect and reconnect on resets and uploads. Arduino IDE’s Serial Monitor may not automatically recover from that disconnect, which is why you sometimes need to close/open Serial Monitor or replug the board. Once you treat that behavior as normal, it becomes part of your expected workflow.
APPLICATIONS & EXTENSIONS
Once you are comfortable with this process, development becomes faster and more confident. You can upload changes without guessing whether the board should show UF2 or a COM port, and you’ll know exactly when to reopen Serial Monitor. Serial prints become a reliable way to confirm that your new code is actually running. This makes the Pico practical for everyday prototyping and debugging.
You can also extend this tutorial by adding interactive Serial commands for faster testing. Instead of re-uploading for every small change, you can type a character in Serial Monitor to trigger an LED, start a motor routine, or request a sensor reading. This keeps your workflow quick while you validate wiring and logic. It’s a common technique used in embedded development to speed up iteration.
From there, the same upload and debugging habits apply to larger builds such as automation controllers, robotics projects, and data loggers. The code will grow, but the Pico’s reboot-and-reconnect behavior will still be part of your routine. Because you understand the USB modes early, you’ll waste less time on “missing port” confusion. That foundation helps you scale projects smoothly.


