
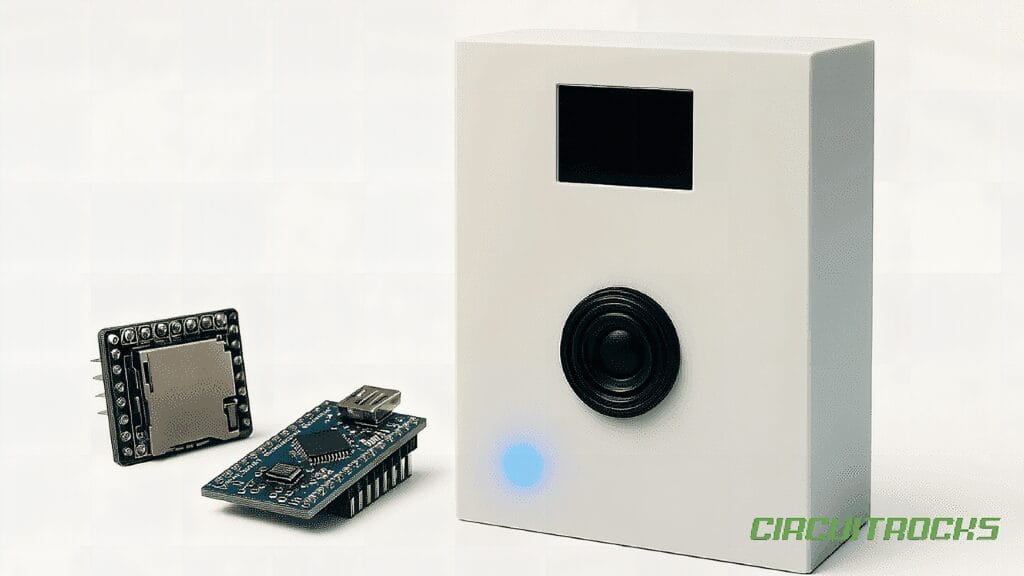
Boot. Play. Sing. As soon as you power on, the 3D DIY Soundbox automatically plays your preloaded track (for example, To the Bone) while the screen shows timed lyrics. 𝄞 There is no phone, no pairing, and no app – just instant music with on-device lyrics. Because the enclosure is 3D-printed, you control the look, grill, and control layout without compromising service ability.
This build behaves like a tiny karaoke appliance. The MP3 module handles audio from a microSD card, while the microcontroller renders lyric lines in sync on a small OLED. The result is a predictable boot-to-play flow that feels polished and repeatable even in busy demo environments.
This is a tutorial, not an insight piece. You will prepare files correctly, wire the audio and display cleanly, and implement a simple timing method for auto-play + auto-lyrics on power-up. After that, you can refine the user experience and scale the sound for bigger rooms if needed.
If you want to learn the modules used in this project in more depth, here are guided lessons you can follow. For the MP3 module, check out theDFPlayer Mini tutorial here. If you want to understand how the OLED animations and text rendering work, explore this OLED guide. These two lessons will help you master the exact components used in the 3D DIY Soundbox so you can expand or customize the project further.
Why Build 3D DIY Soundbox?
You get instant wow at boot. The moment power arrives, the song starts and the first lyric line appears, which makes the device feel like a finished product instead of a prototype. For booths, classrooms, and party corners, that immediate response prevents delays and keeps demos on track.
It is easy to customize and maintain because the body is 3D-printed. You can swap faceplates, resize the speaker cavity, or add proper standoffs without ripping up the entire design. If a clip breaks or you change modules later, you simply reprint the affected part and keep moving.
You also learn real product skills in a compact scope. Power hygiene, storage formatting, serial control, display timing, and a small state machine all show up in this build. Those skills transfer directly to kiosks, exhibits, cosplay props, and any interactive device that needs dependable sound and simple UI.
What You’ll Learn
By building this 3D DIY Soundbox, you’ll:
- Auto-play flow: Power-on → initialize audio → play first track → show “Now Playing” + first lyric line.
- Lyrics timing: Use LRC-style timestamps (e.g.,
[mm:ss.xx]) so lines appear exactly on cue. - Storage prep: FAT32 microSD, predictable names (e.g.,
/mp3/0001.mp3+/lrc/0001.lrc). - Display UX: 0.96″/1.3″ OLED, readable font, single-line updates, and clear prompts.
- Sync strategy: Align to a start time (
t0 = millis()) and optionally track the module’s BUSY pin for stop/pause awareness. - Hardware choices: MP3-TF-16P/DFPlayer (UART audio) + separate SD module for lyrics, or VS1053/ESP32 for a shared SD you can read while audio plays.
- Safety & legal: Clean 5 V, common ground, decoupling caps; use legally obtained audio and lyrics.
What You’ll Need
How It Works
Auto-play at startup is the core behavior. In setup(), you initialize the MP3 module first, then immediately send a play command for your default track (for example, 0001.mp3). At the same time, you set a zero-time reference (t0 = millis()) for lyrics and show a concise “Now Playing” cue on the OLED so users know it’s active.
Reading lyrics from SD without user choice requires the microcontroller to access a text file. If you use DFPlayer/MP3-TF-16P, remember the SD inside that module is not MCU-readable over UART. The common solution is a separate SPI microSD module for the .lrc file (audio stays on the DFPlayer SD, lyrics live on the MCU’s SPI SD). Alternatively, use a VS1053 or an ESP32 with I²S/decoder, where the MCU can read both the MP3 and LRC from the same card.
Timed scrolling is straightforward once you have timestamps. The loop compares (millis() - t0) to the next line’s time tag; when the moment arrives, it replaces the displayed line. If you wire the audio module’s BUSY pin, you can pause or re-align the lyric timer on stops and edge cases, keeping words and music in lockstep across many play cycles.
Applications & Extensions
Use it as a mini-karaoke prop for parties, a classroom demo on timing and UX, or a museum button-box with narration and captions. Because it auto-plays on boot, users encounter almost no friction, and the experience remains consistent across sessions. The 3D-printed body lets you theme it as a retro radio, boombox, or sleek cube.
Extend it to multi-track mode with an on-device selector. Add two buttons or a rotary encoder to browse titles on the OLED, then auto-play with matching LRC files for each track. For larger venues, route DAC_L/R → a small class-D amplifier → a bigger speaker to increase coverage while keeping controls the same.
Polish the UX and timing as you iterate. Add a progress bar or a subtle highlight on the active line, and sync NeoPixel accents to chorus sections for visual drama. If you want analytics, log play counts and timestamps over Serial or BLE so you know which songs and moments are most popular.
Watch Related Project
Frequently Asked Questions
What does this 3D DIY Soundbox tutorial cover?
Boot.
What Arduino library does the 3D DIY Soundbox tutorial use?
The sketch uses standard Wire.h (I2C) or SPI.h plus a part-specific library installable via Arduino IDE → Sketch → Include Library → Manage Libraries. See the Sample Code section.
Why does the 3D DIY Soundbox act differently on USB power vs battery?
Battery voltage sags under load. Add a 100uF cap across the rails, use a 5V/2A regulator-backed pack, and never power motors from the Arduino's onboard regulator.