
Want a tiny MP3-TF-16P prop that plays your own sound, like “The Fate of Ophelia”? Need a simple build for a 3D-printed pumpkin or display? Wondering if a small speaker can work without a big amp, and if a single tap can start the audio?
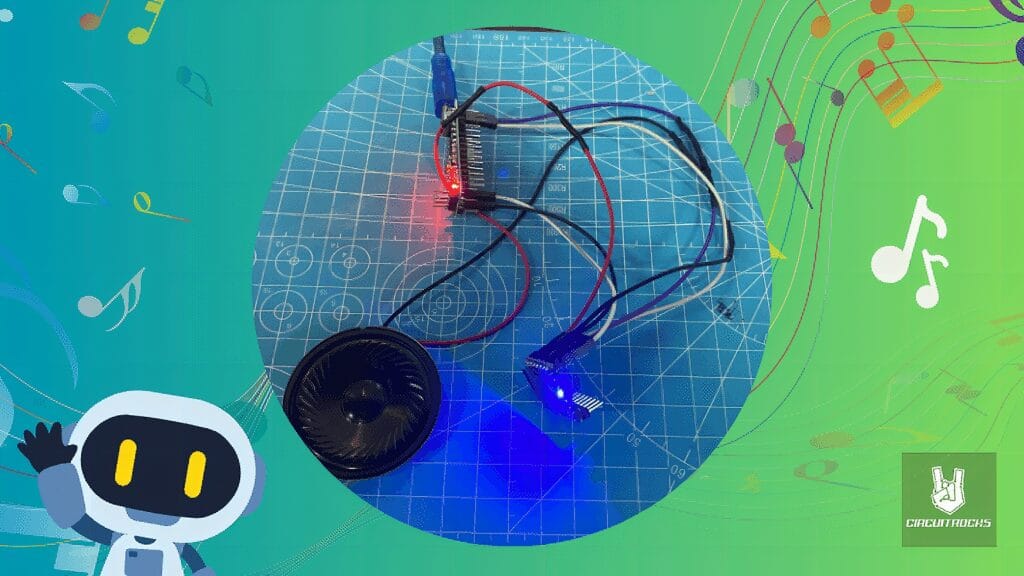
This project pairs an Arduino with a MP3-TF-16P Mini and a microSD card. Your track is saved as 0001.mp3, then a short sketch plays it on power-up or on touch. You connect power, a small speaker, and one trigger. No deep electronics – just a clean setup that’s safe and easy to copy.
Create a touch-activated talking pumpkin, a door chime with custom tones, or a toy soundboard. Add NeoPixel glow while audio plays, motion sensors for jump-scares, or a stronger amp for bigger rooms. Swap the file anytime to change the vibe in seconds.
Want to see a 3D-printed version of this project in action? Check out our Touch-o-Lantern Arduino Halloween Project – a glowing pumpkin prop that reacts to touch, laughs out loud, and lights up the room with every tap.
What You’ll Learn
By building this MP3 Player project, you’ll:
- Understand how an MP3 module pairs with an Arduino for simple audio playback.
- Prepare a microSD the right way (FAT32, zero-padded names like
/mp3/0001.mp3). - Practice safe wiring for DFPlayer power, speaker outputs, and serial pins (D10/D11).
- Learn power best practices: common ground, avoiding speaker shorts, and clean 5 V.
What You’ll Need
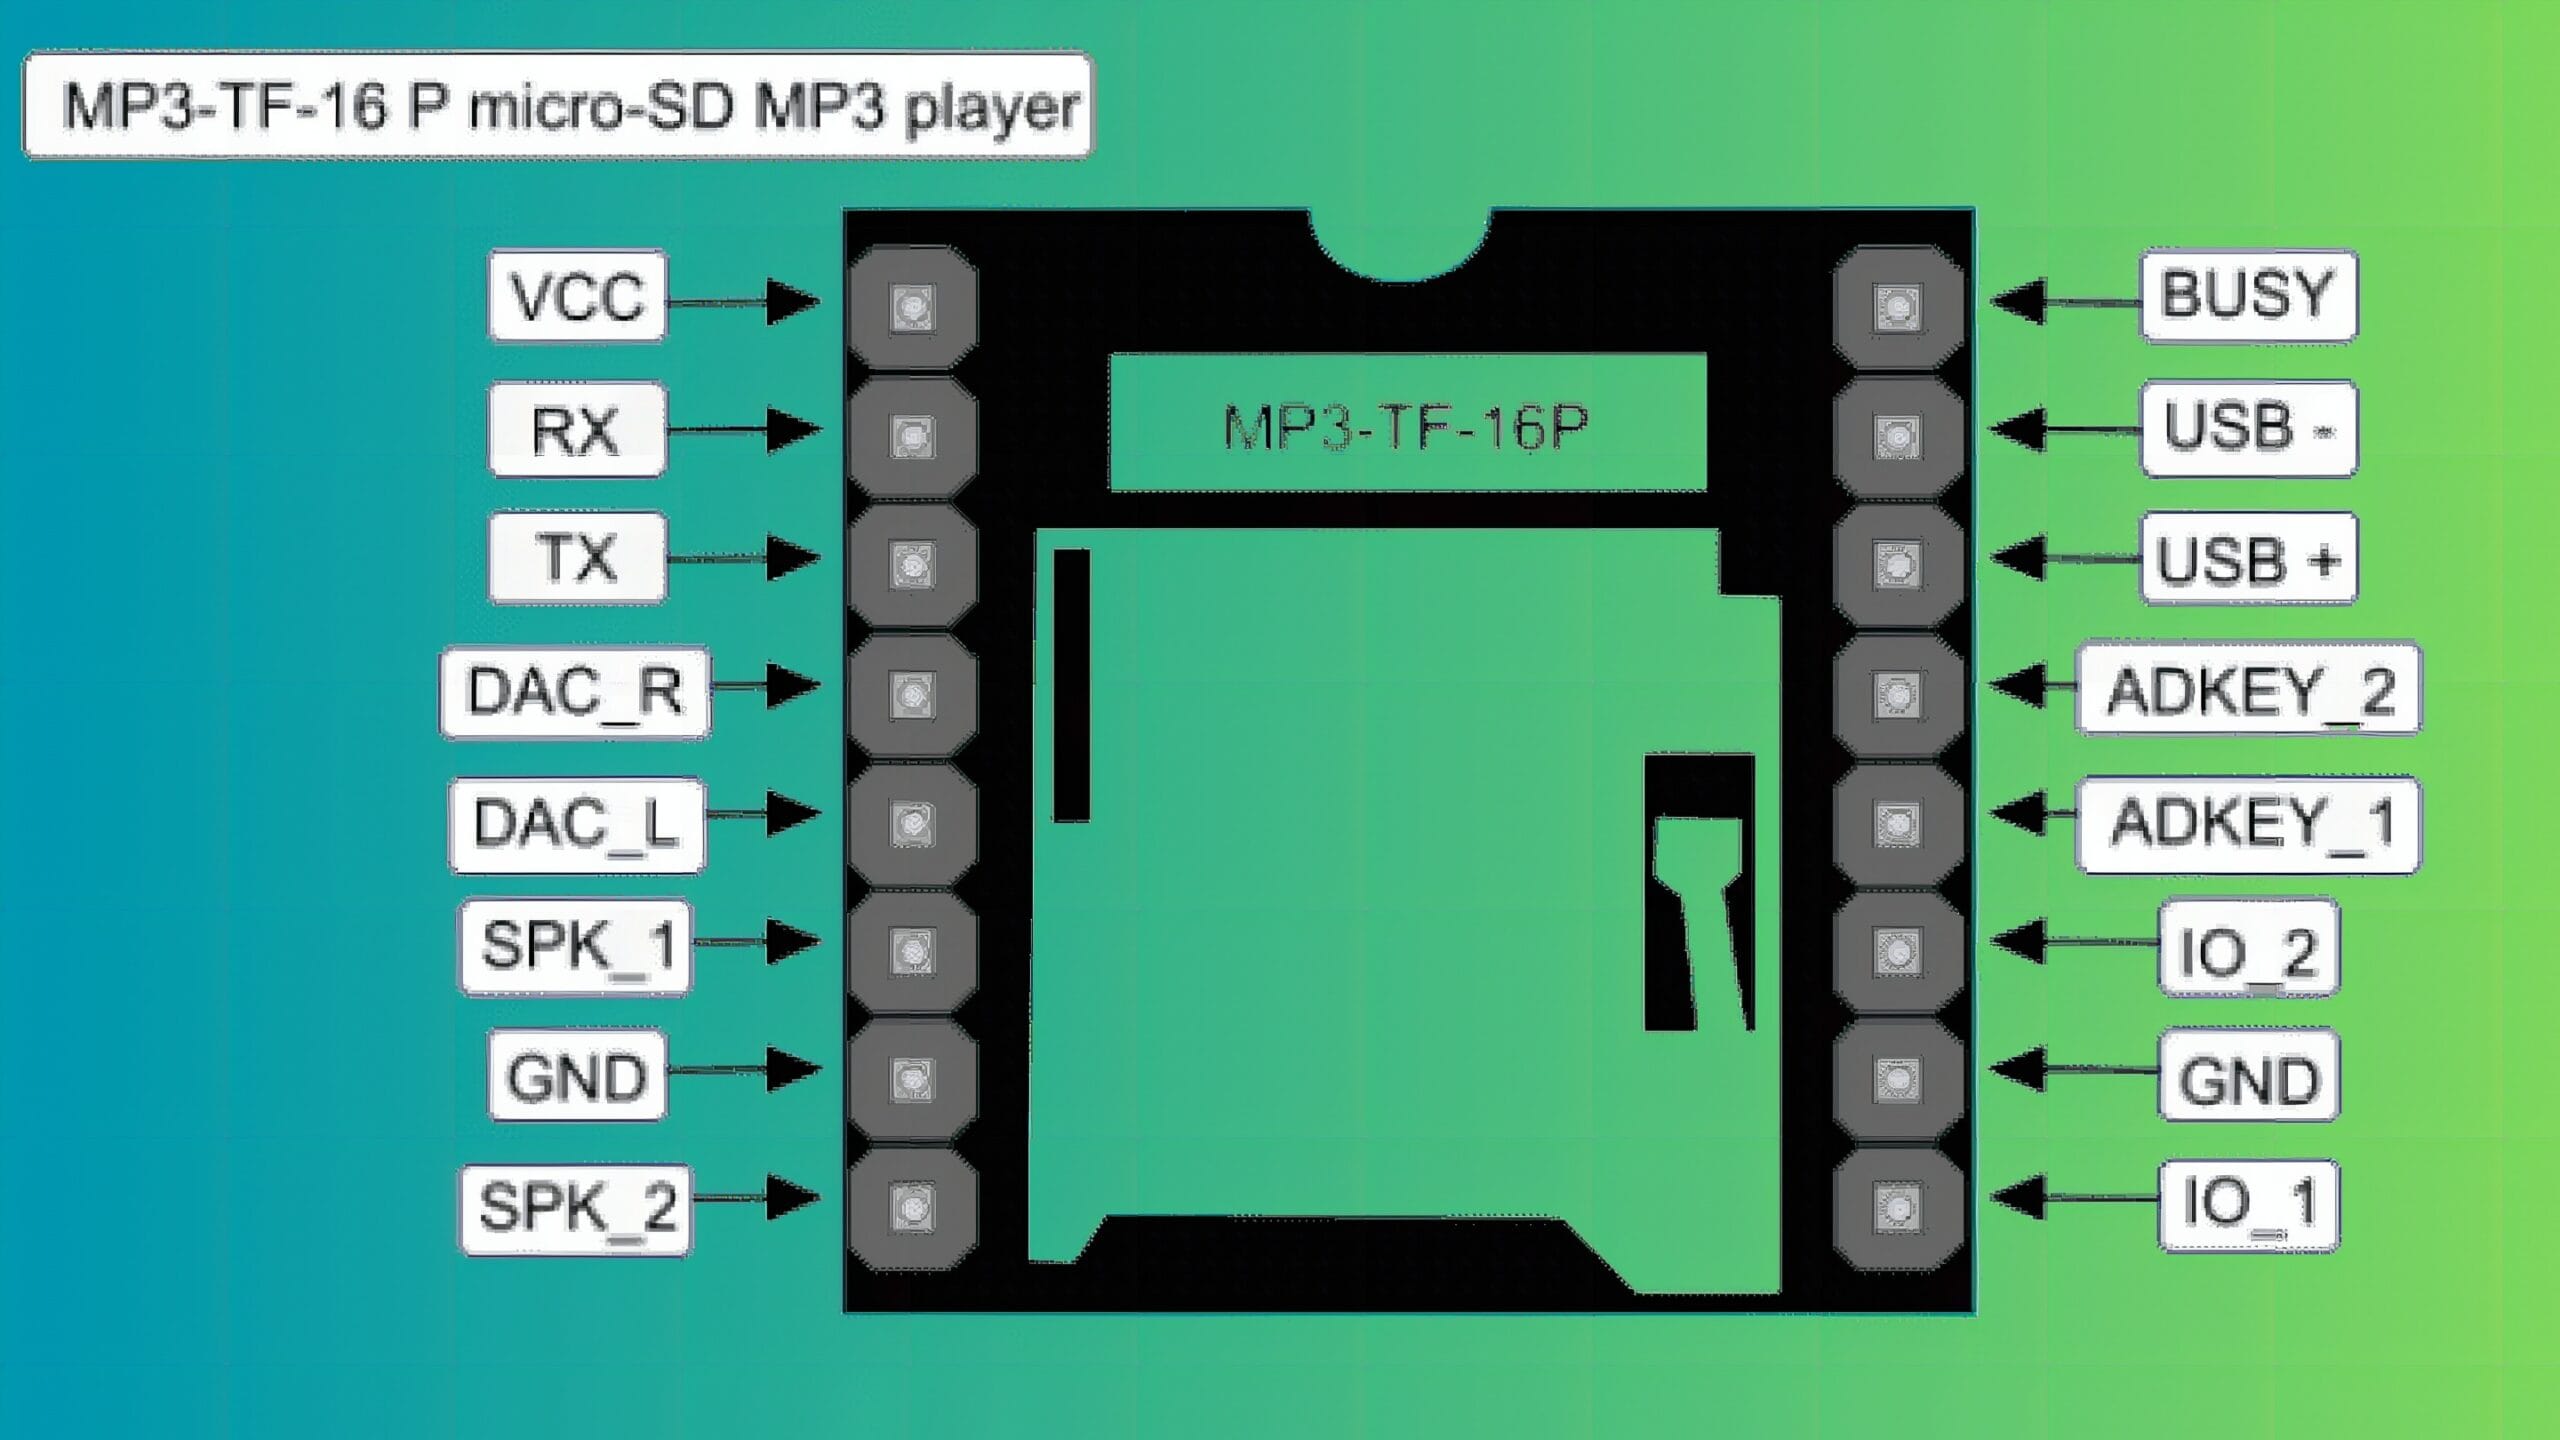
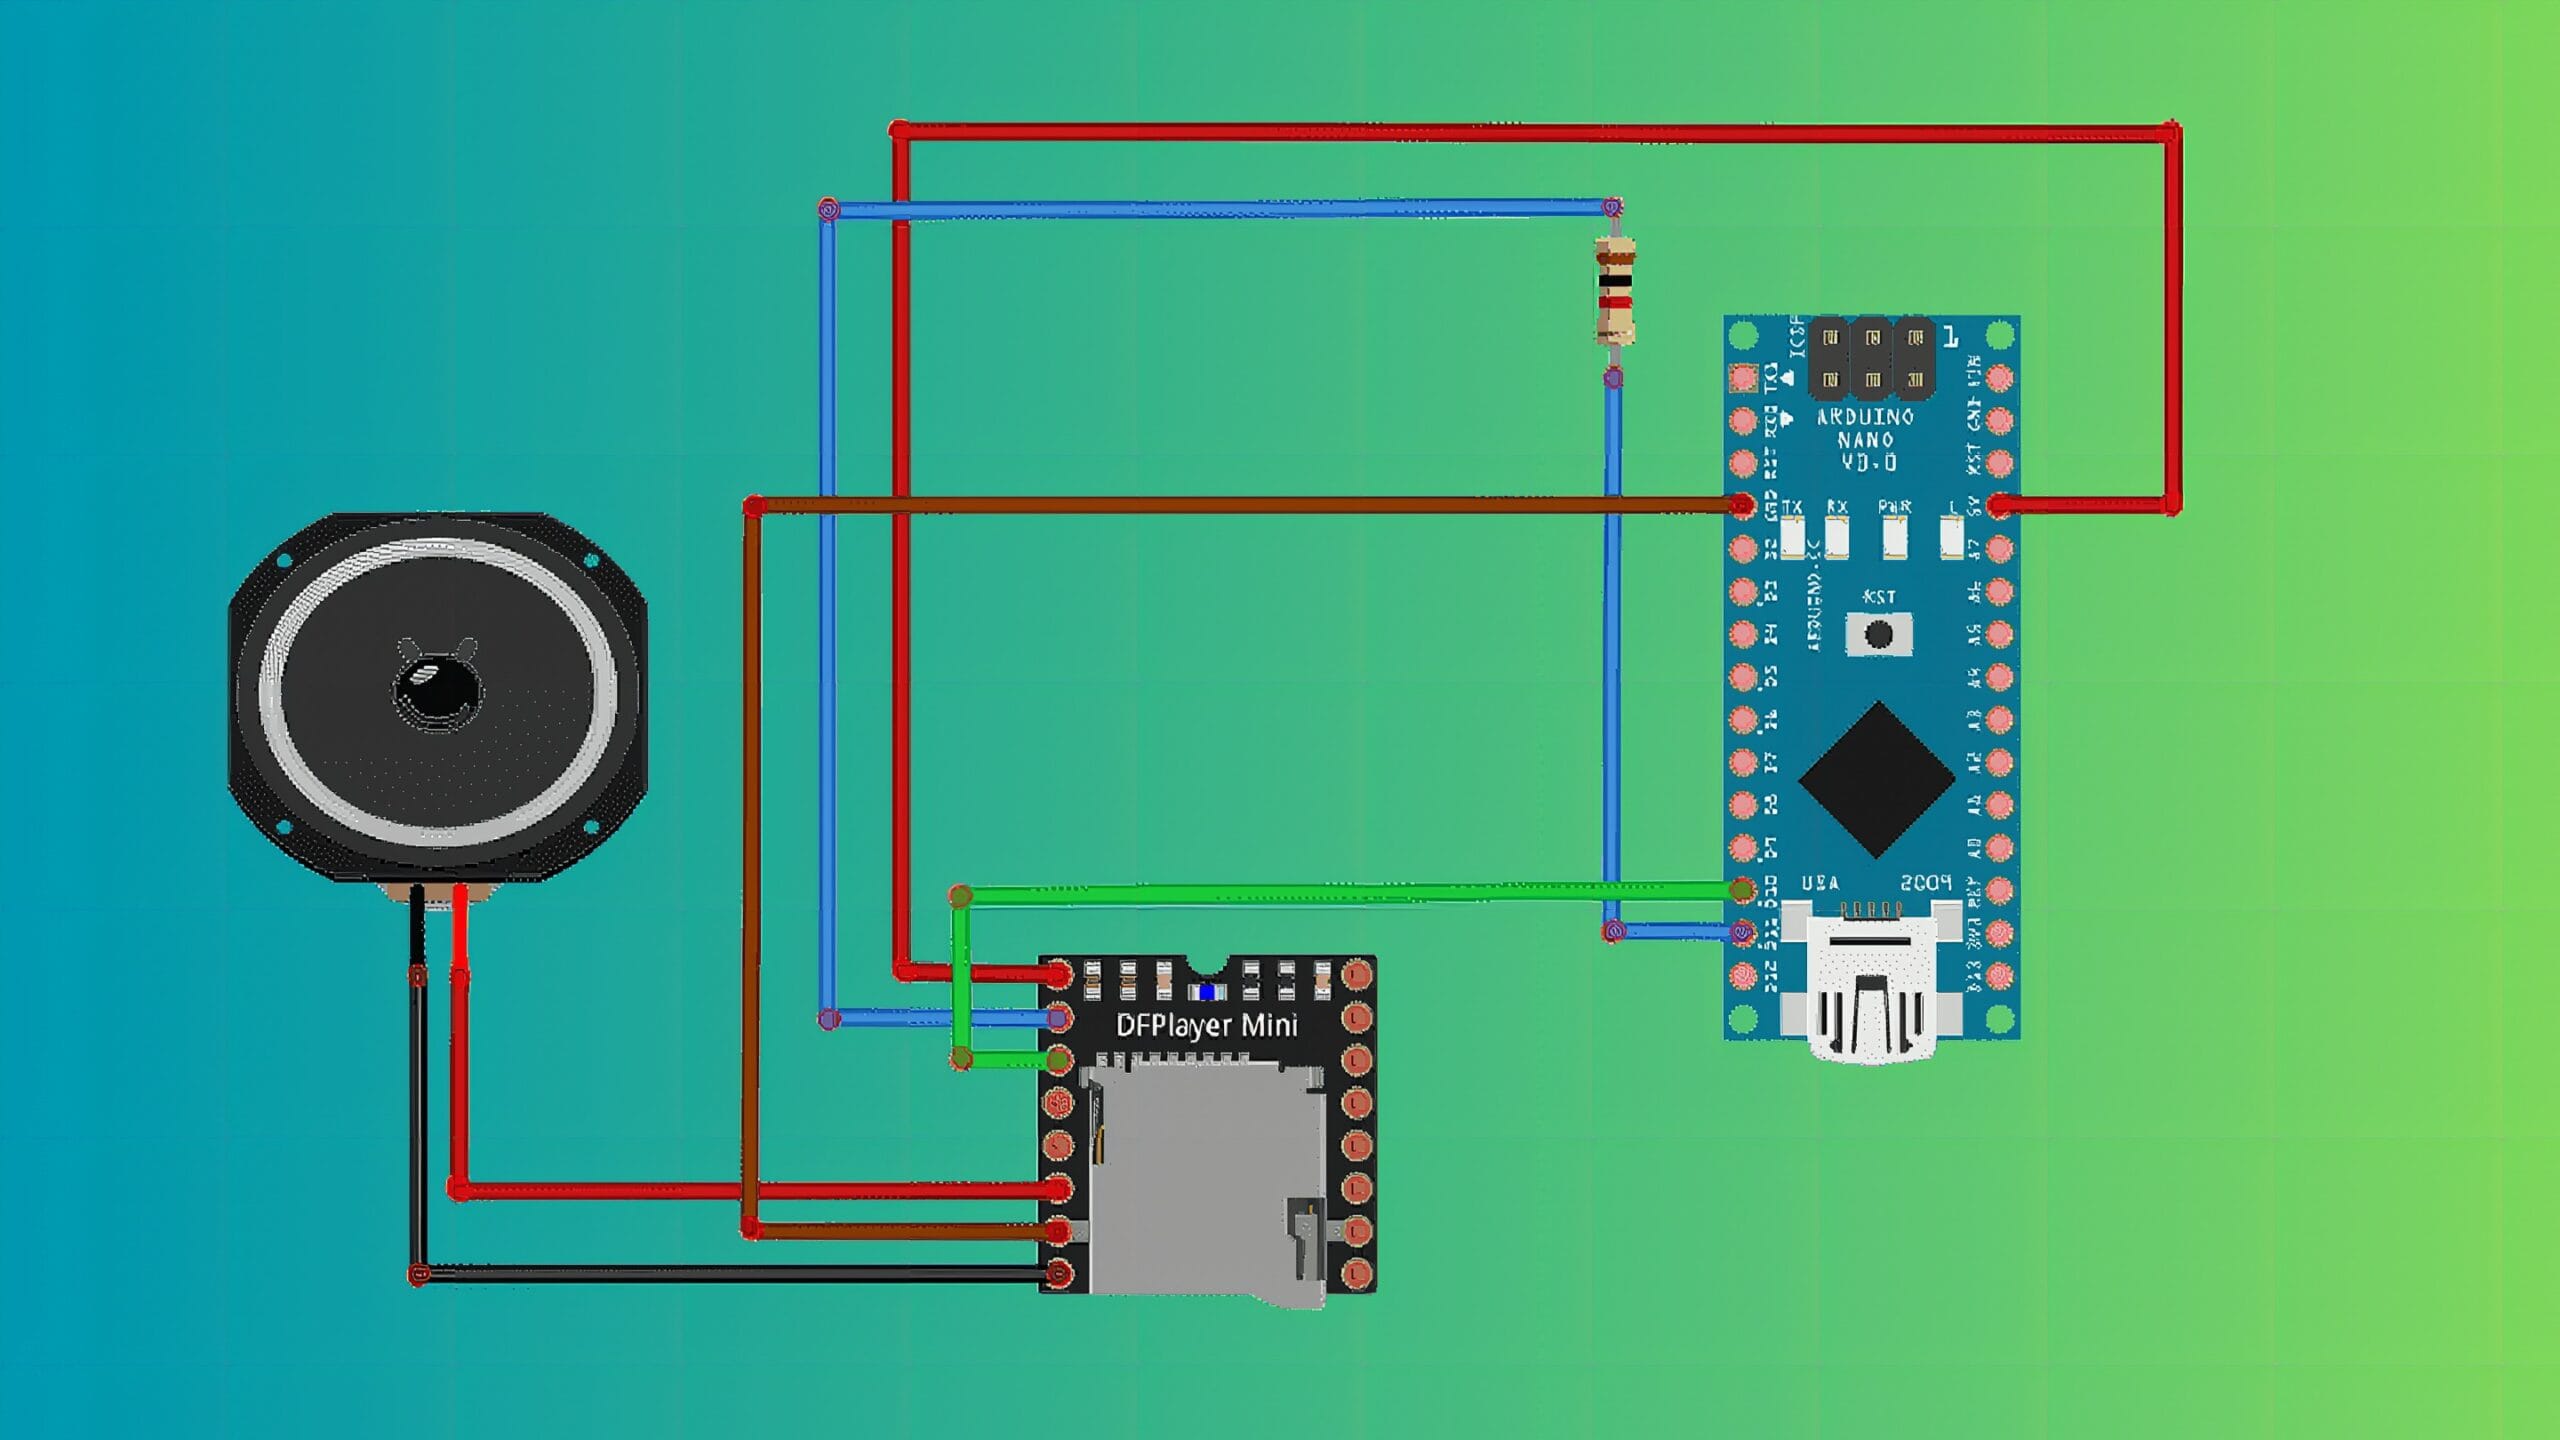
MP3-TF-16P Pinout
MP3 Player Circuit Diagram
SD card prep
- Format FAT32.
- Put your track as
/mp3/0001.mp3(zero-padded).
Microcontroller (MP3 → Arduino Nano)
- VCC → 5V
- GND → GND
- TX → D10
- RX → Arduino D11 → ~1 kΩ resistor
Speaker (MP3 → Speaker)
- SPK1 ↔ one speaker lead
- SPK2 ↔ other speaker lead
Sample Code
#include <SoftwareSerial.h> // DFPlayer serial (no library)
#define MP3_RX 10 // Arduino RX (konektado sa DFPlayer TX)
#define MP3_TX 11 // Arduino TX (via ~1k resistor papunta sa DFPlayer RX) SoftwareSerial mp3(MP3_RX, MP3_TX); void dfSend(uint8_t cmd, uint8_t p1, uint8_t p2) { uint16_t sum = 0xFFFF - (0xFF + 0x06 + cmd + 0x00 + p1 + p2) + 1; uint8_t f[10] = {0x7E,0xFF,0x06,cmd,0x00,p1,p2,(uint8_t)(sum>>8),(uint8_t)sum,0xEF}; for (uint8_t i=0;i<10;i++) mp3.write(f[i]);
} void setVolume(uint8_t v){ if(v>30)v=30; dfSend(0x06,0x00,v); } // 0..30
void setEQ(uint8_t m){ if(m>5)m=5; dfSend(0x07,0x00,m); } // 0=Normal..5=Bass
void playTrack(uint16_t n){ dfSend(0x03,(n>>8)&0xFF,n&0xFF); } // 1 = 0001.mp3 void setup() { mp3.begin(9600); delay(1200); // boot time ng DFPlayer setEQ(5); // Bass EQ (optional) for(uint8_t v=16; v<=30; v++){ setVolume(v); delay(60); } // soft ramp setVolume(30); playTrack(1); // AUTO-PLAY: 0001.mp3
} void loop() { /* nothing */ }
How it Works?
The Arduino talks to the MP3-TF-16P over SoftwareSerial (a software-based UART) on pins D10/D11 and sends 10-byte command frames (set EQ, set volume, play). On power-up the sketch opens the serial link, ramps the volume, then issues “play track 1”, so the DFPlayer reads /mp3/0001.mp3 from the microSD. The DFPlayer’s built-in amplifier drives the speaker on SPK1/SPK2, so you get sound without an external amp; if you later use an amp, you switch to the DAC_L/R line-level outputs instead. During playback the module can assert a BUSY status pin (LOW on most boards), which your code can read to sync lights or other effects while the audio is active.
Applications & Extensions
This tiny MP3 Player setup fits many builds: touch-activated Halloween props, talking displays, custom doorbells, shop greeting chimes, museum buttons with narration, classroom phonics boxes, and small alert systems that play voice cues. You can extend it in simple ways: add triggers (touch, push button, PIR motion, light sensor), sync NeoPixel effects with the module’s BUSY pin, or boost volume using the DAC_L/R line outputs into an external amplifier. Support multiple tracks with next/prev or random play, swap themed folders for events, and store volume/EQ presets. Power it by USB for desks or by a battery pack for portable props, then drop it into a 3D-printed or laser-cut enclosure.
Watch the Full Demo Video
Here’s the MP3-TF-16P.
Frequently Asked Questions
What does this Tutorial of MP3-TF-16P tutorial cover?
Want a tiny MP3-TF-16P prop that plays your own sound, like “The Fate of Ophelia” ? Need a simple build for a 3D-printed pumpkin or display? Wondering if a small speaker can work without a big amp, and if a single tap can start the audio? This project pairs an Arduino with a MP3-TF-16P Mini and a microSD card.
What Arduino library does the Tutorial of MP3-TF-16P tutorial use?
The sketch uses standard Wire.h (I2C) or SPI.h plus a part-specific library installable via Arduino IDE → Sketch → Include Library → Manage Libraries. See the Sample Code section.
Why does the Tutorial of MP3-TF-16P act differently on USB power vs battery?
Battery voltage sags under load. Add a 100uF cap across the rails, use a 5V/2A regulator-backed pack, and never power motors from the Arduino's onboard regulator.