
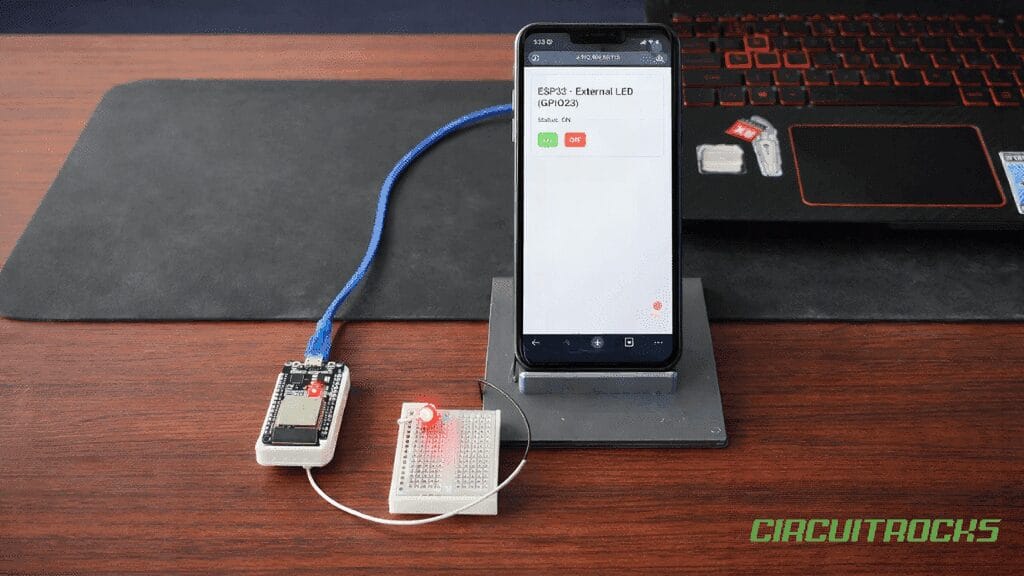
Tap a button on your phone and watch an LED light up across the room. This External LED via Wi-Fi turns an ESP32 into a tiny web server that hosts a page with ON/OFF buttons. Open the page on any device on your Wi-Fi, tap a button, and a 5 mm LED wired to the board flips instantly.
You only need three parts for the prototype: an ESP32, a 5 mm LED, and a 2200 Ω resistor. The LED sits on GPIO 23 so it stays free from the default serial pins, and the resistor limits current for a long, safe demo. Drop everything into a small 3D-printed case if you want a clean, hand-held gadget.
Setup is straightforward: flash the sketch, change the ssid/password, and connect the LED (anode → resistor → GPIO23, cathode → GND). When the Serial Monitor prints the IP address, type it into your phone’s browser. The page loads with big buttons and a live status label so you always know whether the LED is on or off.
Once you’re comfortable with this concept, you can explore more advanced boards like the ESP32-CAM. Instead of just switching an LED, the ESP32-CAM lets you capture images, stream video, and store files on an SD card – perfect for smart cameras and visual IoT projects. If you want to try that next, check out the ESP32-CAM Image Capture and SD Storagetutorial on Circuitrocks Learn.
Why Build?
This project gives you a simple, real-world way to control hardware over Wi-Fi without extra apps. Any phone, tablet, or laptop on the same network can open the ESP32 page and toggle the LED. That makes it great for quick demos, classroom setups, and small prototypes where you want the result to work on almost any device. It also keeps the user flow easy: connect once, then tap ON or OFF anytime.
It also helps you learn the “web control” mindset that many IoT projects use. Instead of pressing a physical button, you trigger actions through a web request, and the ESP32 responds like a tiny local website. Once you understand this pattern, you can reuse it for relays, buzzers, fans, or even sensor dashboards. The LED is just a safe first load that proves the idea works.
Finally, it makes testing and troubleshooting easier before you scale up. You can confirm Wi-Fi connection, IP address, and page loading independently from the LED wiring. You can also confirm the LED state on the page, so you know if the board received the command even when the LED is not connected yet. This creates a clean baseline that saves time when you later add more pins, better UI, or a 3D-printed case.
What You’ll Learn
- ESP32 Wi-Fi basics – connect to a network and confirm
WL_CONNECTEDstatus. - Local IP workflow – read
WiFi.localIP()and open it on your phone browser. - Web server routes – how
/,/on, and/offmap to specific actions. - GPIO control – drive a 5mm LED on GPIO23 using HIGH/LOW safely with a resistor.
- Simple UI building – serve a small HTML/CSS page that works well on mobile.
- State tracking – use a boolean (
ledOn) so the page shows correct ON/OFF status. - Clean refresh – why an HTTP 303 redirect sends you back to
/after clicking a button.
What You'll Need
Fritzing Diagram
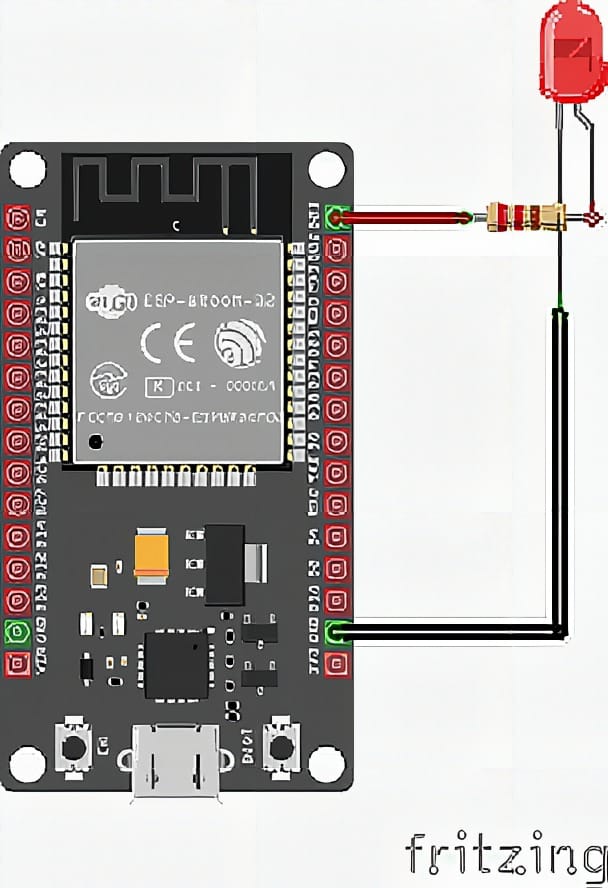
Wiring Connection
- GPIO23 → Resistor (220Ω/330Ω) → LED Anode (long leg +)
- LED Cathode (short leg -) → GND (ESP32)
Sample Code
#include <WiFi.h>
#include <WebServer.h>

// Wi-Fi credentials
const char* ssid     = "YOUR_WIFI_NAME";
const char* password = "YOUR_WIFI_PASSWORD";

// Web server on port 80
WebServer server(80);

// External 5mm LED (GPIO23)
const int LED_PIN = 23;
bool ledOn = false;

// Build the HTML page
String page() {
  String s = R"rawliteral(
<!doctype html>
<html>
<head>
  <meta name="viewport" content="width=device-width, initial-scale=1">
  <title>ESP32 LED Control</title>
  <style>
    body{font-family:Arial;margin:20px}
    .card{max-width:420px;margin:auto;padding:16px;border:1px solid #ddd;border-radius:12px}
    .btn{padding:12px 16px;border:none;border-radius:10px;cursor:pointer;margin-right:8px}
    .on{background:#1f9d55;color:#fff}
    .off{background:#e53e3e;color:#fff}
    .state{font-weight:bold}
  </style>
</head>
<body>
  <div class="card">
    <h2>ESP32 - External LED (GPIO23)</h2>
    <p>Status: <span class="state">
)rawliteral";

  s += (ledOn ? "ON" : "OFF");

  s += R"rawliteral(
    </span></p>
    <p>
      <a href="/on"><button class="btn on">ON</button></a>
      <a href="/off"><button class="btn off">OFF</button></a>
    </p>
  </div>
</body>
</html>
)rawliteral";

  return s;
}

void handleRoot() {
  server.send(200, "text/html", page());
}

void handleOn() {
  ledOn = true;
  digitalWrite(LED_PIN, HIGH);
  server.sendHeader("Location", "/");
  server.send(303);
}

void handleOff() {
  ledOn = false;
  digitalWrite(LED_PIN, LOW);
  server.sendHeader("Location", "/");
  server.send(303);
}

void setup() {
  Serial.begin(115200);

  pinMode(LED_PIN, OUTPUT);
  digitalWrite(LED_PIN, LOW);

  WiFi.begin(ssid, password);
  Serial.print("Connecting");
  while (WiFi.status() != WL_CONNECTED) {
    delay(400);
    Serial.print(".");
  }

  Serial.println("\nConnected!");
  Serial.print("Open website: http://");
  Serial.println(WiFi.localIP());

  server.on("/", handleRoot);
  server.on("/on", handleOn);
  server.on("/off", handleOff);

  server.begin();
  Serial.println("Web server started.");
}

void loop() {
  server.handleClient();
}
How It Works
When the ESP32 boots, it joins your Wi-Fi with WiFi.begin(ssid, password) and waits until WL_CONNECTED. It then prints its local IP address so you know what to open in a browser. The sketch also configures GPIO23 as an output and starts a tiny HTTP server on port 80.
Three routes power the experience. The root path / serves a small HTML page with an ON and OFF button and a visible status label. The /on and /off routes flip the ledOn flag, write HIGH or LOW to GPIO23, and then send an HTTP 303 redirect back to / so the page refreshes with the updated state without you pressing back.
Inside loop(), server.handleClient() processes incoming requests. Because the page is static and the handlers are tiny, the response feels instant even on a phone. The result is a predictable interaction loop: connect → tap → LED reacts → page reflects the new state
Applications & Extensions
Start with the desktop LED in a small 3D-printed case – great for task reminders, meeting indicators, or a silent “ping” light for teammates. Since it’s just a web page, anyone on the same network can toggle it from a browser without installing anything.
Grow it into multi-output control. Add more pins and buttons for a lamp, fan, or relay board, or swap the LED for a MOSFET-driven LED strip. You can also add a slider UI for brightness or animation speed and map it to PWM on another pin.
Harden it for the real world. Add a simple login form, mDNS (http://esp32.local/) so you don’t memorize IPs, or move to AsyncWebServer for heavier pages. If you need control outside your LAN, pair it with a VPN, a reverse proxy, or a cloud dashboard – same hardware, same wiring, bigger reach.
Watch the Full Demo Video
Frequently Asked Questions
What does this External LED via Wi-Fi | ESP32 Mini Guide tutorial cover?
Tap a button on your phone and watch an LED light up across the room.
Why does my ESP32 reset randomly during the External LED via Wi-Fi | ESP32 Mini Guide sketch?
Usually brownout from a weak USB supply. Use a 5V/2A wall adapter or add a 470uF cap across VIN/GND. Second cause: WDT timeout — sprinkle yield() or vTaskDelay() in long loops.
Can I run ESP8266 code on an ESP32?
Mostly yes. ESP32 is API-compatible with most ESP8266 Arduino libraries plus dual core, BLE, and more I/O. Watch for analogRead range (ESP32 is 0-4095, 12-bit) and pin numbering.