A simple yet has a wide variety of applications is the Piezo Vibration Sensor. Need to detect an impact? Use Piezo Vibration Sensor. Need to detect knocking on a surface? Use the Piezo Vibration Sensor. In fact, it’s so straightforward to use that most Piezo Vibration Sensors don’t even require you to download a library.
Now how does a Piezo Vibration Sensor work? Piezo Vibration Sensors come in different shapes and sizes, some as thin as paper. At the same time, some have weights integrated with them. The Piezo Vibration Sensor is unique because they convert mechanical energy to electrical energy. An alternating current is produced when the sensor is stressed (bent). It’s essential to keep in mind that these sensors can produce voltages up to 20V, potentially burning out a microcontroller’s analog-to-digital converter (ADC) circuit. To avoid this, Piezo Vibration Sensors are usually connected in parallel with a resistor, around the 1M? range, effectively dampening the voltage spikes.
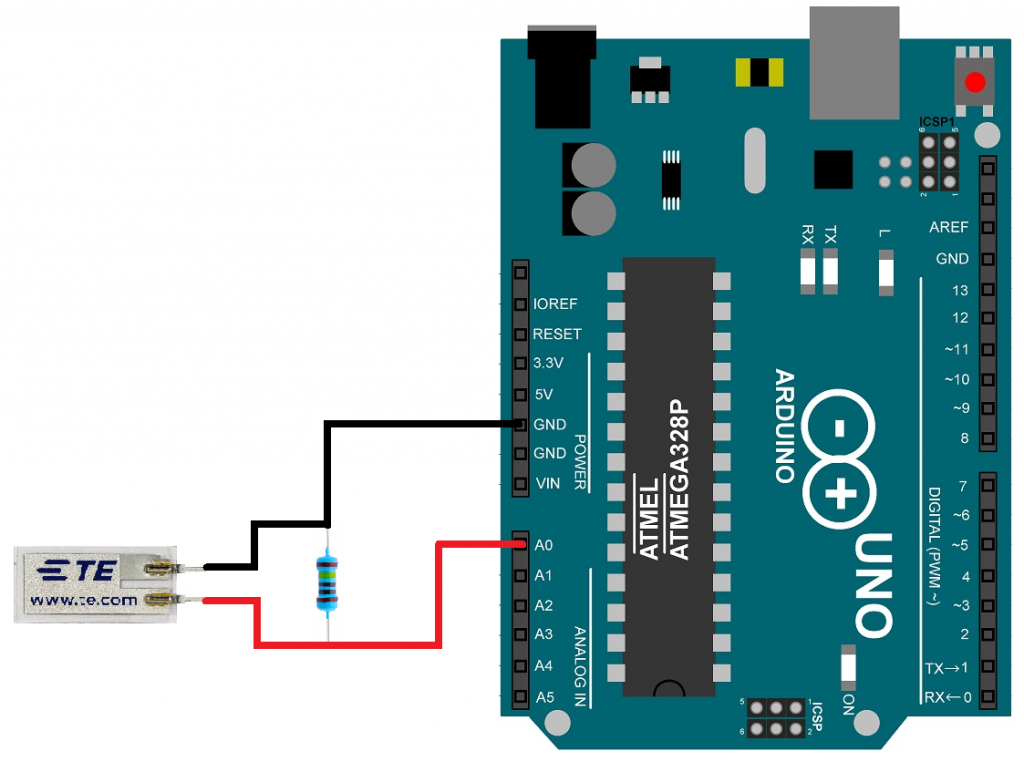
Wiring Diagram
Below is the wiring diagram to get you started using the Piezo Vibration Sensor.

Example Code
Below is an example code written by Jim Lindblom of SparkFun Electronics. The board used in this example is an Arduino Uno. The software for compiling and uploading the code is the Arduino IDE.
const int PIEZO_PIN = A0; // Piezo output

void setup()
{
  Serial.begin(9600);
}

void loop()
{
  // Read Piezo ADC value in, and convert it to a voltage
  int piezoADC = analogRead(PIEZO_PIN);
  float piezoV = piezoADC / 1023.0 * 5.0;
  Serial.println(piezoV); // Print the voltage.
}
After uploading the code via Arduino IDE, simply open the serial monitor. You’ll be able to monitor the stream of data recorded from the Piezo Vibration Sensor. Don’t forget to set the Baud Rate of the monitor to 9600 bps, and then shake or tap the Piezo Vibration Sensor to watch the data reading change. For a more detailed tutorial, visit the SparkFun tutorial found here.


