

Ever wonder how an.ino file from the Arduino IDE finds its way to an Arduino microcontroller’s flash memory? In this tutorial, we will try to understand the Arduino Sketch build process.
Overview
The reason why Arduino programming is popular is that it provides layers of abstractions that make it easier for developers to work with microcontrollers. These abstractions, however, is a double-edged sword. Not only it requires more memory but it also impedes developers from learning the actual concepts of programming hardware.
Every hardware developer must grow out of them or they’ll get stuck calling functions that make it seem easier but is actually not that efficient.
So today, in order to peel these layers off one by one, we are going to have a deeper understanding of how the Arduino framework builds its sketches.
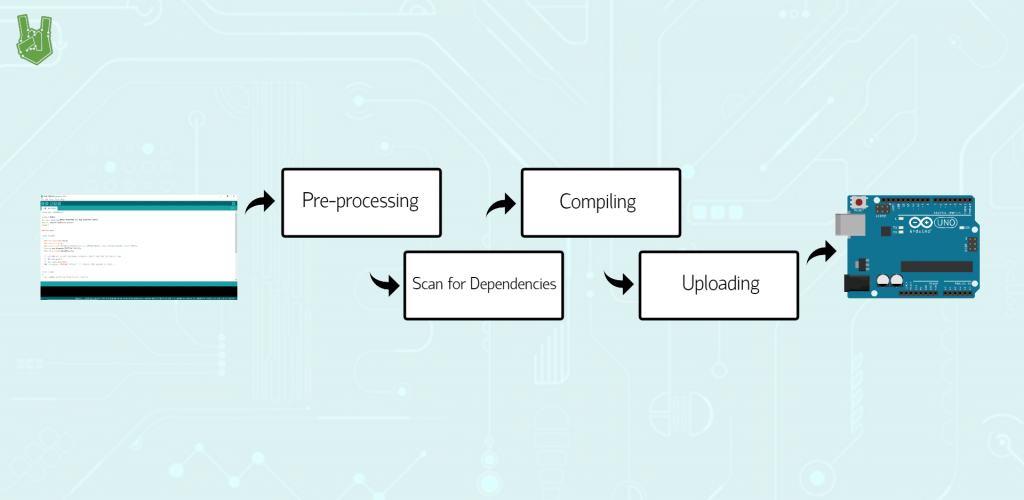
Pre-Processing
You can never go wrong with Hello World. It started from being a traditional first program to being an inside joke between IT people but somehow ended up being something canonical. There’s even a movie named for it. So to honor this ritual, let’s use a Hello World program as an example.
Our Hello World sketch should print “Hello, world!” in a serial monitor, with a communication rate of 9600 bits per second.
void setup() { Serial.begin(9600); Serial.println("Hello, world!"); } void loop() { }The first thing the Arduino development software would do to your code is to turn it into a C++ program. The header file Arduino.h is added at the beginning of the sketch. These header files are sets of definitions and functions that are written together so that you won’t have to reiterate them when you write new code. By doing this, you gain access to the system libraries of the standard Arduino core. A pre-processed.ino file would look like below:
#include <Arduino.h>
#include <stdio.h> void setup(void); void loop(void); int main(void) { setup(); while(true) { loop(); } return 0;
} void setup(void)
{ Serial.begin(9600); Serial.println("Hello, world!");
}
Other IDEs, such as PlatformIO, save Arduino sketches using the.cpp extension already. Consequently, it does not require pre-processing anymore, but needs an Arduino.h at the beginning of every sketch.
Dependency Resolution
After pre-processing, the sketch is thoroughly scanned for dependencies. The pre-defined search paths are:
- Core library folder (as defined by
{build.core}) - Variant folder (as defined by
{build.variant}) - Standard system directories (e.g.,
{runtime.tools.avr-gcc.path}/avr/include) - Include search paths added to resolve prior dependencies
If the software doesn’t find the dependency in any of these locations, it proceeds to search for the installed libraries.
Moreover, if the software detects multiple libraries with a similar #include directive, the following rules are implemented, and priority is given to the winner. The rules are executed in this order and will continue to be until a winner is determined.
- A library that is architecture compatible wins against a library that is not architecture compatible.
- A library that has better “folder name priority” wins.
- A library that is architecture optimized wins against a library that is not architecture optimized.
- A library that has a better “location priority” wins.
- A library that has a folder name with a better score using the “closest-match” algorithm wins.
- A library that has a folder name that comes first in alphanumeric order wins.
Architecture Matching
A library is compatible with a particular architecture if and only if the architectures field in library.properties explicitly contains the architecture.
architectures field in library.properties | Compatible with avr | Optimized for avr |
|---|---|---|
| not specified | YES | NO |
architectures=* | YES | NO |
architectures=avr | YES | YES |
architectures=*,avr | YES | YES |
architectures=*,esp8266 | YES | NO |
architectures=avr,esp8266 | YES | YES |
architectures=samd | NO | NO |
Folder Name Priority
| Rule | Example for Servo.h |
|---|---|
| The folder name matches the include 100% | Servo |
The folder name matches the include 100%, except with a -master suffix | Servo-master |
| The folder name has a matching prefix | ServoWhatever |
| The folder name has a matching suffix | AwesomeServo |
| The folder name contains the include | AnAwesomeServoForWhatever |
Location Priority
- The library is in the sketchbook (
{sketchbook path}/libraries) - The library is bundled with the board platform/core (
{runtime.platform.path}/libraries) - The library is bundled with the referenced board platform/core
- The library is bundled with the Arduino IDE (
{runtime.ide.path}/libraries)
Compilation
After scanning for dependencies, the sketch is now compiled in a system-wide temporary directory using a compiler called avr-gcc (Atmel AVR port of the GNU Compiler Collection (GCC)).
The compiler takes the source code, which is usually in.c or.cpp, and converts it into machine language instructions with an.o extension. These are called object files, and they contain useful bits, including debugging symbols.
The final step in compiling involves converting the object file into bits that the Arduino hardware can understand. This conversion is done by the avr-objcpy utility, which links the object file against the standard Arduino libraries as well as avr-libc, the open-source C library for the Atmel AVR microcontrollers. It produces the binary executable image, which is formatted as an Intel HEX file.
Uploading
Finally, the resulting HEX file is uploaded to the Arduino’s program flash memory using avr-dude (AVR downloader/uploader).
Who knows this has been hiding inside a single button in the Arduino IDE?
Frequently Asked Questions
What does this Understanding the Arduino Sketch Build Process tutorial cover?
Ever wonder how an.
What Arduino library does the Understanding the Arduino Sketch Build Process tutorial use?
The sketch uses standard Wire.h (I2C) or SPI.h plus a part-specific library installable via Arduino IDE → Sketch → Include Library → Manage Libraries. See the Sample Code section.
Why does the Understanding the Arduino Sketch Build Process act differently on USB power vs battery?
Battery voltage sags under load. Add a 100uF cap across the rails, use a 5V/2A regulator-backed pack, and never power motors from the Arduino's onboard regulator.