Welcome to this tutorial, where we will explore how to use the Nokia 5110 LCD display with an Arduino. This project is perfect for beginners who are looking to learn how to integrate a simple yet effective graphical display. The Nokia 5110 is an affordable and easy-to-use display. It showcases text and basic graphics, making it ideal for beginners in microcontroller projects.
The sample code will first render a simple graphic star. Followed by text displaying “I Love Circuitrocks” and a message encouraging users to connect on social media. This initial testing phase helps verify that the display is functioning correctly and gives you a chance to experiment with basic features like text positioning, text size adjustment, and clearing the screen. Understanding these concepts lets you dynamically control the display.
Mastering the basics unlocks many possibilities for advanced projects with the Nokia 5110 display. From displaying sensor data to creating interactive visual feedback. The skills you learn in this project will be applicable to a wide range of applications. For those new to Arduino, this project allowing you to enhance your projects with meaningful visual output.
Components:
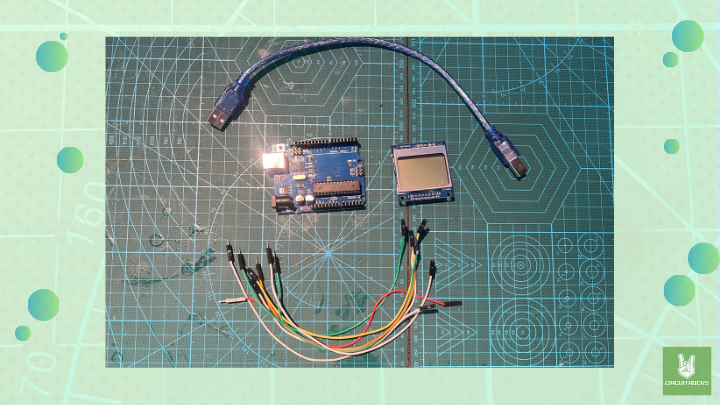
Connections:
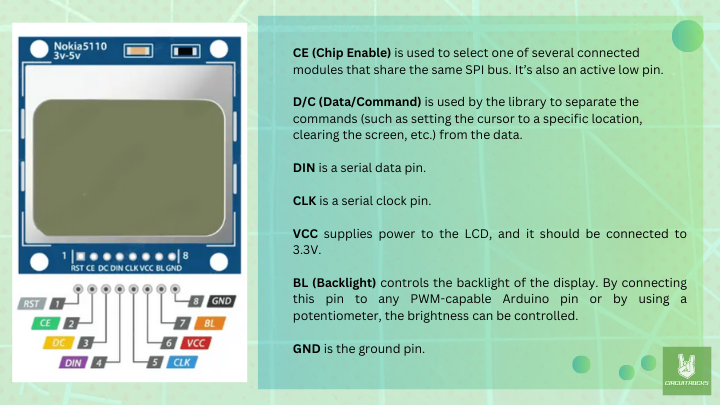
The following diagram shows the wiring.
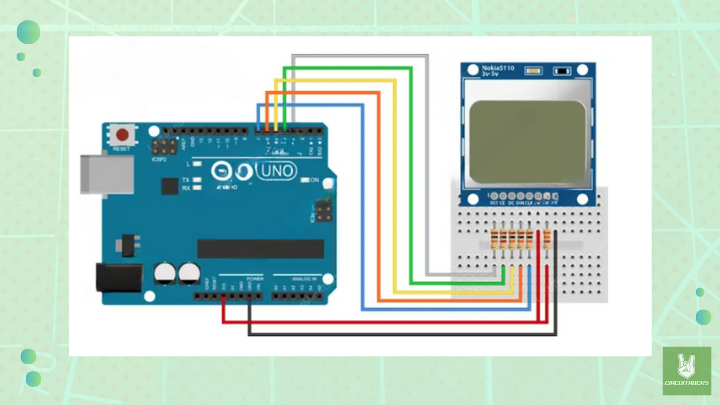
- RST (Reset): Pin 3 on the Arduino
- CE (Chip Enable): Pin 4 on the Arduino
- DC (Data/Command): Pin 5 on the Arduino
- DIN (Data Input): Pin 6 on the Arduino
- CLK (Clock): Pin 7 on the Arduino
- VCC: Connect to 5v Arduino
- GND: Connect to GND
Notes:
- Download and install these through the Arduino Library Manager in the IDE. Go to Sketch > Include Library > Adafruit GFX Library and Adafruit PCD8544 Library
- If your screen is blank or the display is too dim, adjust the contrast in the code (
display.setContrast(value)). Values typically range from 40 to 60.
Code:
Setting up the Nokia 5110 display is simple. It connects to the Arduino using the SPI protocol, with just five pins. To control the display, you’ll need to install the Adafruit GFX and Adafruit PCD8544 libraries. One important step is adjusting the screen contrast using the setContrast() function to make sure the text and graphics are clear.
This guide helps you set up and use the Nokia 5110 display and integrate it into future projects. With a little practice, you can transform your Arduino-based projects by adding clear, informative, and engaging displays.
#include <SPI.h>
#include <Adafruit_GFX.h>
#include <Adafruit_PCD8544.h>

// Declare LCD object for software SPI
// Adafruit_PCD8544(CLK, DIN, D/C, CE, RST);
Adafruit_PCD8544 display = Adafruit_PCD8544(7, 6, 5, 4, 3);

void setup() {
    Serial.begin(9600);

    // Initialize Display
    display.begin();

    // Set contrast for best viewing
    display.setContrast(57);

    // Clear the buffer
    display.clearDisplay();

    // Display Stars
    display.setTextSize(2);
    display.setTextColor(BLACK);
    display.setCursor(0, 0);
    display.println("*****");
    display.setCursor(0, 16);
    display.println("*****");
    display.display();
    delay(2000);
    display.clearDisplay();

    // Display "I Love CircuitRocks"
    display.setTextSize(1);
    display.setTextColor(BLACK);
    display.setCursor(0, 0);
    display.println("I Love");
    display.setTextSize(2);
    display.setCursor(0, 16);
    display.println("Circuitrocks");
    display.display();
    delay(3000);
    display.clearDisplay();

    // Display "Message us on FB @circuitrocks"
    display.setTextSize(1);
    display.setTextColor(BLACK);
    display.setCursor(0, 0);
    display.println("Message us on");
    display.setCursor(0, 10);
    display.println("FB @circuitrocks");
    display.display();
    delay(3000);
}

void loop() {
    // No further actions in the loop
}

