

LoRa is a wireless communication known for its long range capability. But what if the distances between sensor nodes are farther than the range you can achieve with LoRa.
That’s when you need a LoRa Mesh network. A mesh network is not a network in the typical star topology where every node is connected to a central station (with WiFi that would be an access point, with LoRa that would usually be a gateway). Instead every node knows about all other nodes in the network, even if two nodes cannot communicate directly with each other because they are too far away from each other.
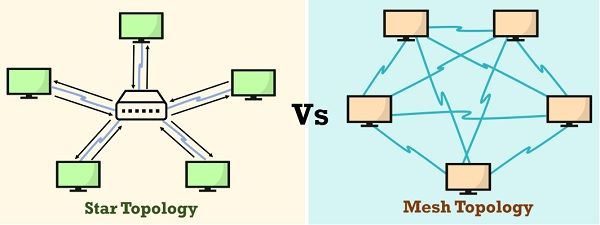
There is a nice article that compares both network topologies on TechDifferences. And of course there is something about Mesh networks on Wikipedia.
Before you go on!
Scope of the tutorial:
This tutorial will just create a simple Mesh network that sends randomly messages to other nodes within the Mesh network. There is no data structure or gateway functions to other networks like GSM or WiFi.
The goal here is to have a working core Mesh network that can be used to build up a second layer of communication which can be anything you want to do, e.g. a network of sensors that send out their sensor data.
Target hardware:
The code is written to work on either an ESP32 or a nRF52 microcontroller and is not compatible with other microcontrollers. The LoRa transceivers used are Semtech SX1262 transceivers. They are either connected to the microcontroller as a Adafruit Feather compatible breakout (Circuitrocks Alora RFM1262) or integrated into a SOC together with a Nordic nRF52 (Insight ISP4520).
And another important thing:
This code is NOT written to work with the ArduinoIDE. It is structured to be compiled under PlatformIO using one of the IDE’s supported by PlatformIO. My favorite is Visual Studio Code.
The heart of a Mesh network
To be able to communicate from any node in the network to any other one, each node has its own router. The router builds a map that is based on the nodes that are in reach (visible to the node). In addition it holds routes in the map about nodes that are not in reach (invisible to the node), the distance to this invisible node and which visible node can be used to reach the invisible node.
Building up the routing map
In order to build this map of the Mesh network, each node distributes its map of visible nodes to all its neighbours. Let’s imagine you have 4 nodes, called A, B, C and D. In this small network, A can only communicate with B, but nodes C and D are too far away. B can see all other nodes, while D and C sees only each other and B.
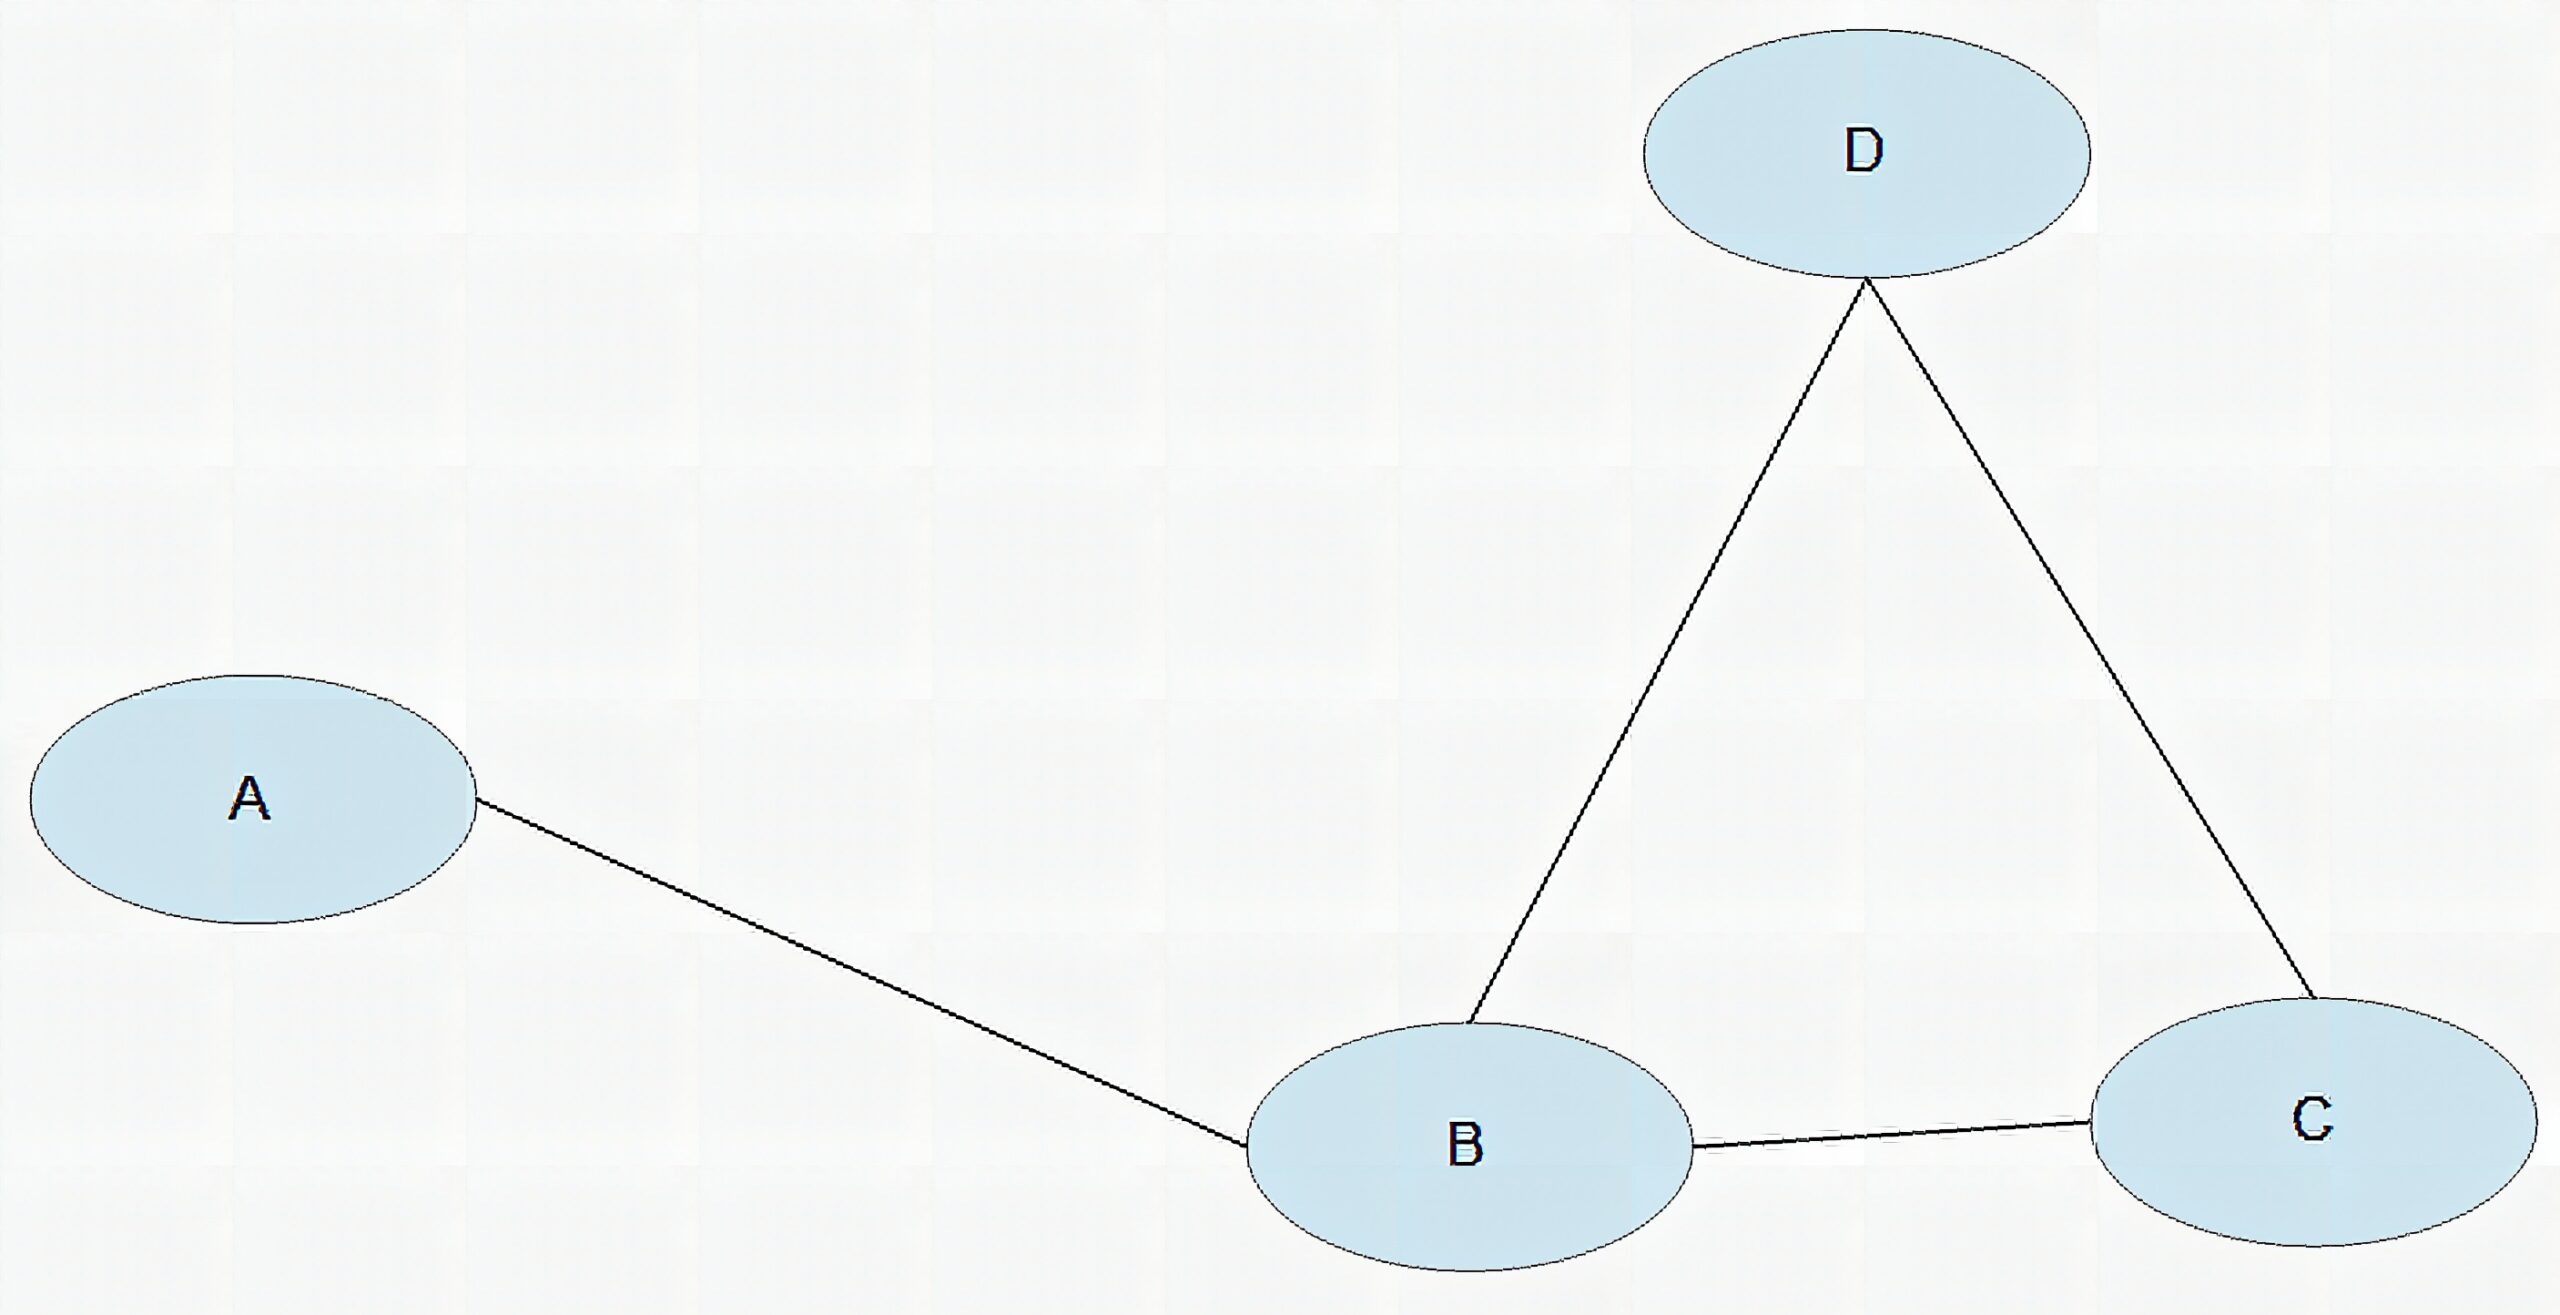
When the nodes start broadcasting their maps, in the beginning, each of them will only broadcast a map with the nodes it can see.
1st broadcast
A‘s map contains only B
B‘s map contains A, C and D
C‘s map contains B and D
D‘s map contains B and C
When A receives the map from node B, it adds nodes C and D as additional nodes into it’s map not as direct nodes, but as indirect nodes with an information about the distance (hops) to the node and a route address, which is the node that he got the map from. Same for nodes C and D. They will add node A into their map, but with B as route address and a distance of 1.
2nd broadcast
A‘s map now contains B and with a hop value of 1 the nodes C and D. Nodes C and D as well are entered with node B as their first hop address.
B‘s map is unchanged and contains A, C and D
C‘s map now contains B and D and in addition node A with a hop value of 1 and node B as the first hop address.
D‘s map now contains B and D and in addition node A with a hop value of 1 and node B as the first hop address.
So now node A knows, if it wants to send data to node C or D, it has to send it first to node B, which then forwards the message to the receiver node.
Add more nodes
Now lets make it a little bit more complicated and add another node E. E can only communicate with C and D, but it cannot communicate with A or B
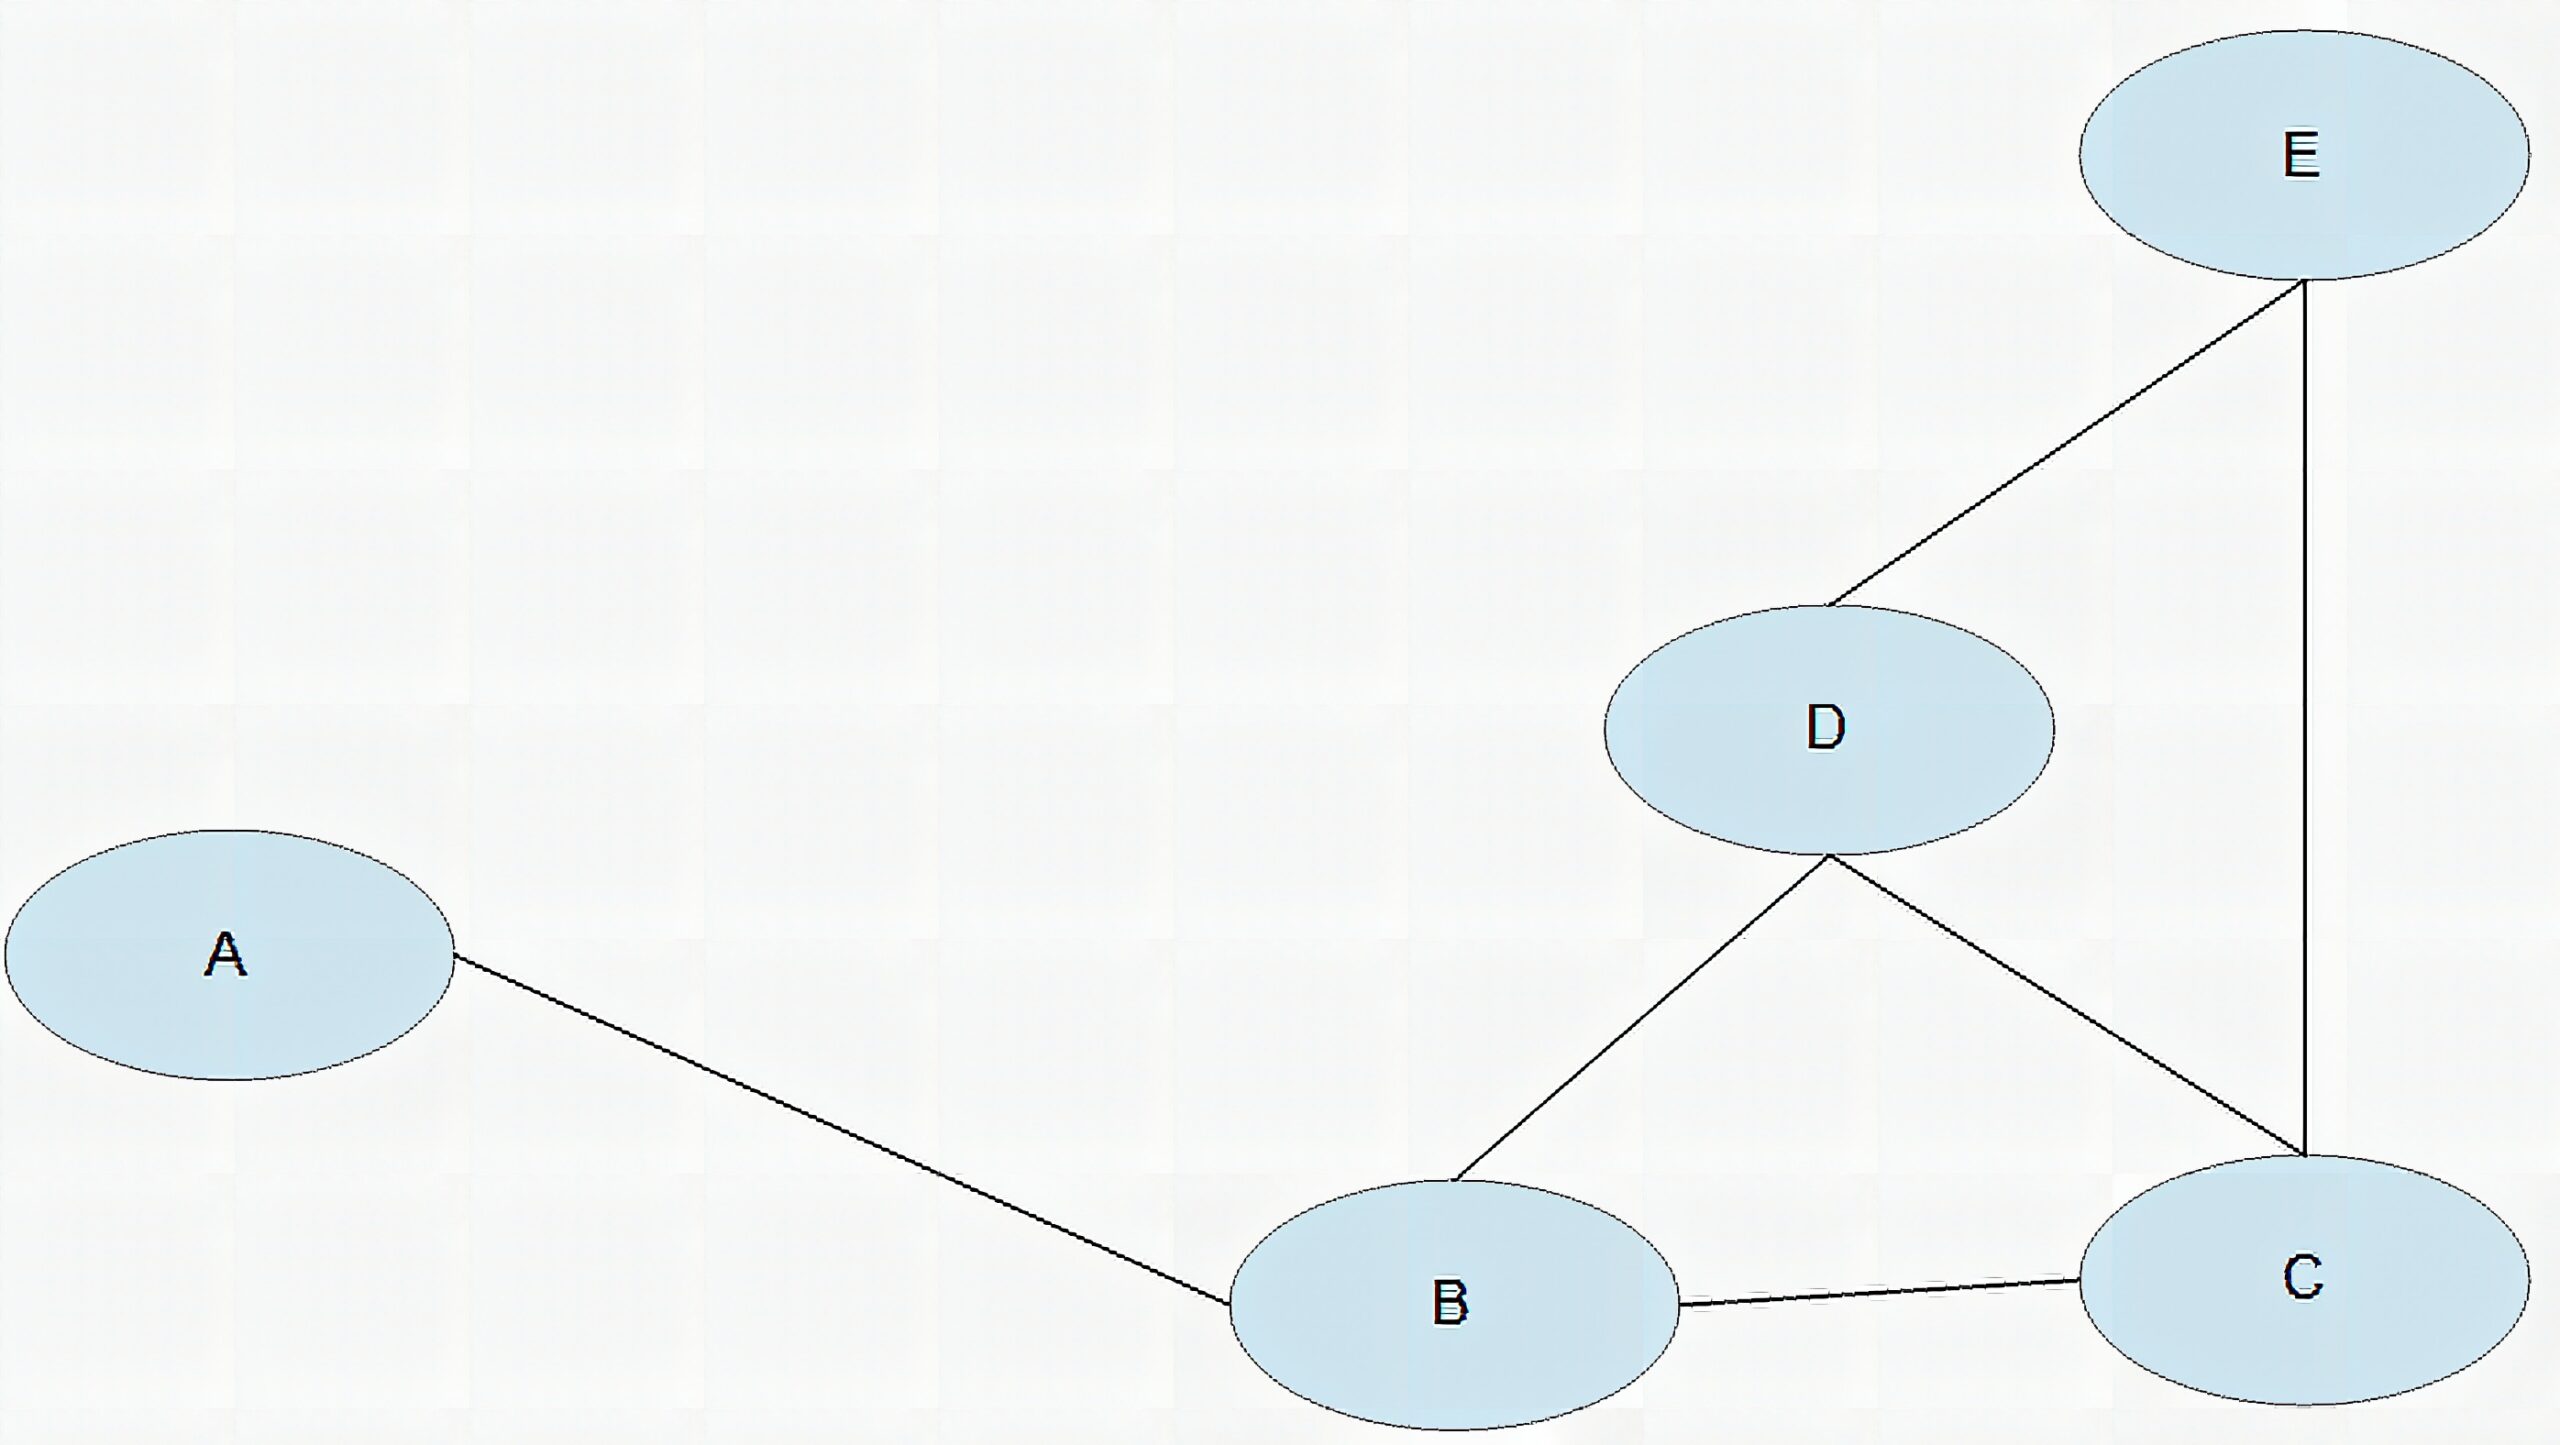
After the map is build it would look in each node like
Map of A
B with hops 0 and no route address
C with hops 1 and route address B
D with hops 1 and route address B
E with hops 2 and route address B
Map of B
A with hops 0 and no route address
C with hops 0 and no route address
D with hops 0 and no route address
E with hops 1 and route address C
Map of C
A with hops 1 and route address B
B with hops 0 and no route address
D with hops 0 and no route address
E with hops 0 and no route address
Map of D
A with hops 1 and route address B
B with hops 0 and no route address
C with hops 0 and no route address
E with hops 0 and no route address
Map of E
A with hops 2 and route address D
B with hops 1 and route address C
C with hops 0 and no route address
D with hops 0 and no route address
Now node E knows, that if he wants to send data to node A, it has to send the package first to node D. Node D receives the data, and will forward it to node B. Finally node B will send the data to node A.
Restrictions:
Some restrictions you need to be aware off when you start playing around with the LoRa Mesh software.
- LoRa is slow and frequency of sending data is limited by local regulations. Therefor the Mesh network takes some time (specially if you have many nodes) to build up its complete map in each node. After reboot a nodes starts to send its own map every 30 seconds for the first 5 minutes. After that it resend its map only every 60 seconds to lower the traffic in the network.
- The size of the data package is limited. The SX126x has a send buffer of only 256 bytes (and some bytes are reserved to the CRC checksum). So the maximum size of a data package is limited to 250 bytes.
- The number of nodes in the Mesh network is limited. Because of the limited size of the send buffer the map cannot contain more than 48 nodes.
- Package receive is not confirmed. With the code in this tutorial, a data package can get lost at any node. If you need to make sure that a data package was received by the targeted node, you need to build an acknowledge functionality on top of this sample code.
- Keep the amount of data packages limited in size and frequency of sending. Again this is to comply with local regulations, but it as well keeps the Mesh network stable and avoids data collisions which lead to loss of packages.
More restrictions
This code is written to work on ESP32 and nRF52 microcontrollers only. It is using task and message queue technologies that are only available in FreeRTOS. But the code is using the Arduino framework, so it is easy to understand.
It will take some effort to get this code to run on simple AVR, SAM or ESP8266 microcontrollers.
FreeRTOS
To keep the main application free from handling the Mesh events, a Mesh handler is running as its own FreeRTOS task. This way the main application does not need to call a function from its main loop to handle the Mesh. If the main application wants to send a data package to a specific node, it just has to call a function of the Mesh handler to put the data package into a queue which will be handled by the Mesh task to make sure data packages are not colliding with sending of map information or receiving of data from other nodes.
To achieve above independence between the main application and the Mesh handler, several functions of FreeRTOS are used.
- As already said, an independent FreeRTOS task is started and running in parallel to the Arduino loop() to handle all Mesh events.
- To make sure that data is sent without colliding with an attempt to broadcast a Mesh map or interrupting an ongoing data receive, a FreeRTOS queue mechanism is used to manage outgoing packages.
- To make sure that map data is not changed while accessed from the main app, FreeRTOS semaphores are used to control the access.
But getting this independence between main app and Mesh handler comes with the cost that this example code is at the moment only working on microprocessors that are running FreeRTOS.
Testing
I tested this software with a Mesh network of 12 nodes. 6 nodes were build with ESP32’s and 6 nodes were build with nRF52’s. All nodes were using the SX1262 LoRa transceiver chips.
To simulate isolation between certain nodes, the code includes filtering of incoming maps based on node ID’s. The test network (with isolation between certain nodes) looks like this:
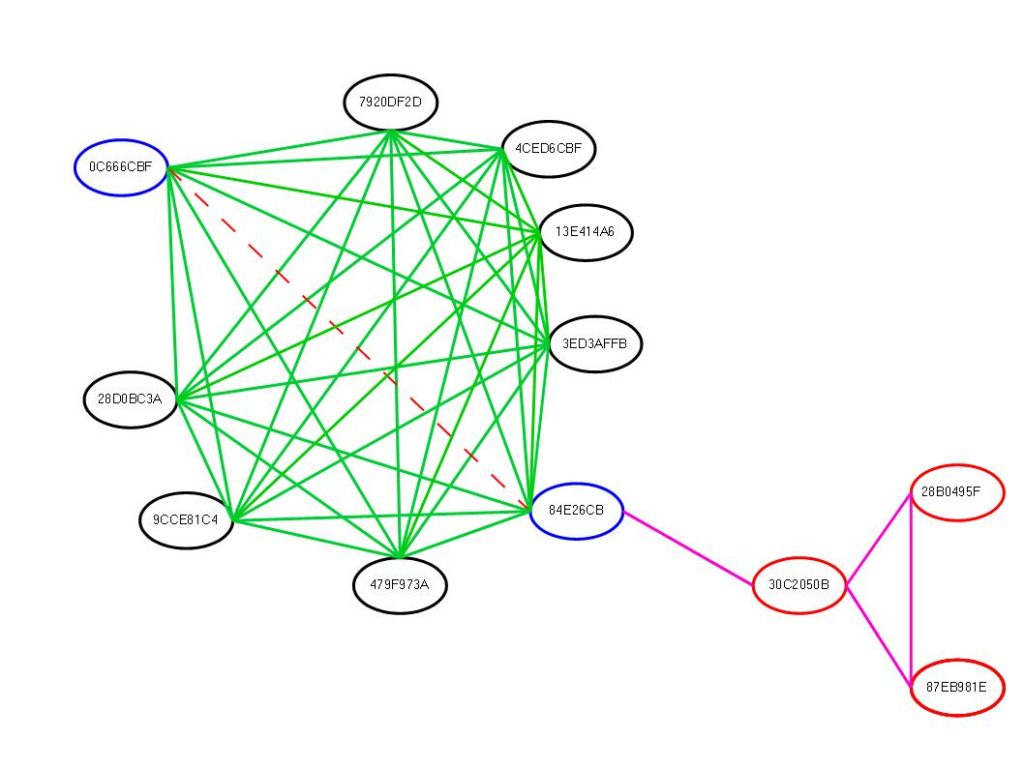
As you can see, there are 9 nodes (Black and Blue circles) on the left side, where nearly every node can see each other. The only exception are the nodes 0C666CBF and 84E26CB, which cannot see each other.
On the right side is another bunch of 3 nodes (Red circles) that can see each other, but only node 30C2050B can see one node of the left group, the node 84E26CB.
To test the network. every node selects randomly another node from the Mesh network every 30 seconds and sends a data package to it. The receive of the data package is NOT confirmed, I only checked it with recorded logs from the serial output of the nodes.
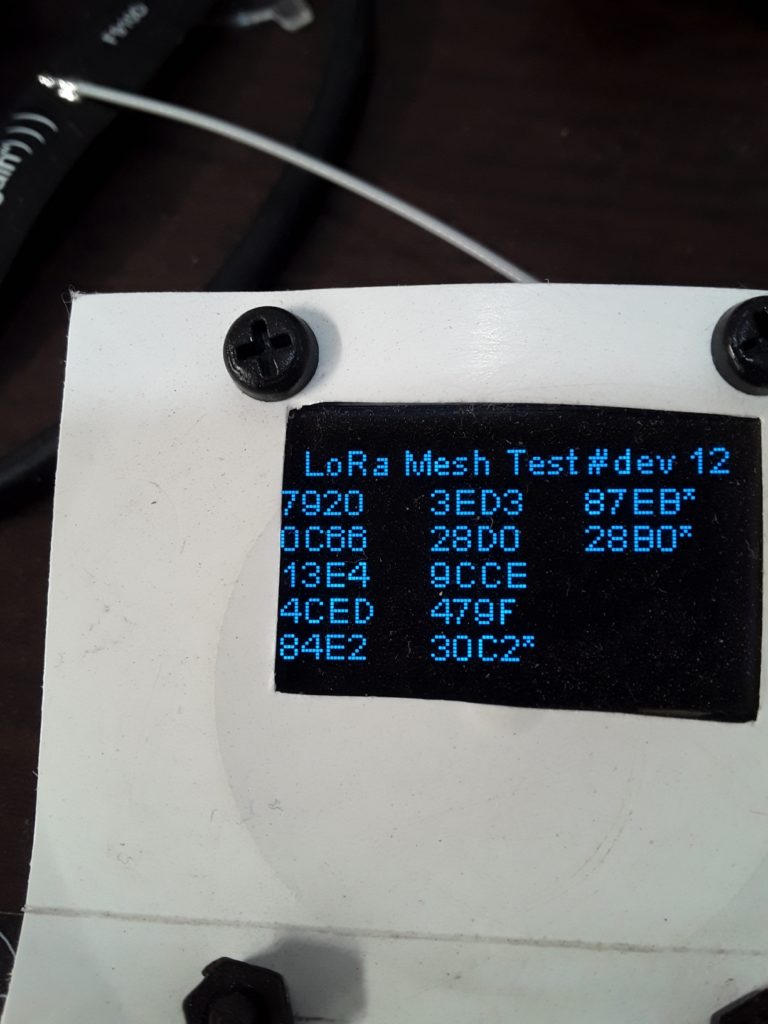
In addition I equipped one of the nodes with a display that permanently shows the map to check visually if all nodes in the network are mapped.
The display node
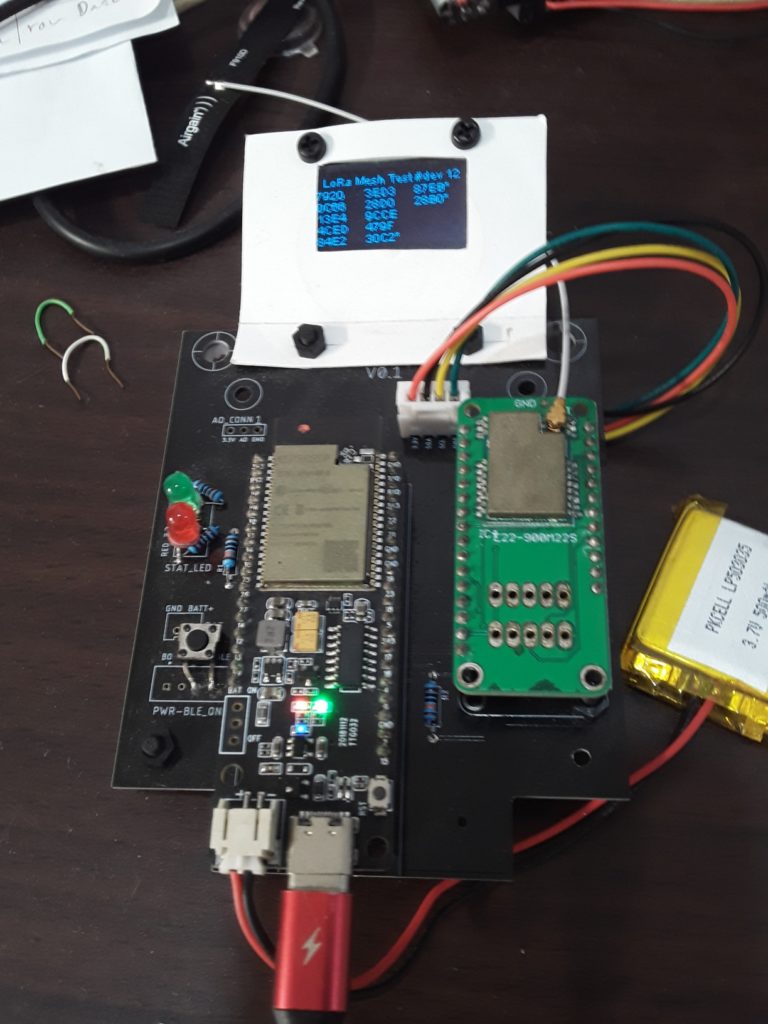
The Feather ESP32 nodes
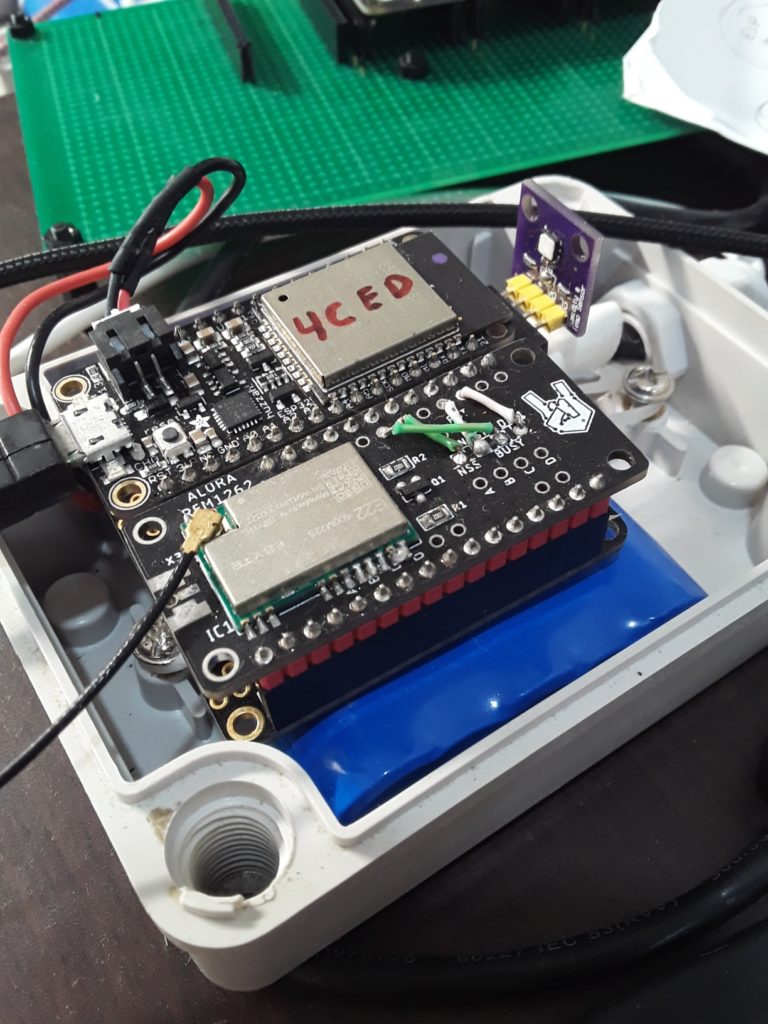
The nRF52 nodes

This test setup was running for nearly a week without major problems. As I needed some of the modules for other developments, frequently some nodes disappeared from the Mesh network. Other nodes in the network could adapt their map and the Mesh continued to function. After putting the node back into the Mesh the rebuild of the map worked as well.
Frequently Asked Questions
What does this Alora RFM1262 tutorial cover?
LoRa is a wireless communication known for its long range capability.
What's the working voltage of the Alora RFM1262?
Check the Sample Code section for the exact pinout — most maker-grade sensors run on 3.3V or 5V. Wire VCC to the matching rail, GND common with your MCU, data to a digital or analog pin.
Why does the Alora RFM1262 read garbage or saturated values?
Three usual causes: wrong voltage rail, missing pull-up resistor on I2C lines (4.7k–10k to VCC), or a floating data pin. Double-check wiring against the diagram, then probe with a multimeter.