
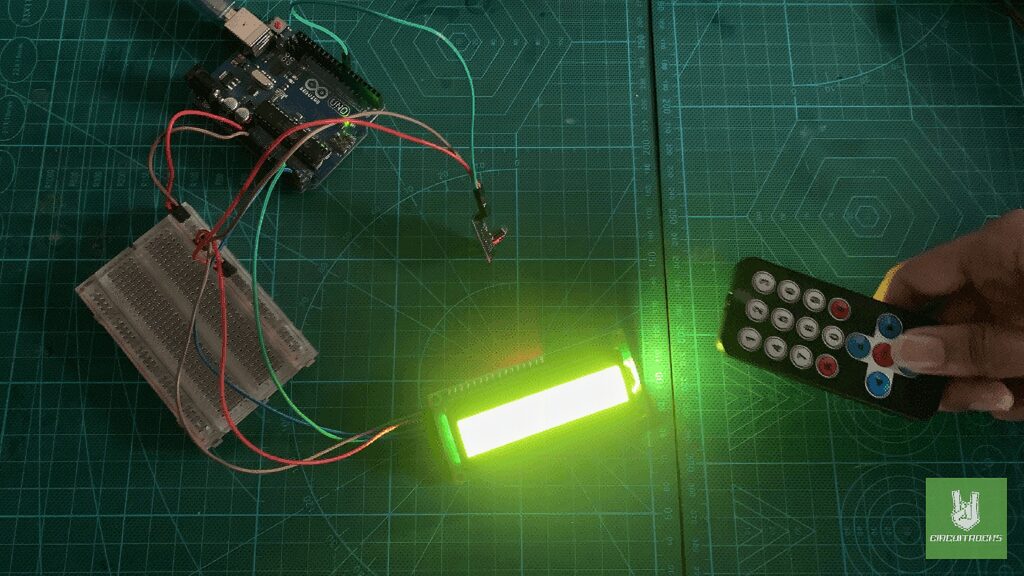
An Arduino LCD IR Remote Control Display is where an infrared, remote and LCD combined. Through this, students will get a chance to work with Arduino hardware and programming. They will learn how to make Arduino microcontroller respond to the IR signals. From a remote control that displays information on the LCD screen.
This system uses an Arduino board to create a remote-controlled display. When you press a button on an remote. The IR receiver on the Arduino detects the signal and tells the Arduino which button was pressed. Then uses this information to display a message on LCD screen.
Furthermore, this project is important for beginners as it demonstrates the real-world applications of Arduino. It shows how Arduino can be used to create interactive systems that respond to user inputs, laying the groundwork for more complex projects. Additionally, this project encourages beginners to explore the possibilities of Arduino and inspires them to pursue further learning in electronics and programming.
Components
Connection:
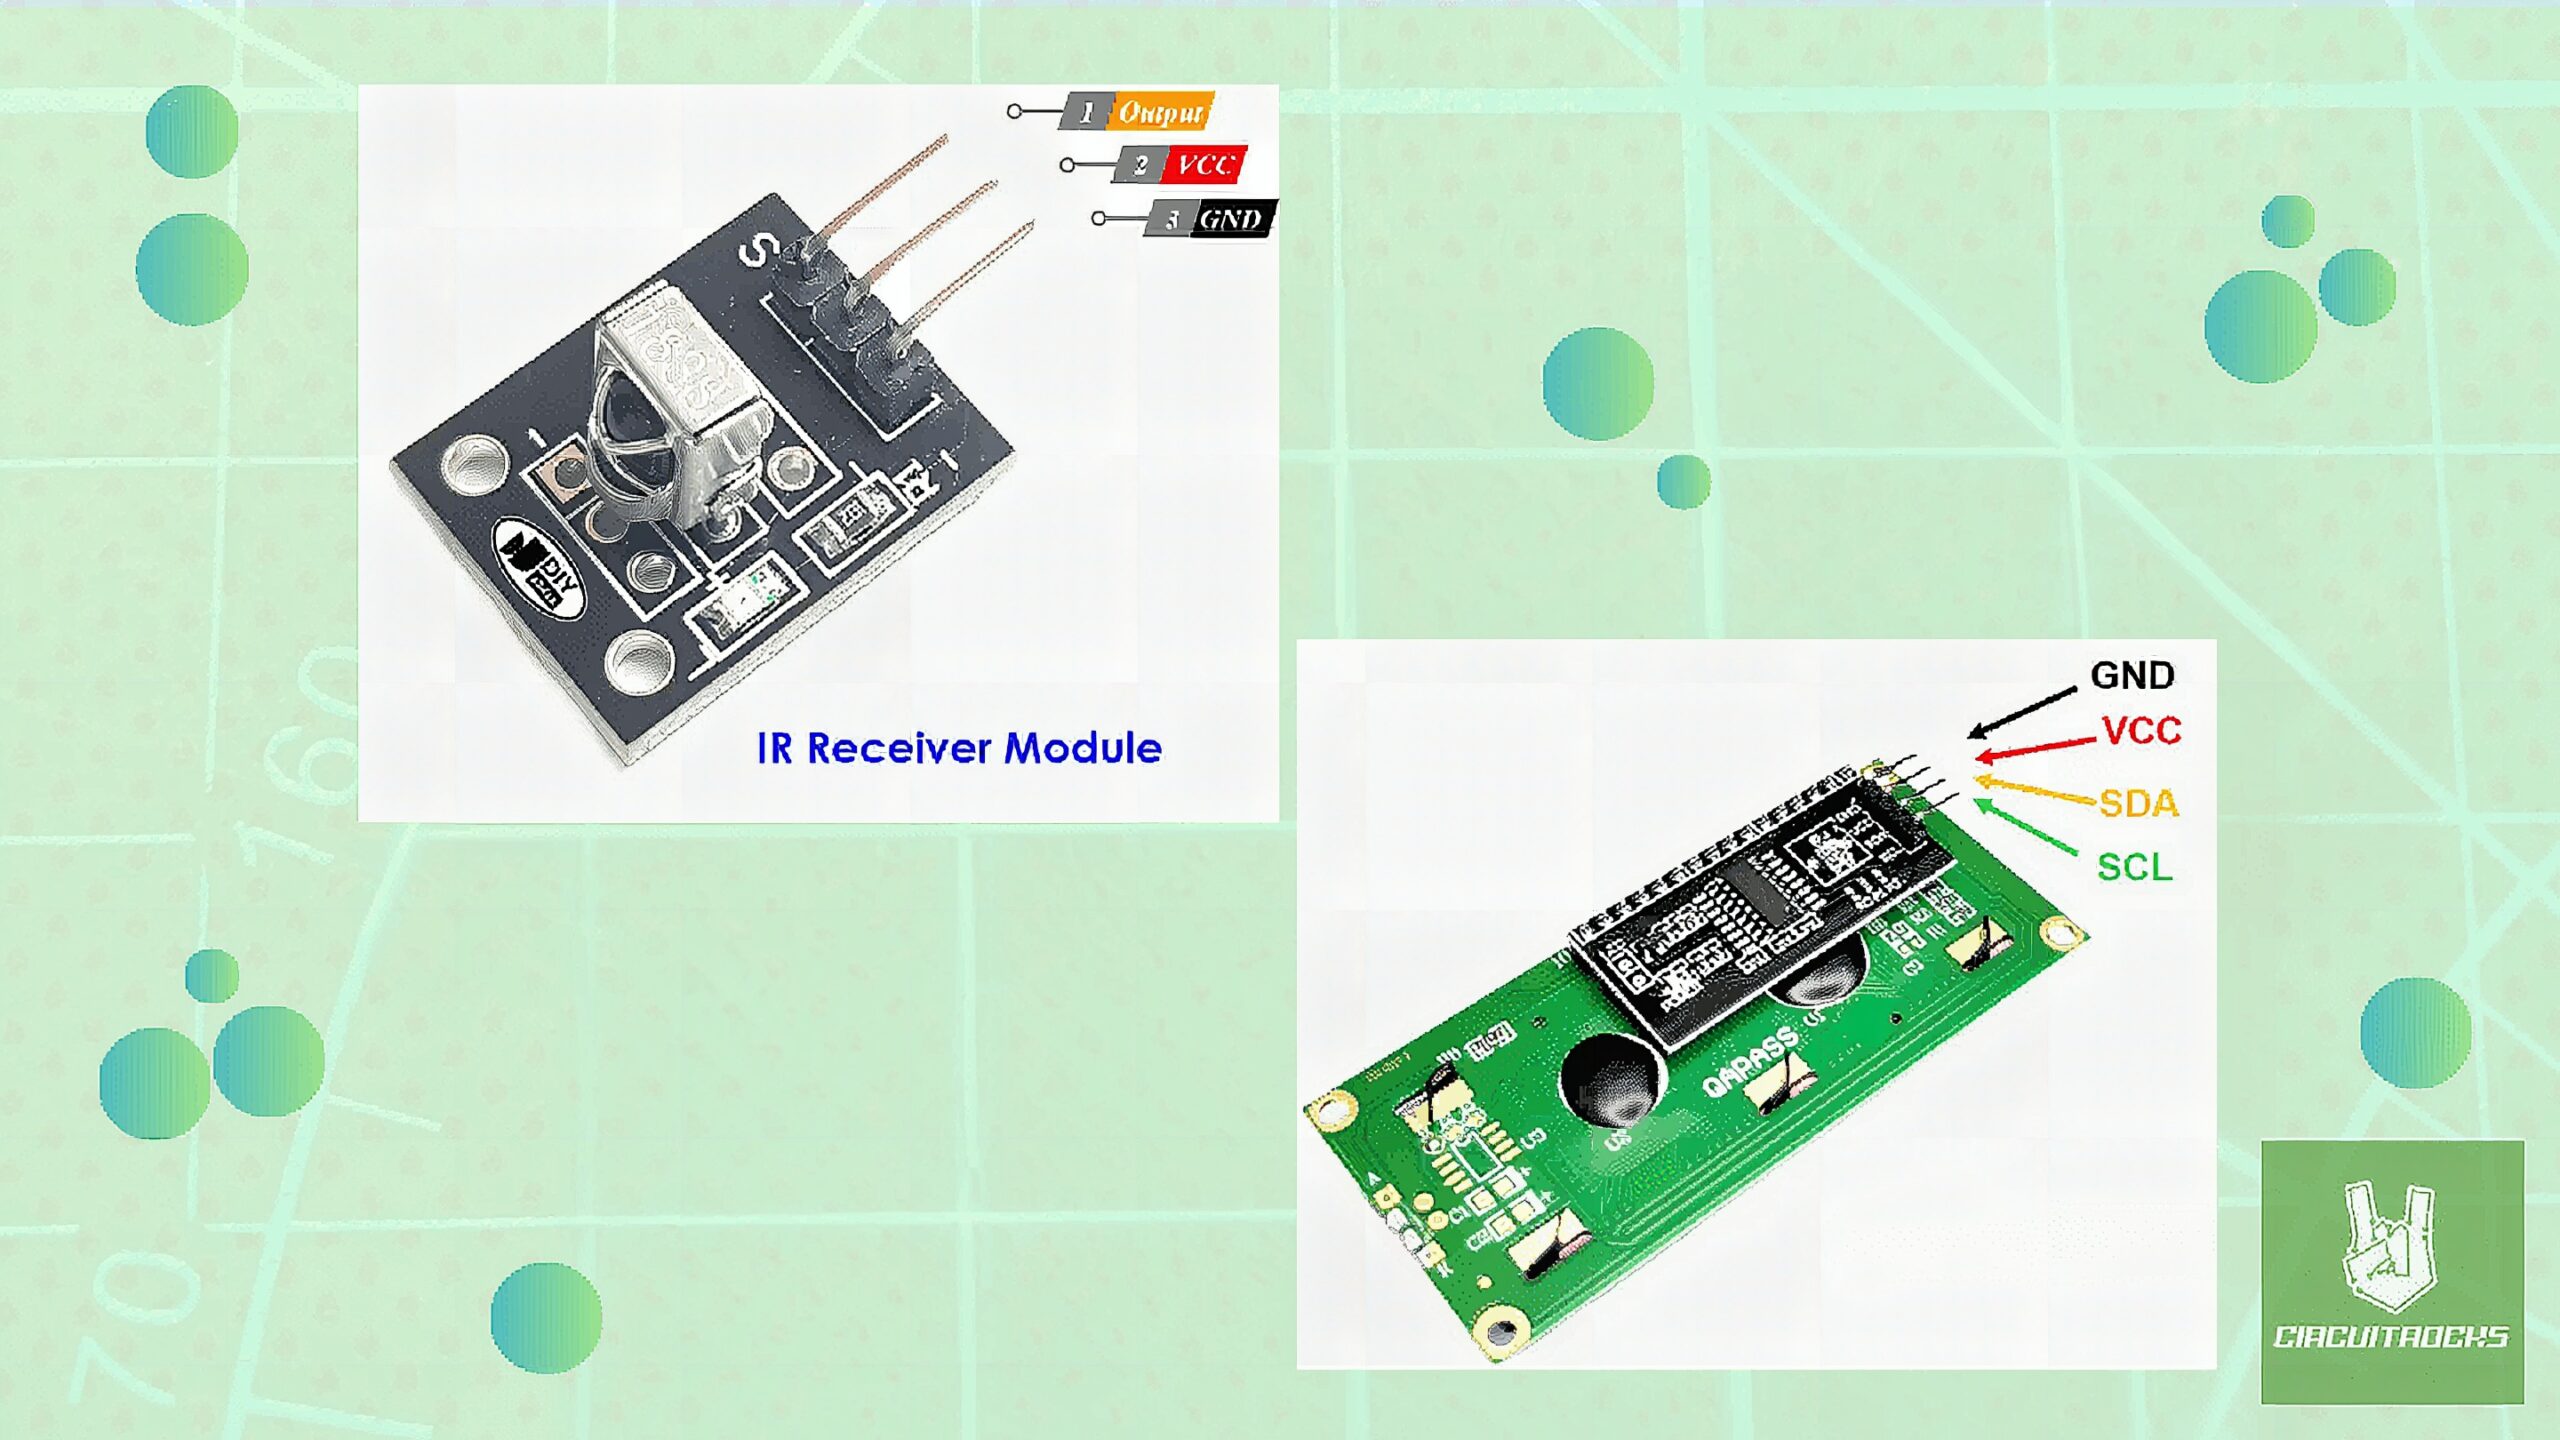
The IR receiver module typically has three pins: VCC, GND, and OUT. Meanwhile, LCD display with an I2C module also typically has four pins: VCC, GND, SDA, and SCL.
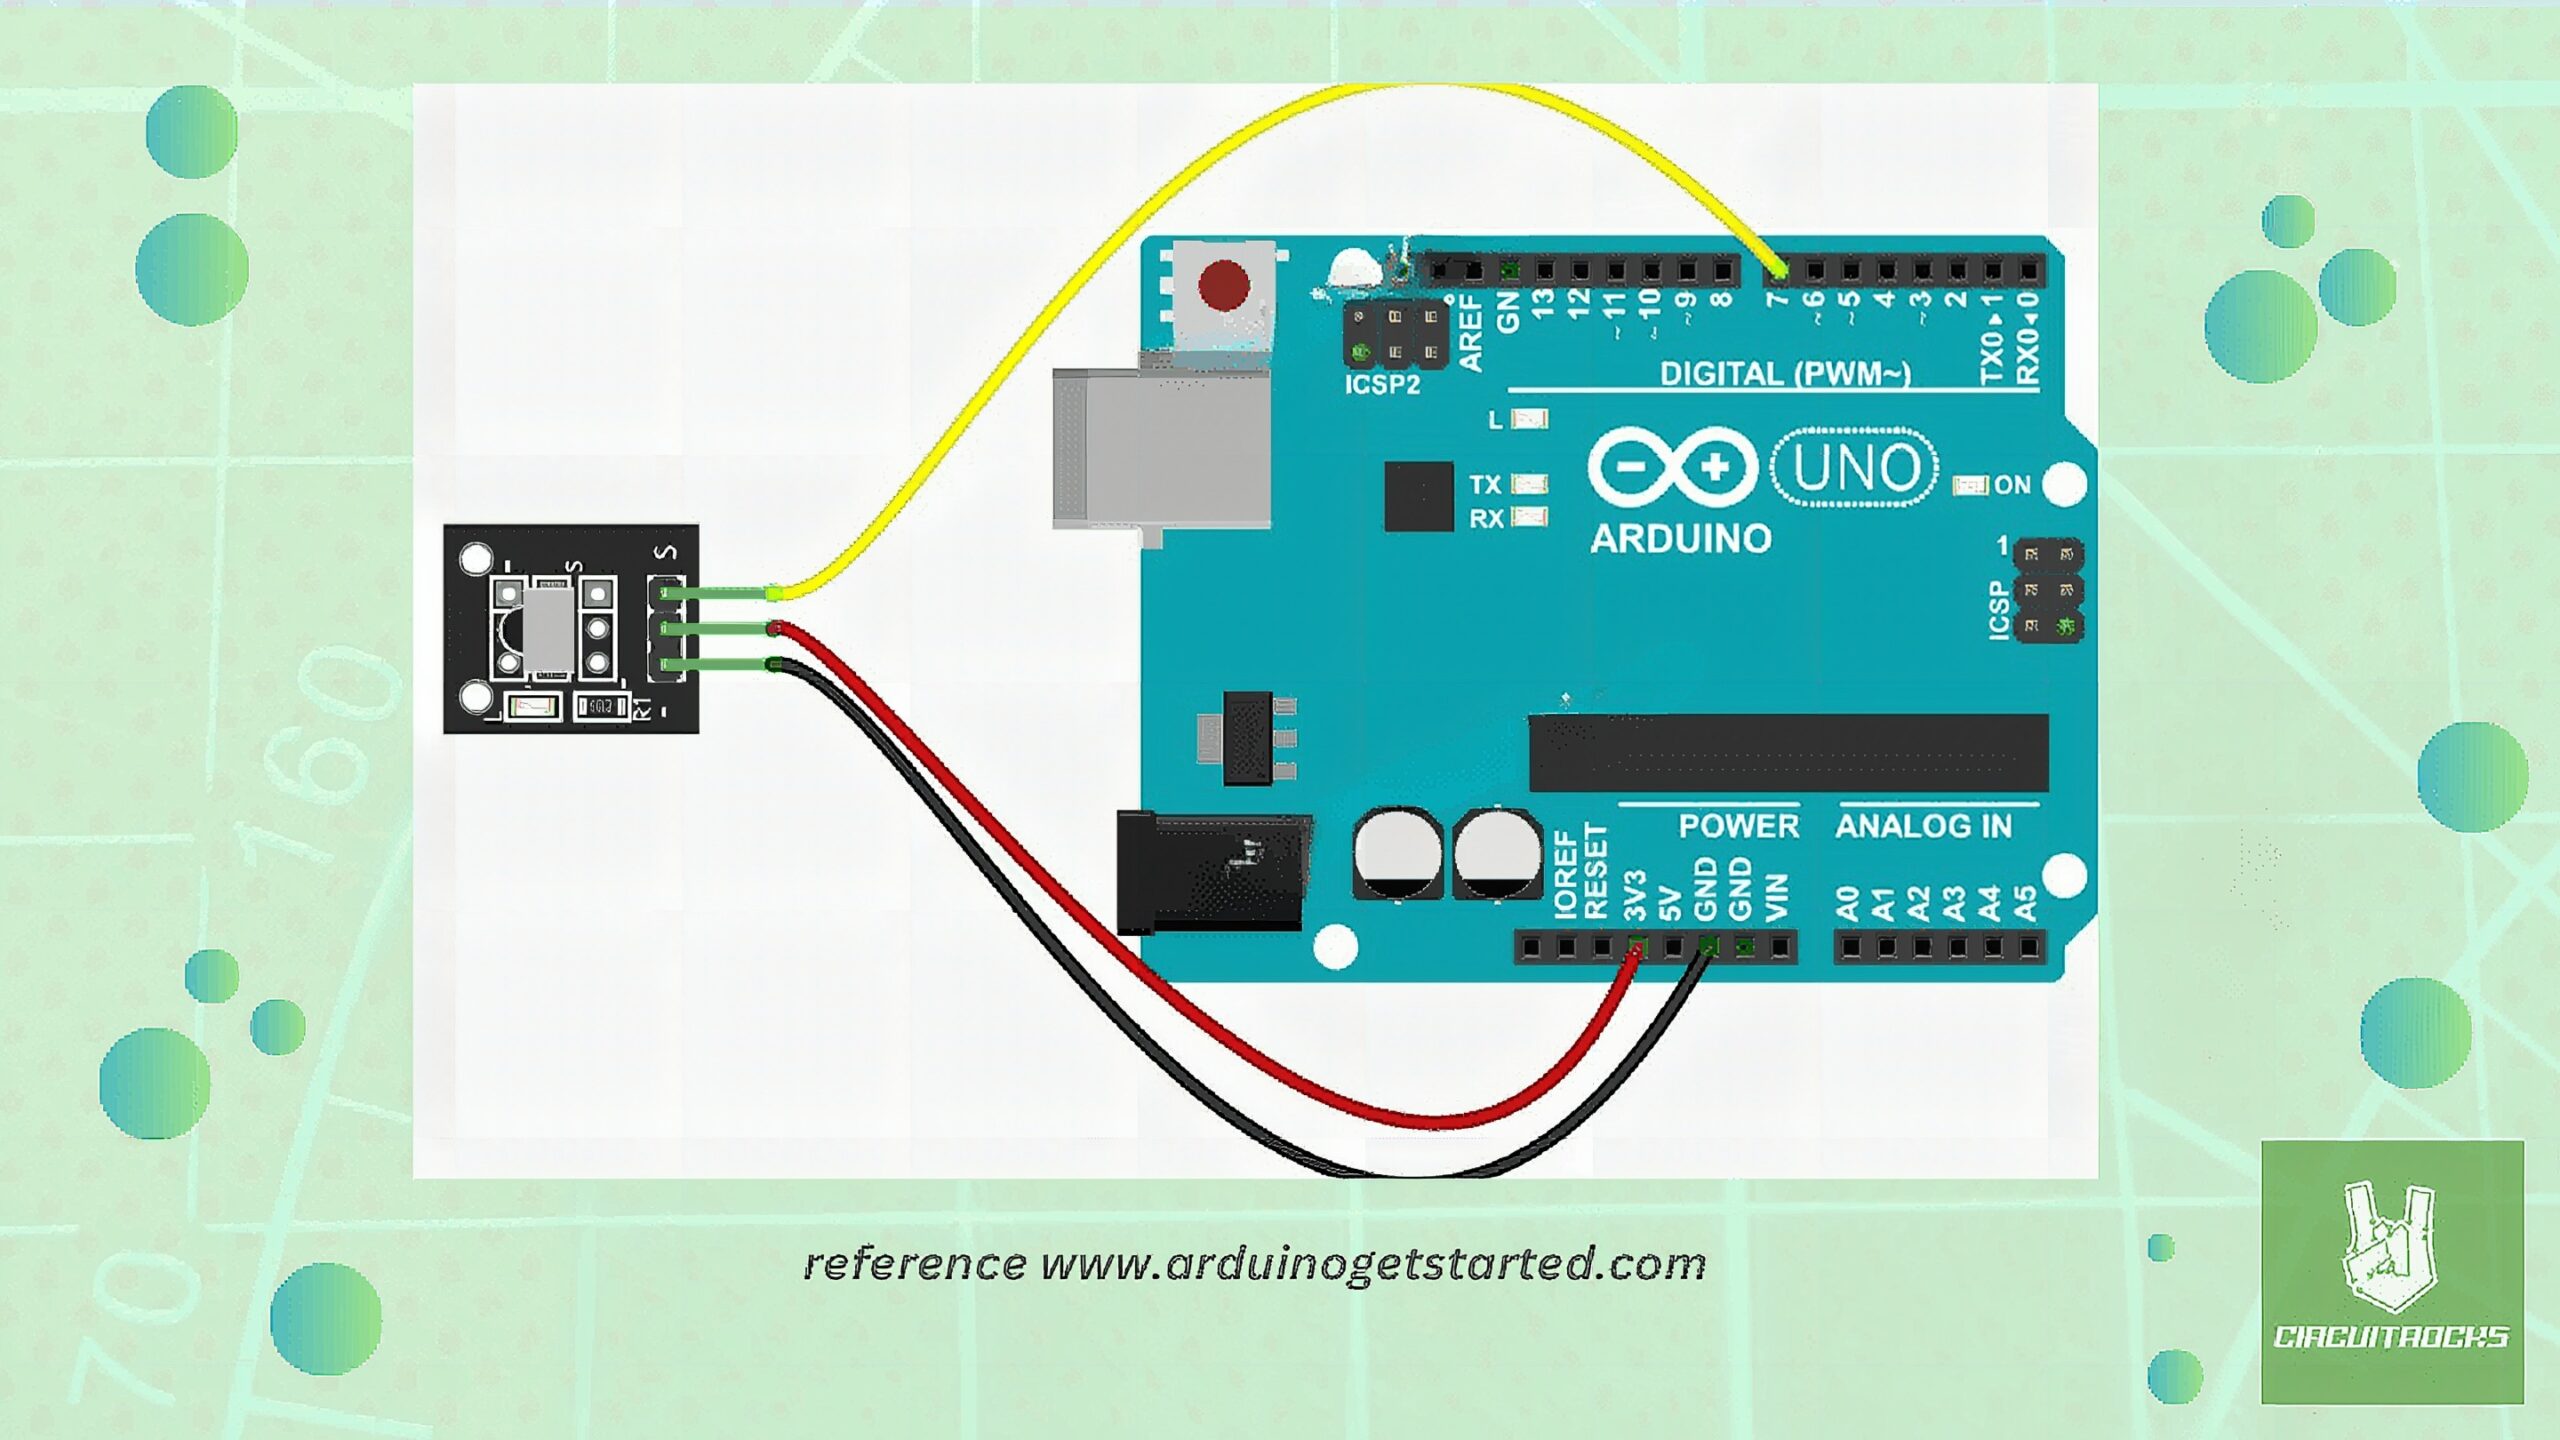
IR Receiver:
- VCC connected to the 5V output on the Arduino.
- GND connected to one of the Arduino’s GND pins.
- OUT pin connected to a Digital 7 pin on the Arduino configured to receive IR signals.
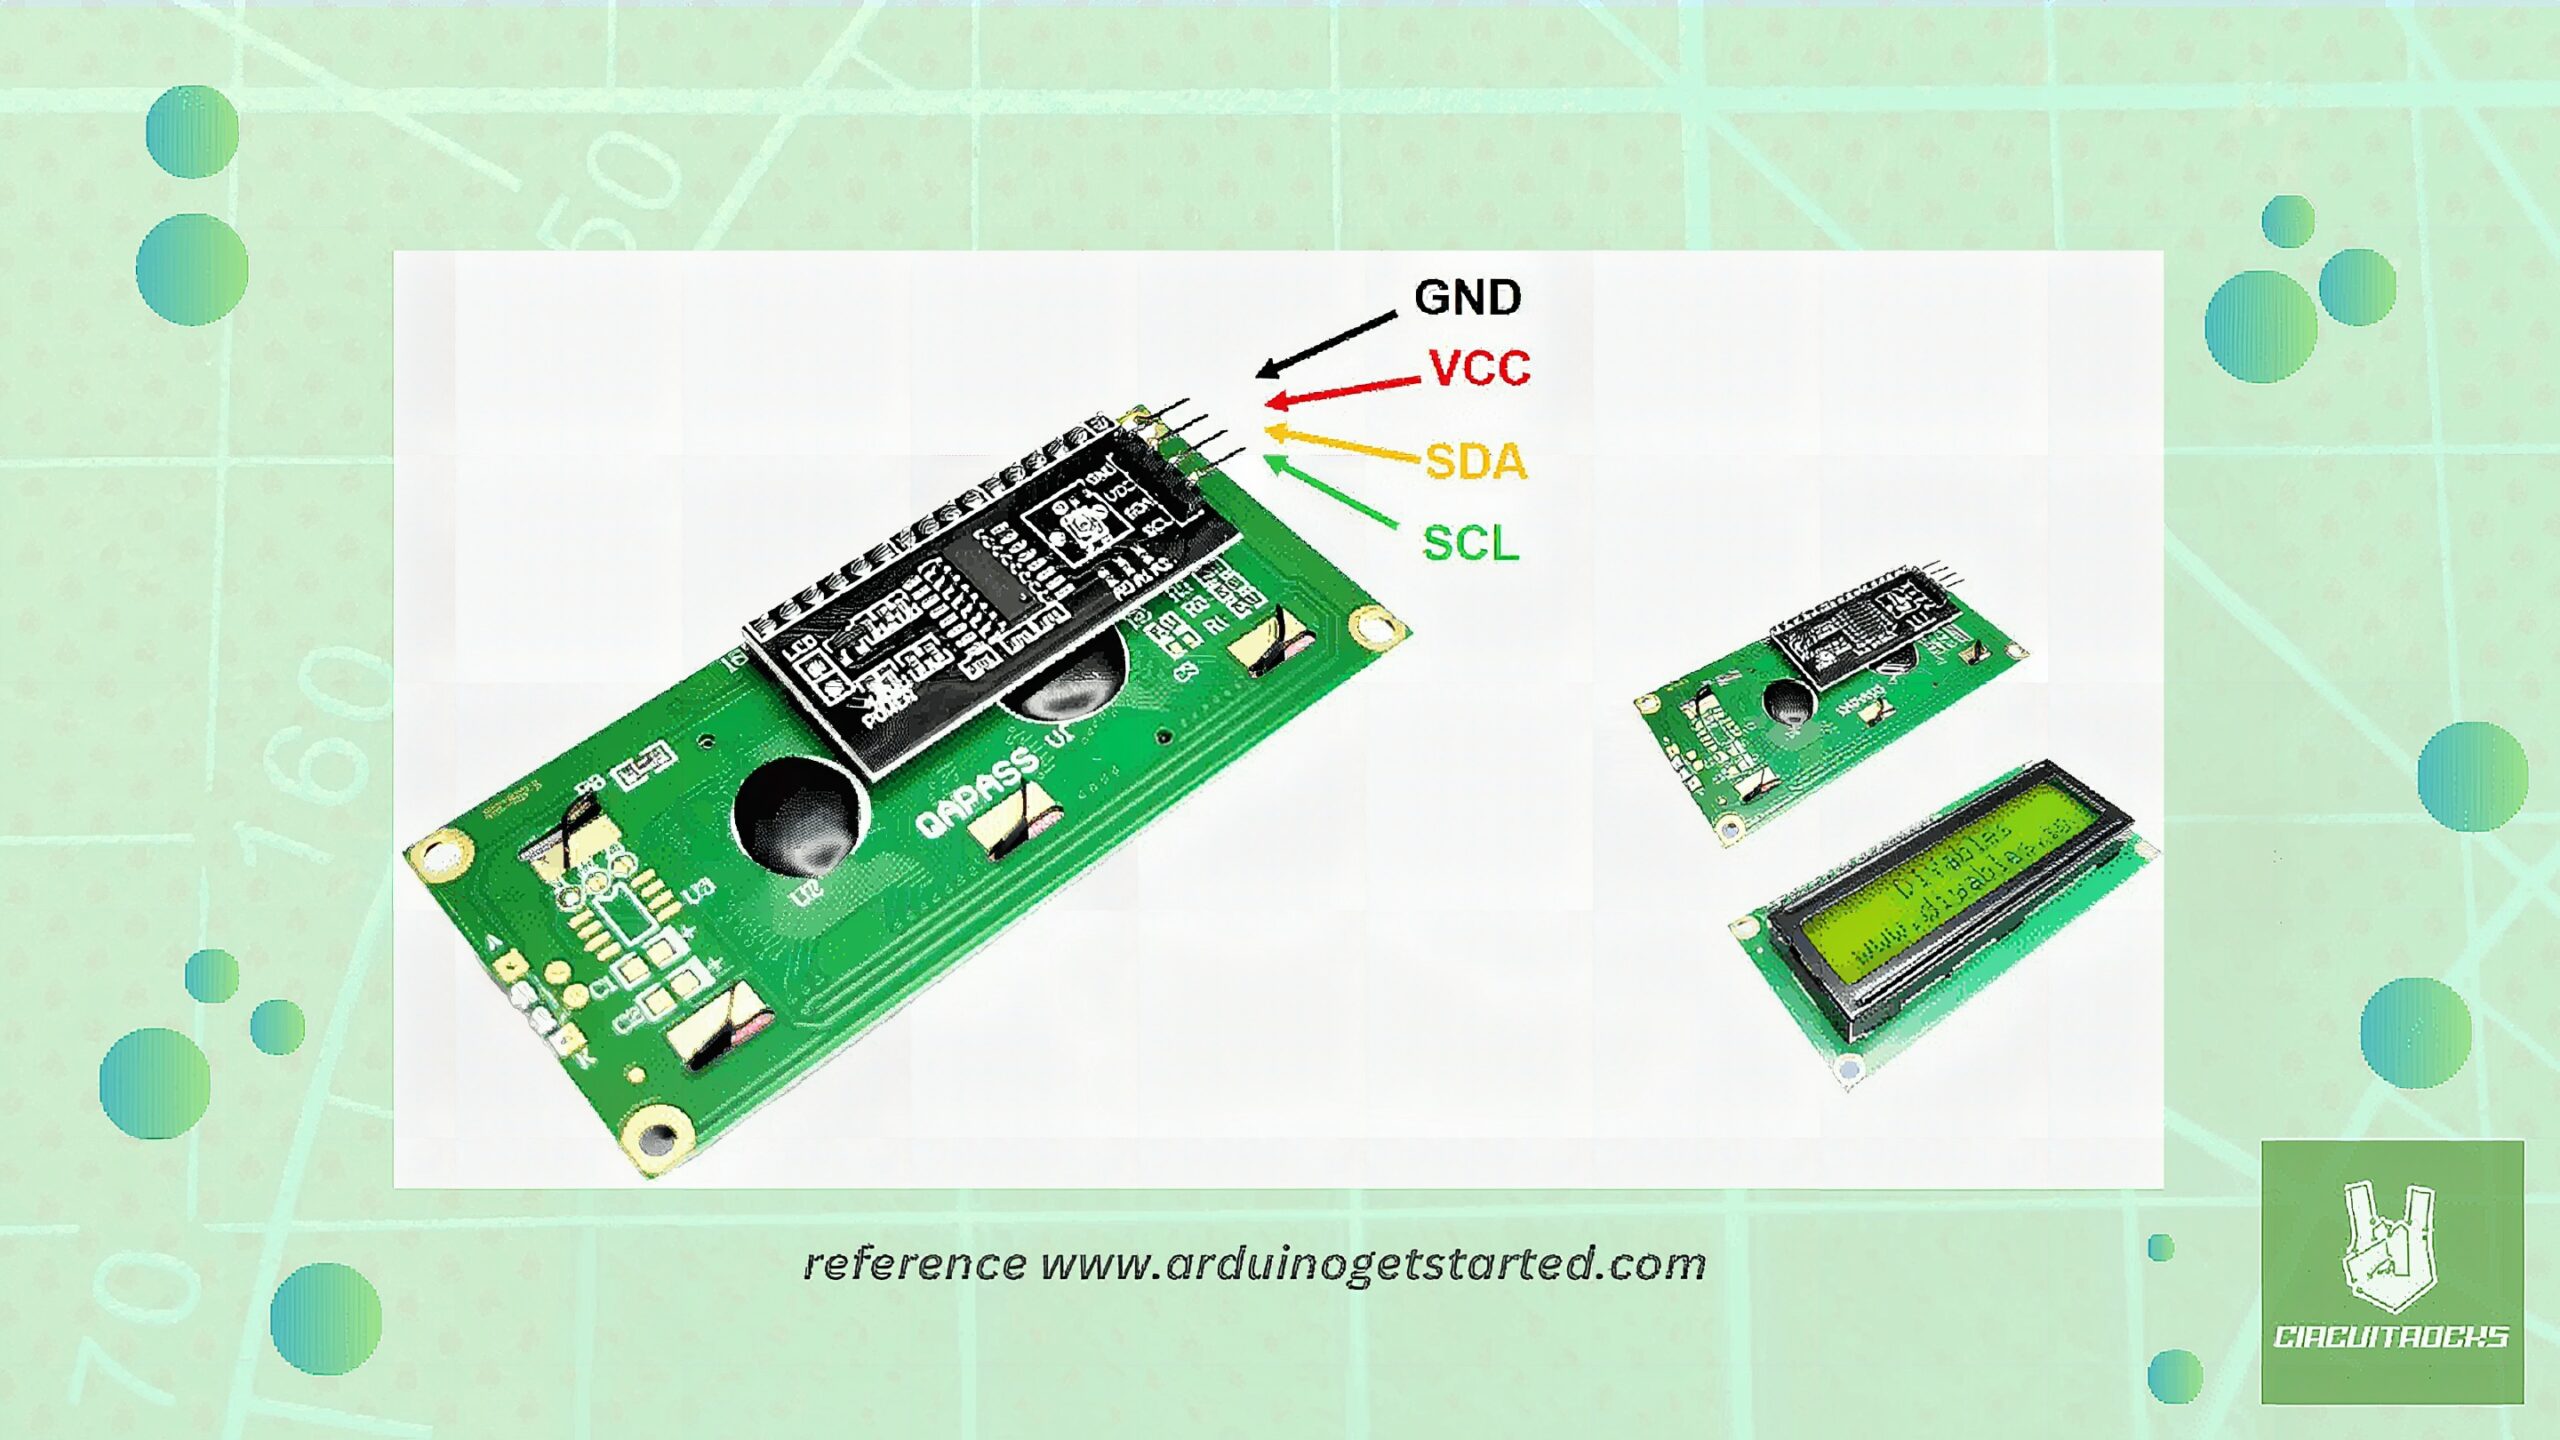
LCD Display I2C Module:
- VCC goes to the 5V on the Arduino.
- GND connects to the Arduino’s ground.
- SDA (Serial Data Line) connects to the A4 pin.
- SCL (Serial Clock Line) connects to the A5 pin.
To simplify wiring, you can use a breadboard to distribute power to both the IR and LCD.
Note:
Install the following libraries:
- LiquidCrystal_I2C – is used for controlling I2C LCD displays. It simplifies managing the display through the I2C bus.
- DIYables_IRcontroller – used to create an instance of an IR controller with specified debounce time, read which button is pressed, and then take action based on that input.
Code:
In the code, a signal received will be deciphered by the Arduino and after this will print on the display screen the button that was pressed. In case if an undefined key is pressed, a warning notification will appear. Generally, the system become easy to use and interactively operate the data with a remote control that is infrared and Arduino board.
#include <Wire.h>
#include <LiquidCrystal_I2C.h>
#include <DIYables_IRcontroller.h> #define IR_RECEIVER_PIN 7 // The Arduino pin connected to IR controller
#define BACKLIGHT_PIN 3 // LCD backlight control pin DIYables_IRcontroller_17 irController(IR_RECEIVER_PIN, 200); // debounce time is 200ms // Set the LCD address to 0x27 for a 16 chars and 2 line display
LiquidCrystal_I2C lcd(0x27, 16, 2); void setup() { Serial.begin(9600); irController.begin(); // Initialize the LCD lcd.init(); lcd.backlight();
} void loop() { Key17 key = irController.getKey(); if (key!= Key17::NONE) { switch (key) { case Key17::KEY_1: lcd.clear(); lcd.setCursor(0, 0); lcd.print("1"); break; case Key17::KEY_2: lcd.clear(); lcd.setCursor(0, 0); lcd.print("2"); break; case Key17::KEY_3: lcd.clear(); lcd.setCursor(0, 0); lcd.print("3"); break; case Key17::KEY_4: lcd.clear(); lcd.setCursor(0, 0); lcd.print("4"); break; case Key17::KEY_5: lcd.clear(); lcd.setCursor(0, 0); lcd.print("5"); break; case Key17::KEY_6: lcd.clear(); lcd.setCursor(0, 0); lcd.print("6"); break; case Key17::KEY_7: lcd.clear(); lcd.setCursor(0, 0); lcd.print("7"); break; case Key17::KEY_8: lcd.clear(); lcd.setCursor(0, 0); lcd.print("8"); break; case Key17::KEY_9: lcd.clear(); lcd.setCursor(0, 0); lcd.print("9"); break; // Ad case Key17::KEY_STAR: lcd.clear(); lcd.setCursor(0, 0); lcd.print("*"); break; case Key17::KEY_0: lcd.clear(); lcd.setCursor(0, 0); lcd.print("0"); break; case Key17::KEY_SHARP: lcd.clear(); lcd.setCursor(0, 0); lcd.print("#"); break; case Key17::KEY_UP: lcd.clear(); lcd.setCursor(0, 0); lcd.print("UP"); break; case Key17::KEY_DOWN: lcd.clear(); lcd.setCursor(0, 0); lcd.print("DOWN"); break; case Key17::KEY_LEFT: lcd.clear(); lcd.setCursor(0, 0); lcd.print("LEFT"); break; case Key17::KEY_RIGHT: lcd.clear(); lcd.setCursor(0, 0); lcd.print("RIGHT"); break; case Key17::KEY_OK: lcd.clear(); lcd.setCursor(0, 0); lcd.print("OK"); break; // Ad // Add cases for other keys similarly default: lcd.clear(); lcd.setCursor(0, 0); lcd.print("WARNING: undefined key"); break; } }
}
QUICK LINK
Frequently Asked Questions
What does this Arduino IR Remote Control Display tutorial cover?
An Arduino LCD IR Remote Control Display is where an infrared, remote and LCD combined.
What Arduino library does the Arduino IR Remote Control Display tutorial use?
The sketch uses standard Wire.h (I2C) or SPI.h plus a part-specific library installable via Arduino IDE → Sketch → Include Library → Manage Libraries. See the Sample Code section.
Why does the Arduino IR Remote Control Display act differently on USB power vs battery?
Battery voltage sags under load. Add a 100uF cap across the rails, use a 5V/2A regulator-backed pack, and never power motors from the Arduino's onboard regulator.