

Feliz Navidad learners! Christmas is just around the corner. What better way to welcome our guests than a fine Christmas song? In this beginner friendly tutorial, I’ll teach you how I made an automated door greeting device using a magnetic reed switch, a digital speaker module, and an Arduino UNO.
What you’ll need:
- Arduino UNO
- Magnetic reed switch
- Digital Speaker Module
- 2 LEDs
- 2 x 220? resistors
- 1 x 10k? resistor
Magnetic Reed Switches
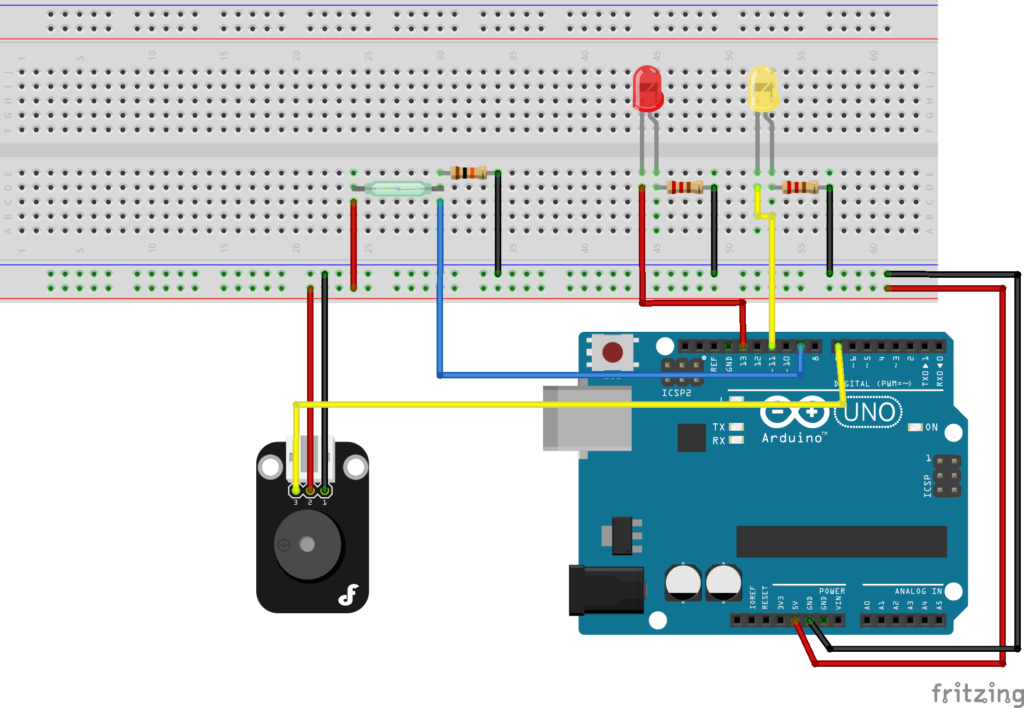
For us to understand how magnetic reed switches work, we will follow this guide from randomnerdtutorials. First, using a breadboard, build the schematic diagram below.

Basically, what this circuit will do is it will light up the yellow LED when the reed switch is together and light up the red LED when it is separated. Upload the code below to see for yourself!
/* Created by Rui Santos All the resources for this project: https://randomnerdtutorials.com/ */ int ledOpen=8; int ledClose=10; int switchReed=6; void setup(){ pinMode(ledOpen, OUTPUT); pinMode(ledClose, OUTPUT); pinMode(switchReed, INPUT); Serial.begin(9600); } void loop(){ if (digitalRead(switchReed)==HIGH){ digitalWrite(ledOpen, LOW); digitalWrite(ledClose, HIGH); Serial.println("Your Door is Closed"); } else { digitalWrite(ledOpen, HIGH); digitalWrite(ledClose, LOW); Serial.println("Your Door is Open"); } delay(1); }You can put your LED and reed switch pins on any GPIO pins on the Arduino. Just be sure to define them correctly in your own program.


Now let’s add the digital speaker module into our switch mechanism. Just like the LEDs, you can insert the speaker into any GPIO pins you want, just indicate where you’ve put it in the program.
To test the speaker, copy the code below and upload it into your Arduino.
const int buzzer = 9; void setup() { pinMode(buzzer, OUTPUT); } void loop() { tone(buzzer, 1000); // Send 1KHz sound signal... }You should hear a constant 1kHz sound from the speaker. To test further, let’s send 1kHz signal pulses by adding a delay.
const int buzzer = 9; void setup() { pinMode(buzzer, OUTPUT); } void loop(){ tone(buzzer, 1000); delay(250); noTone(buzzer); delay(250); }You’ll hear a sound akin to an alarm. Doesn’t this give you an idea on where we can use this? Congratulations! Yes, you’ve just made the simplest door alarm security system in history! Try attaching the whole system on your door.


Power Supply
Of course, to make this work you’ll need a small power bank or power supply of some sort. In my case, I made a rechargeable and current-adjustable power supply using a 18650 battery, a used TP4056 charging board and a MT3608 step up converter. I don’t advise doing this but if you, by chance, have this boards lying on a box somewhere, you’re most welcome to do this as well.

Making the Speakers Sing
To make the digital speaker play a tune, we’ll assign all the frequencies of all notes possible using this code:
#define NOTE_B0 31 #define NOTE_C1 33 #define NOTE_CS1 35 #define NOTE_D1 37 #define NOTE_DS1 39 #define NOTE_E1 41 #define NOTE_F1 44 #define NOTE_FS1 46 #define NOTE_G1 49 #define NOTE_GS1 52 #define NOTE_A1 55 #define NOTE_AS1 58 #define NOTE_B1 62 #define NOTE_C2 65 #define NOTE_CS2 69 #define NOTE_D2 73 #define NOTE_DS2 78 #define NOTE_E2 82 #define NOTE_F2 87 #define NOTE_FS2 93 #define NOTE_G2 98 #define NOTE_GS2 104 #define NOTE_A2 110 #define NOTE_AS2 117 #define NOTE_B2 123 #define NOTE_C3 131 #define NOTE_CS3 139 #define NOTE_D3 147 #define NOTE_DS3 156 #define NOTE_E3 165 #define NOTE_F3 175 #define NOTE_FS3 185 #define NOTE_G3 196 #define NOTE_GS3 208 #define NOTE_A3 220 #define NOTE_AS3 233 #define NOTE_B3 247 #define NOTE_C4 262 #define NOTE_CS4 277 #define NOTE_D4 294 #define NOTE_DS4 311 #define NOTE_E4 330 #define NOTE_F4 349 #define NOTE_FS4 370 #define NOTE_G4 392 #define NOTE_GS4 415 #define NOTE_A4 440 #define NOTE_AS4 466 #define NOTE_B4 494 #define NOTE_C5 523 #define NOTE_CS5 554 #define NOTE_D5 587 #define NOTE_DS5 622 #define NOTE_E5 659 #define NOTE_F5 698 #define NOTE_FS5 740 #define NOTE_G5 784 #define NOTE_GS5 831 #define NOTE_A5 880 #define NOTE_AS5 932 #define NOTE_B5 988 #define NOTE_C6 1047 #define NOTE_CS6 1109 #define NOTE_D6 1175 #define NOTE_DS6 1245 #define NOTE_E6 1319 #define NOTE_F6 1397 #define NOTE_FS6 1480 #define NOTE_G6 1568 #define NOTE_GS6 1661 #define NOTE_A6 1760 #define NOTE_AS6 1865 #define NOTE_B6 1976 #define NOTE_C7 2093 #define NOTE_CS7 2217 #define NOTE_D7 2349 #define NOTE_DS7 2489 #define NOTE_E7 2637 #define NOTE_F7 2794 #define NOTE_FS7 2960 #define NOTE_G7 3136 #define NOTE_GS7 3322 #define NOTE_A7 3520 #define NOTE_AS7 3729 #define NOTE_B7 3951 #define NOTE_C8 4186 #define NOTE_CS8 4435 #define NOTE_D8 4699 #define NOTE_DS8 4978You can add that before your main program but in order to make everything a tad tidier, I followed this guide. Basically, I made my own header file “pitches.h” defining all this constants. Now all I have to do is call it in the program. With that, we’re all set up to compose our Christmas song. I choosed, “We Wish You a Merry Christmas”, because I feel it welcomes guests a little bit better then “I Saw Mommy Kissing Santa Claus”. I used this as a reference for the song.
Here’s the whole code for the main program:
#include "pitches.h" int ledOpen = 11; int ledClose = 13; int switchReed = 9; const int buzzer = 7; void setup() { pinMode(ledOpen, OUTPUT); pinMode(ledClose, OUTPUT); pinMode(switchReed, INPUT); pinMode(buzzer, OUTPUT); // Set buzzer - pin 9 as an output Serial.begin(9600); } void loop() { if (digitalRead(switchReed) == HIGH) { digitalWrite(ledOpen, LOW); digitalWrite(ledClose, HIGH); } else { digitalWrite(ledOpen, HIGH); digitalWrite(ledClose, LOW); int melody[] = { NOTE_C4, NOTE_F4, NOTE_F4, NOTE_G4, NOTE_F4, NOTE_E4, NOTE_D4, NOTE_D4, NOTE_D4, NOTE_G4, NOTE_G4, NOTE_A4, NOTE_G4, NOTE_F4, NOTE_E4, NOTE_E4, NOTE_E4, NOTE_A4, NOTE_A4, NOTE_B4, NOTE_A4, NOTE_G4, NOTE_F4, NOTE_D4, NOTE_C4, NOTE_C4, NOTE_D4, NOTE_G4, NOTE_E4, NOTE_F4 }; // note durations: 4 = quarter note, 8 = eighth note, etc.: int noteDurations[] = { 4, 4, 8, 8, 8, 8, 4, 4, 4, 4, 8, 8, 8, 8, 4, 4, 4, 4, 8, 8, 8, 8, 4, 4, 8, 8, 4, 4, 4, 2 }; for (int thisNote = 0; thisNote < 30; thisNote++) { // to calculate the note duration, take one second divided by the note type. //e.g. quarter note = 1000 / 4, eighth note = 1000/8, etc. int noteDuration = 1000 / noteDurations[thisNote]; tone(5, melody[thisNote], noteDuration); // to distinguish the notes, set a minimum time between them. // the note's duration + 30% seems to work well: int pauseBetweenNotes = noteDuration * 1.30; delay(pauseBetweenNotes); // stop the tone playing: noTone(5); } } }That’s it! Only thing left to do is preparing how to answer your guests asking how this device wplays a christmas song every time they come in. Again, stay tuned on Learn for fun projects like this. I did an analysis on the basic arduino schematic diagram previously, you might want to check it out. Merry Christmas, and keep creating!
Frequently Asked Questions
What does this Greet Your Visitors With a Christmas Song tutorial cover?
Feliz Navidad learners! Christmas is just around the corner.
Can I use an Arduino Nano or Mega instead of UNO for the Greet Your Visitors With a Christmas Song build?
Yes. Nano shares the same ATmega328P and pinout. Mega has more I/O if you outgrow UNO. The code stays the same — just match the pin numbers used in the Sample Code section.
Why does my Greet Your Visitors With a Christmas Song sketch fail to upload?
Usually wrong COM port, missing CH340/CH341 driver for clone boards, or another program holding the serial port. Disconnect the board, install the driver, reselect the port, retry.