
Overview
In this simple tutorial you will:
- Use the Arduino IDE to program an ESP8266
- Interface a Neopixel ring, battery management module, and lithium polymer battery to the ESP8266
- Control the device using a dashboard hosted on the ESP8266, without using any online services or an internet connection
Components

Microcontroller
The ESP8266 is dirt cheap, runs at 80MHz, and has built in WiFi. An ESP8266 is the perfect choice for this project, letting us ditch the wires in favor of hosting the control dashboard on the microcontroller itself.
We have the WeMos D1 mini module in particular, which includes a USB to Serial converter and 3.3V regulator on board – so it’s just plug and play!
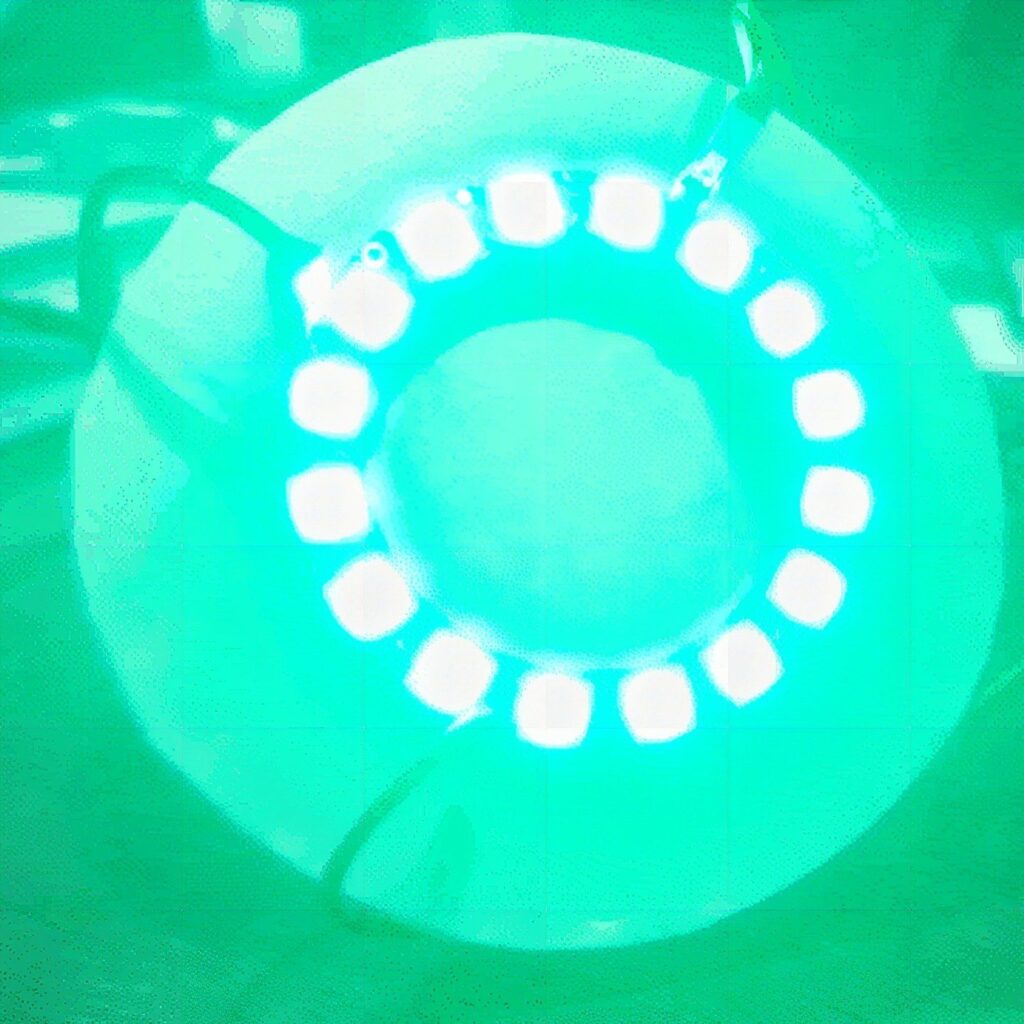
Neopixel Ring
Neopixels, Adafruit’s brand name for strings of WS2812 LEDs have made incorporating lighting into electronic projects extremely convenient. These RGB LEDs are serial addressable – which means that you can control them conveniently, with just one data signal going through the entire chain of LEDs.
The Neopixel ring we are using for this project contains 16 on board RGB LEDs and the ability to be hooked up to additional Neopixel modules – if you want to really turn up the light show.
Lithium Polymer Battery
We’ll need to power our project somehow – and a modern lithium polymer battery is the ideal choice. It has the highest energy density out of most modern battery chemistries.
The one used in this project is a 1200mAh single cell battery with a JST connector for easier interfacing. The battery also includes built in protection against overcharging, overdischarging and short circuits.
Battery Management Module
The MP2636 power boost and charging module takes care of managing the output of the battery – boosting the output from 3.7/4.2 to 5V. This allows us to easily provide power to the neopixel ring, which runs at 5V and provide 5V to the WeMos module through its USB connector.
It also takes care of properly charging our 1200mAh battery!
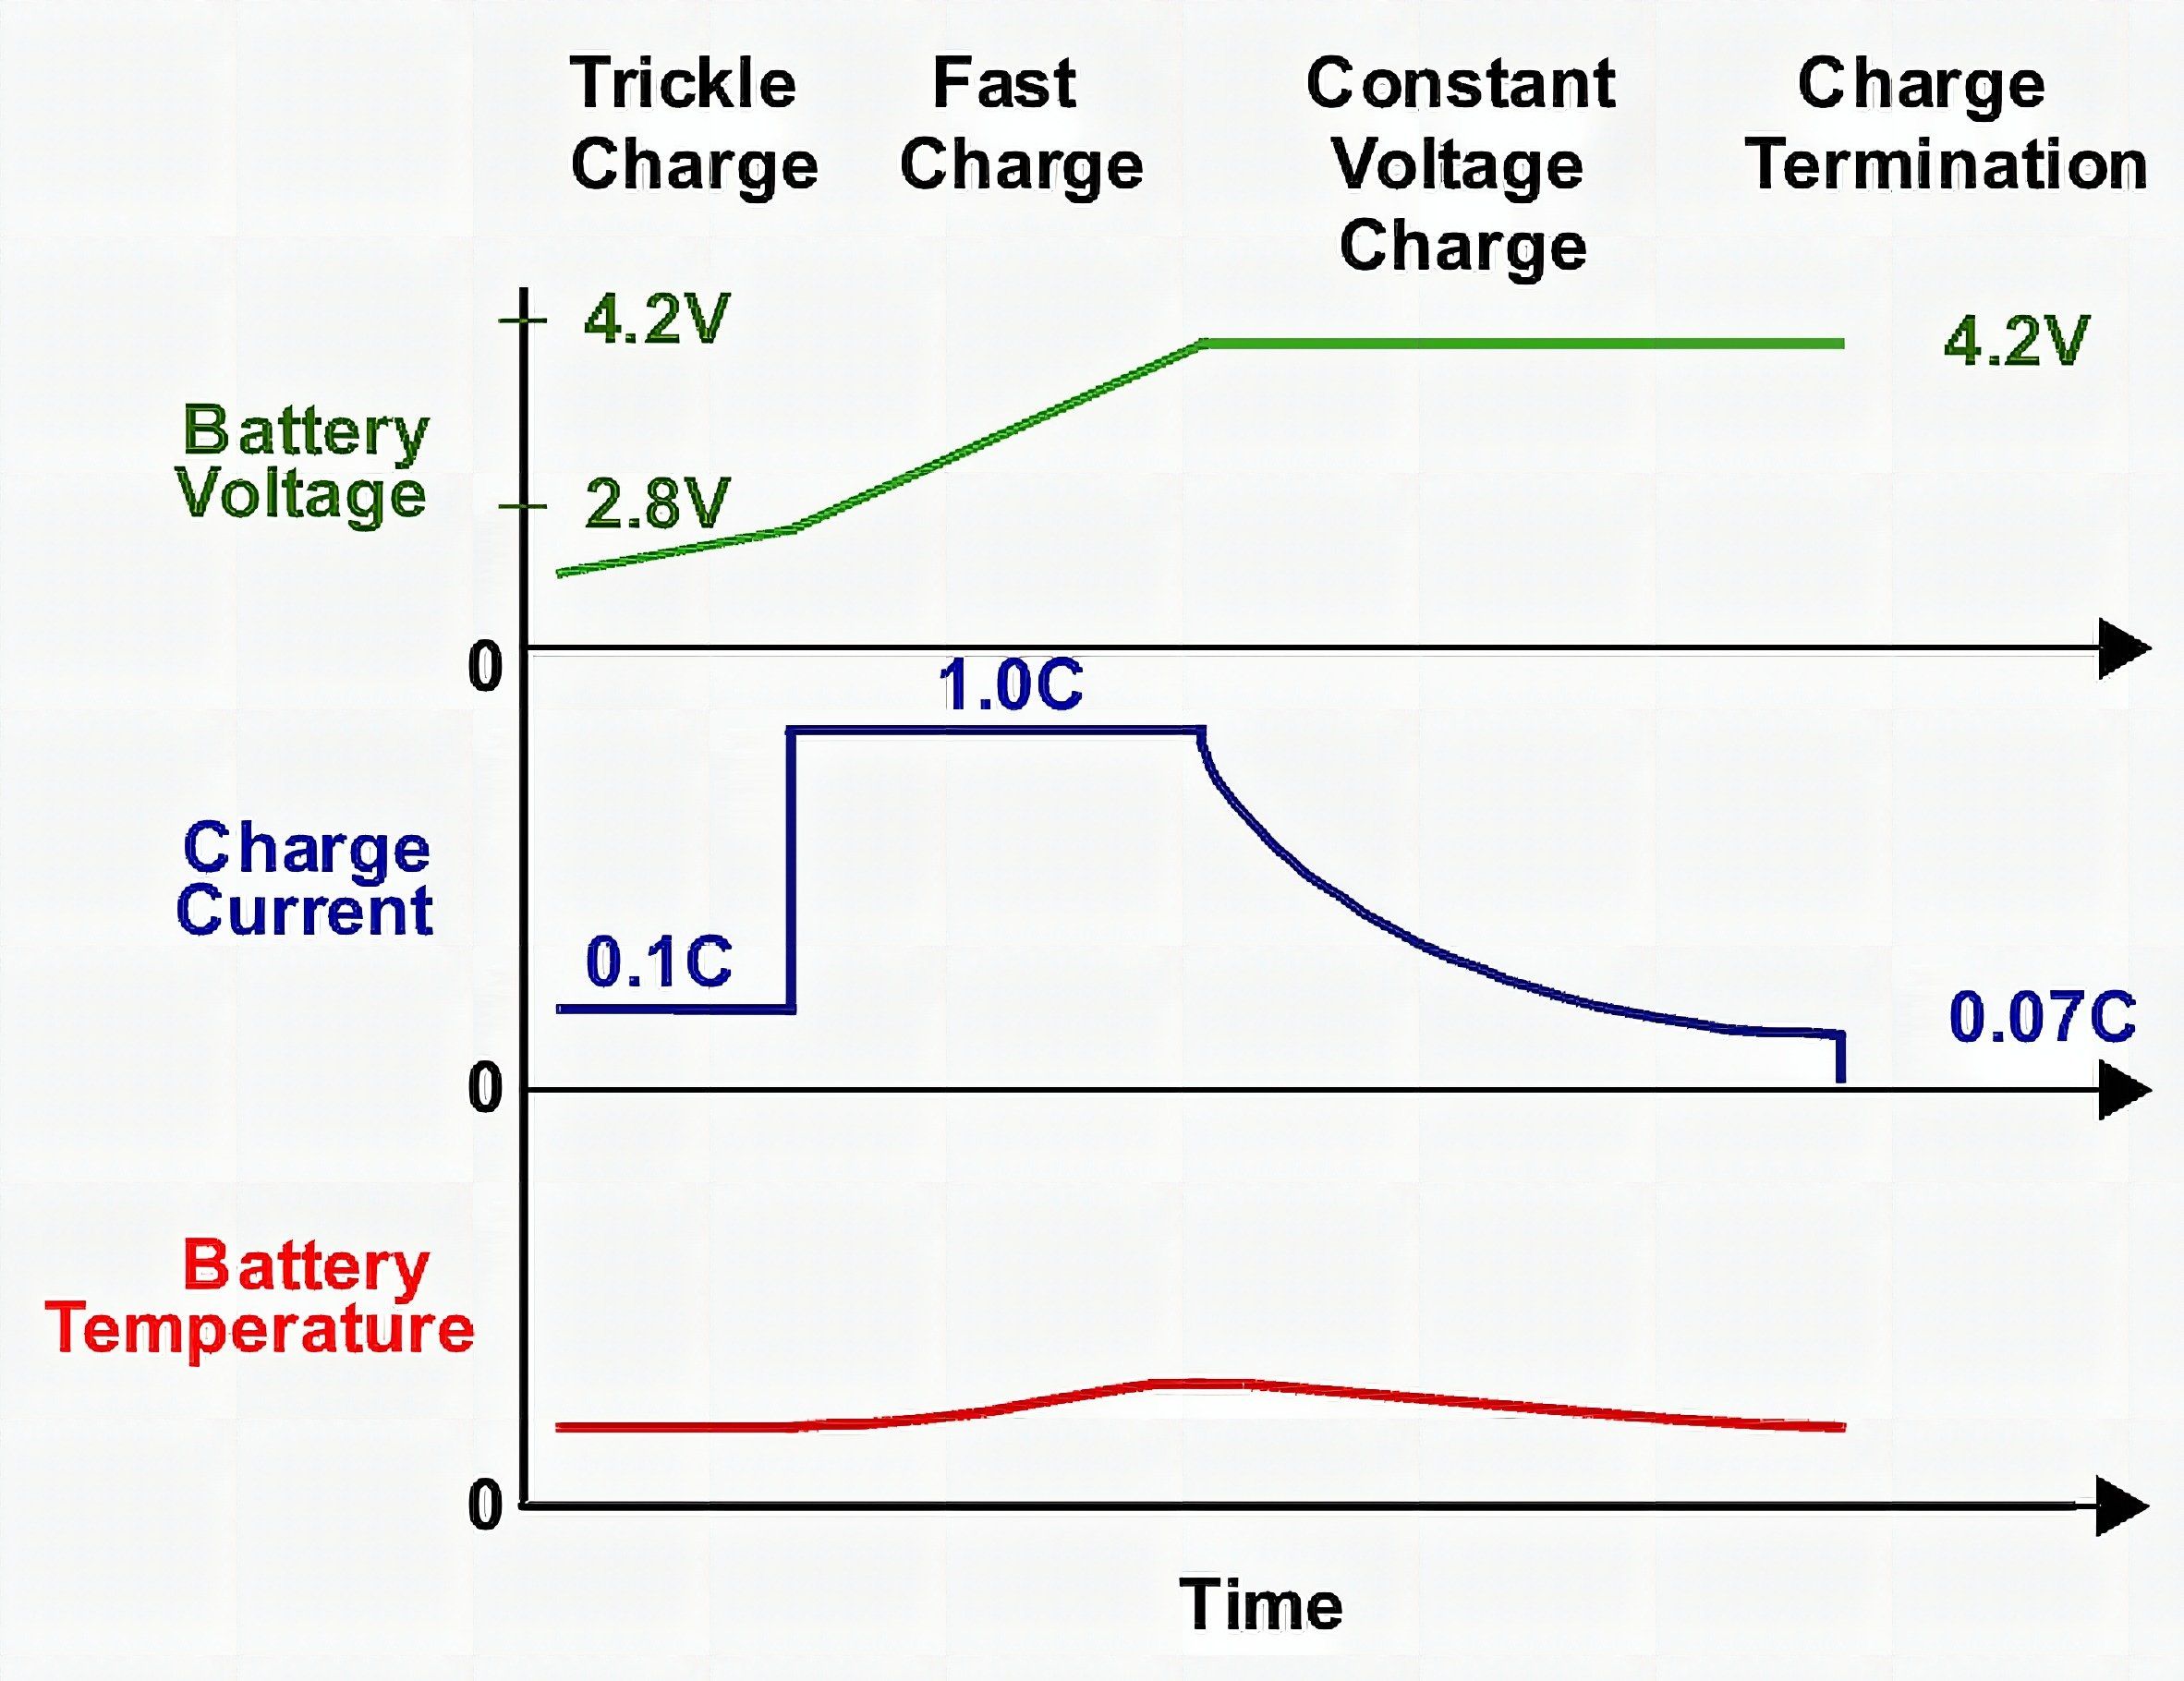
Charging the lithium polymer battery when interfaced to the MP2636 is as simple as connecting a micro USB cable to the VIN micro USB port of the module. You can use any standard phone charger to charge the device – or even your computer’s USB port (albeit much more slowly).
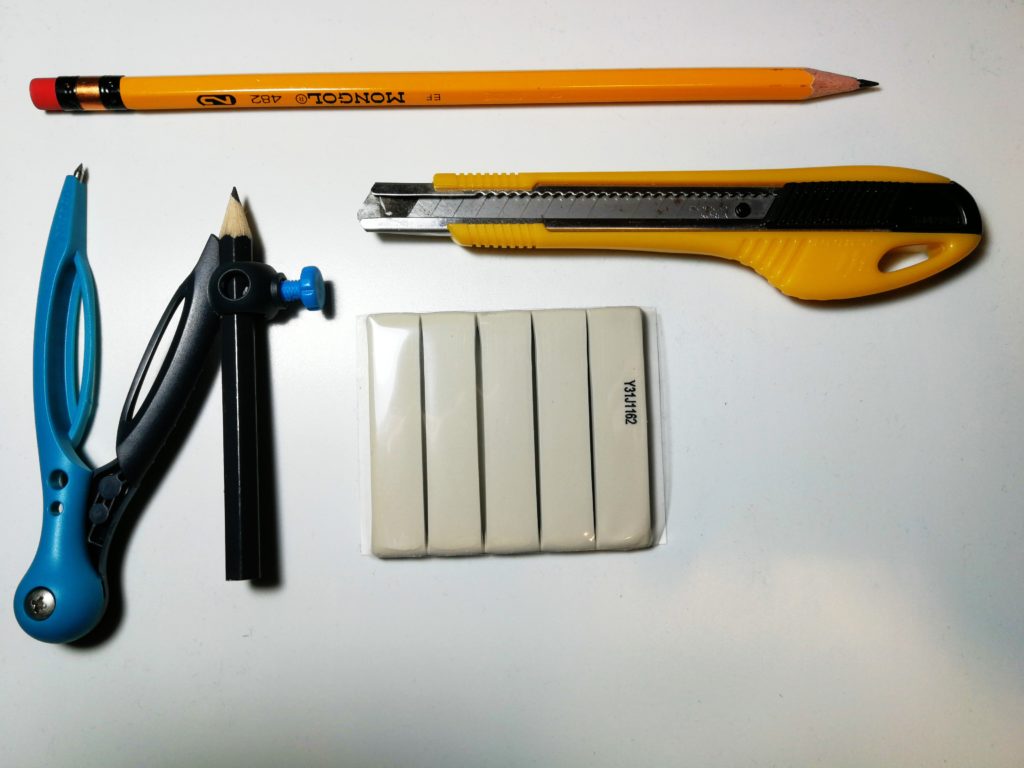
Art Materials
Sintra board is used as the base of the timer for this tutorial. It’s a low cost crafts board available from any of the nearest office supply shops or book stores.
Tracing out the Neopixel ring requires a pencil and a drawing compass.
A box cutter is used to cut out the Sintra board once you’re done tracing out the shape of the ring – or the intended shape of your timer.
Any form of adhesive is going to be useful for keeping wires out of the way and in place. You’ll also want to bond the modules to the Neopixel ring using this adhesive. In this tutorial we’re using Elmer’s Tack – a common brand of reusable adhesive.
Wiring
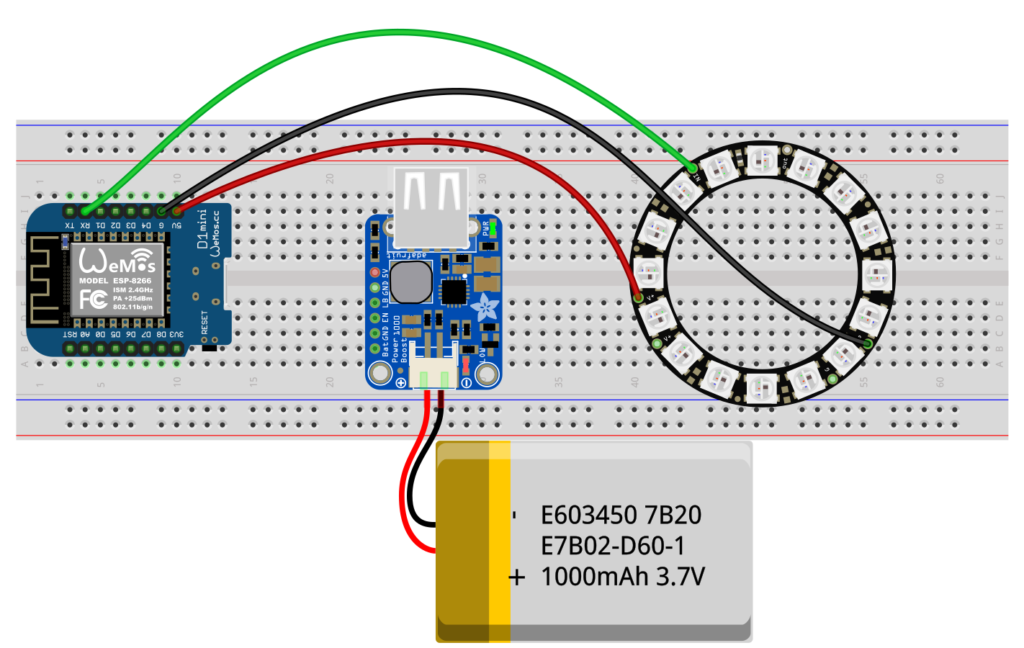
Power
The Neopixel ring runs on 5V, so you’ll need to connect the V+ pin of the ring to the 5V output of the Wemos D1 Mini. This comes directly from the USB output of the power boost module.
The G or ground pin of the ring is connected to the G or ground pin of the WeMos module.
The lithium polymer battery we chose for this project comes with a JST connector, so you just need to plug it in the power boost module – it’s asymmetrical, so it’s impossible to plug it in the wrong way.
Signals
There’s only one data signal we have to carry to the Neopixel ring, and that’s going to come from the RX pin of the ESP8266. This library we are using mandates this particular pin be used due to the way that the signal for driving the Neopixels is generated (through DMA).
The RX pin of the ESP8266 must be connected to the Data In pin of the Neopixel ring. Attach any additional Neopixel rings or strips to the Data Out pin if you want to add some extra flare to your project.
Crafting
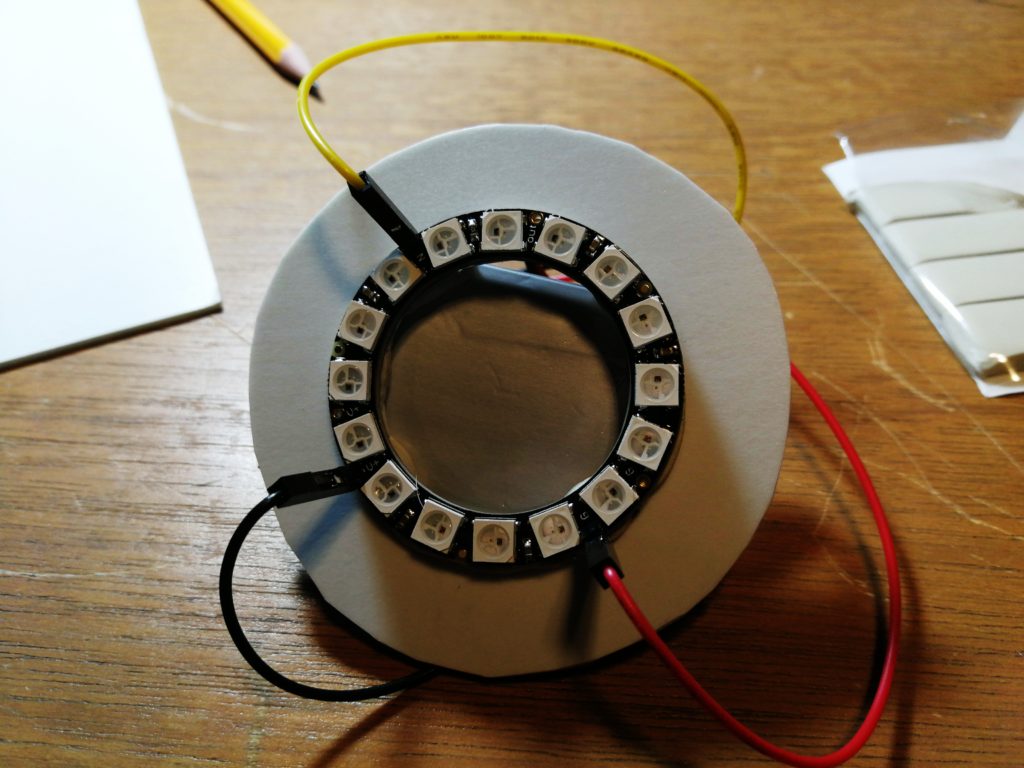
Trace out the shape of the Neopixel ring, and draft some lines in the approximate area where the V+, G, and Data In pins are located.
You’ll want to make cut outs where the V+, G and Data In pins are located so you can solder some wires onto them. After making these cut outs, you can use your adhesive on the surrounding border so the Neopixel ring stays in place.
You should end up with a clean interface between your Sintra board cut out and the Neopixel ring.
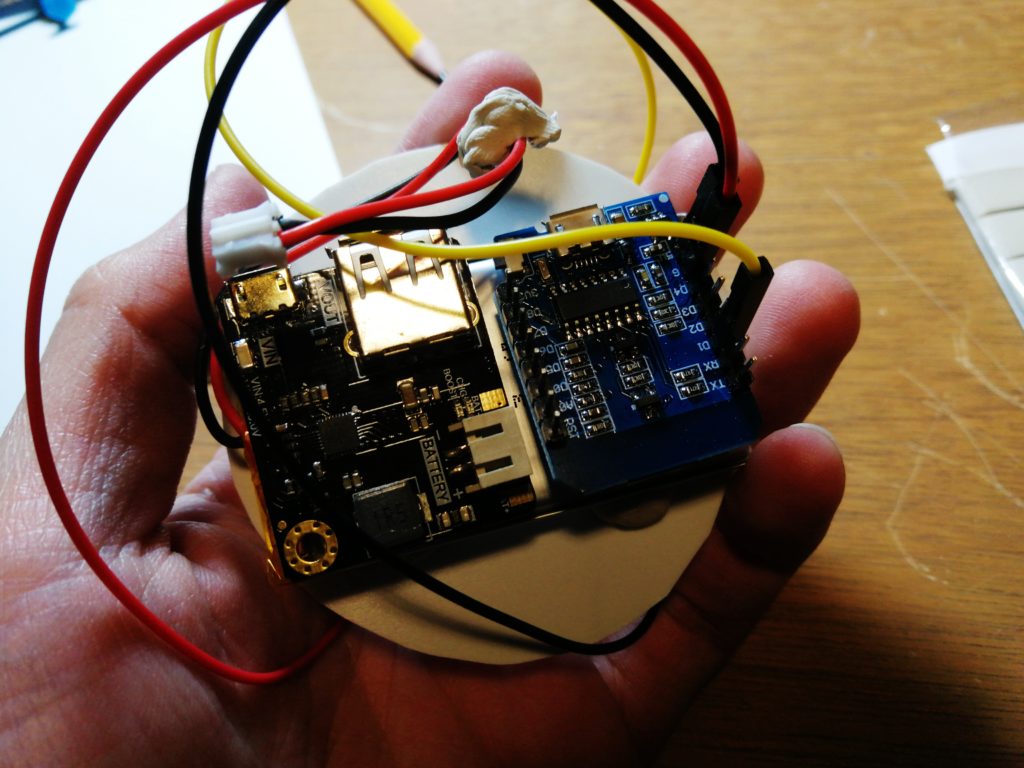
You can also use the adhesive material to tack on the battery, power boost module and WeMos module together. The adhesive can also bind wires together to keep things neat and tucked in at the back of the timer.
Libraries
Here are the libraries you would want to have installed to get these devices up and running quickly.
- https://github.com/ayushsharma82/ESP-DASH
- https://github.com/bblanchon/ArduinoJson
- https://github.com/me-no-dev/ESPAsyncTCP
- https://github.com/me-no-dev/ESPAsyncWebServer
- https://github.com/Makuna/NeoPixelBus
Go to Sketch->Include Library->Manage Libraries to find these libraries.
Software Setup
To use the Arduino IDE to program an ESP32, you’re going to need to add the ESP32 to the board manager of the Arduino IDE. You can accomplish this by:
- Opening the preferences window in the Arduino IDE.
- Entering
https://arduino.esp8266.com/stable/package_esp8266com_index.jsoninto the Additional Board Manager URLs field. - Open Boards Manager from Tools > Board menu and install esp8266 platform
You’ll want to input the credentials of your WiFi access point at home, or a hotspot – so you can access the dashboard through that connection. You don’t actually need internet access – the hotspot or router will merely facilitate your connection to ESP8266.
It is possible to do all this without any third party access points involved – we’ll cover this in a future tutorial.
Set the pixel count value to the number of LEDs in your Neopixel ring or strip.
After running, the ESP8266 will immediately output the IP address you must connect to over serial. This means you’ll want to have the serial monitor running on the Arduino IDE.

Connect to the same WiFi access point using your computer, and input the IP address into your browser to view the dashboard hosted by the ESP8266.
Code
#include <Arduino.h>
#include <NeoPixelBus.h>
#include <Ticker.h>
#include <ESP8266WiFi.h>
#include <ESPAsyncTCP.h>
#include <ESPAsyncWebServer.h>
#include <ESPDash.h> AsyncWebServer server(80); const char* ssid = ""; // Your WiFi SSID
const char* password = ""; // Your WiFi Password const uint16_t PixelCount = 16; // Set this to the number of pixels your neopixel strip/ring has
const uint8_t PixelPin = 2; // make sure to set this to the correct pin, ignored for Esp8266 #define colorSaturation 70 NeoPixelBus<NeoGrbFeature, Neo800KbpsMethod> strip(PixelCount, PixelPin);
Ticker timer; //Define any colors you want to use here
RgbColor red(colorSaturation, 0, 0);
RgbColor green(0, colorSaturation, 0);
RgbColor blue(0, 0, colorSaturation);
RgbColor white(colorSaturation);
RgbColor black(0); int timer_value = 0;
int timer_set = 0; void strip_0(){ strip.SetPixelColor(0,black); strip.SetPixelColor(1, black); strip.SetPixelColor(2, black); strip.SetPixelColor(3, black); strip.SetPixelColor(4, black); strip.SetPixelColor(5, black); strip.SetPixelColor(6, black); strip.SetPixelColor(7, black); strip.SetPixelColor(8, black); strip.SetPixelColor(9, black); strip.SetPixelColor(10, black); strip.SetPixelColor(11, black); strip.SetPixelColor(12, black); strip.SetPixelColor(13, black); strip.SetPixelColor(14, black); strip.SetPixelColor(15, black); strip.Show(); } void strip_1(){ strip.SetPixelColor(0,green); strip.SetPixelColor(1, black); strip.SetPixelColor(2, black); strip.SetPixelColor(3, black); strip.SetPixelColor(4, black); strip.SetPixelColor(5, black); strip.SetPixelColor(6, black); strip.SetPixelColor(7, black); strip.SetPixelColor(8, black); strip.SetPixelColor(9, black); strip.SetPixelColor(10, black); strip.SetPixelColor(11, black); strip.SetPixelColor(12, black); strip.SetPixelColor(13, black); strip.SetPixelColor(14, black); strip.SetPixelColor(15, black); strip.Show(); } void strip_2(){ strip.SetPixelColor(0,green); strip.SetPixelColor(1, green); strip.SetPixelColor(2, black); strip.SetPixelColor(3, black); strip.SetPixelColor(4, black); strip.SetPixelColor(5, black); strip.SetPixelColor(6, black); strip.SetPixelColor(7, black); strip.SetPixelColor(8, black); strip.SetPixelColor(9, black); strip.SetPixelColor(10, black); strip.SetPixelColor(11, black); strip.SetPixelColor(12, black); strip.SetPixelColor(13, black); strip.SetPixelColor(14, black); strip.SetPixelColor(15, black); strip.Show(); } void strip_3(){ strip.SetPixelColor(0,green); strip.SetPixelColor(1, green); strip.SetPixelColor(2, green); strip.SetPixelColor(3, black); strip.SetPixelColor(4, black); strip.SetPixelColor(5, black); strip.SetPixelColor(6, black); strip.SetPixelColor(7, black); strip.SetPixelColor(8, black); strip.SetPixelColor(9, black); strip.SetPixelColor(10, black); strip.SetPixelColor(11, black); strip.SetPixelColor(12, black); strip.SetPixelColor(13, black); strip.SetPixelColor(14, black); strip.SetPixelColor(15, black); strip.Show(); } void strip_4(){ strip.SetPixelColor(0,green); strip.SetPixelColor(1, green); strip.SetPixelColor(2, green); strip.SetPixelColor(3, green); strip.SetPixelColor(4, black); strip.SetPixelColor(5, black); strip.SetPixelColor(6, black); strip.SetPixelColor(7, black); strip.SetPixelColor(8, black); strip.SetPixelColor(9, black); strip.SetPixelColor(10, black); strip.SetPixelColor(11, black); strip.SetPixelColor(12, black); strip.SetPixelColor(13, black); strip.SetPixelColor(14, black); strip.SetPixelColor(15, black); strip.Show(); } void strip_5(){ strip.SetPixelColor(0,green); strip.SetPixelColor(1, green); strip.SetPixelColor(2, green); strip.SetPixelColor(3, green); strip.SetPixelColor(4, green); strip.SetPixelColor(5, black); strip.SetPixelColor(6, black); strip.SetPixelColor(7, black); strip.SetPixelColor(8, black); strip.SetPixelColor(9, black); strip.SetPixelColor(10, black); strip.SetPixelColor(11, black); strip.SetPixelColor(12, black); strip.SetPixelColor(13, black); strip.SetPixelColor(14, black); strip.SetPixelColor(15, black); strip.Show(); } void strip_6(){ strip.SetPixelColor(0,green); strip.SetPixelColor(1, green); strip.SetPixelColor(2, green); strip.SetPixelColor(3, green); strip.SetPixelColor(4, green); strip.SetPixelColor(5, green); strip.SetPixelColor(6, black); strip.SetPixelColor(7, black); strip.SetPixelColor(8, black); strip.SetPixelColor(9, black); strip.SetPixelColor(10, black); strip.SetPixelColor(11, black); strip.SetPixelColor(12, black); strip.SetPixelColor(13, black); strip.SetPixelColor(14, black); strip.SetPixelColor(15, black); strip.Show(); } void strip_7(){ strip.SetPixelColor(0,green); strip.SetPixelColor(1, green); strip.SetPixelColor(2, green); strip.SetPixelColor(3, green); strip.SetPixelColor(4, green); strip.SetPixelColor(5, green); strip.SetPixelColor(6, green); strip.SetPixelColor(7, black); strip.SetPixelColor(8, black); strip.SetPixelColor(9, black); strip.SetPixelColor(10, black); strip.SetPixelColor(11, black); strip.SetPixelColor(12, black); strip.SetPixelColor(13, black); strip.SetPixelColor(14, black); strip.SetPixelColor(15, black); strip.Show(); } void strip_8(){ strip.SetPixelColor(0,green); strip.SetPixelColor(1, green); strip.SetPixelColor(2, green); strip.SetPixelColor(3, green); strip.SetPixelColor(4, green); strip.SetPixelColor(5, green); strip.SetPixelColor(6, green); strip.SetPixelColor(7, green); strip.SetPixelColor(8, black); strip.SetPixelColor(9, black); strip.SetPixelColor(10, black); strip.SetPixelColor(11, black); strip.SetPixelColor(12, black); strip.SetPixelColor(13, black); strip.SetPixelColor(14, black); strip.SetPixelColor(15, black); strip.Show(); } void strip_9(){ strip.SetPixelColor(0,green); strip.SetPixelColor(1, green); strip.SetPixelColor(2, green); strip.SetPixelColor(3, green); strip.SetPixelColor(4, green); strip.SetPixelColor(5, green); strip.SetPixelColor(6, green); strip.SetPixelColor(7, green); strip.SetPixelColor(8, green); strip.SetPixelColor(9, black); strip.SetPixelColor(10, black); strip.SetPixelColor(11, black); strip.SetPixelColor(12, black); strip.SetPixelColor(13, black); strip.SetPixelColor(14, black); strip.SetPixelColor(15, black); strip.Show(); } void strip_10(){ strip.SetPixelColor(0,green); strip.SetPixelColor(1, green); strip.SetPixelColor(2, green); strip.SetPixelColor(3, green); strip.SetPixelColor(4, green); strip.SetPixelColor(5, green); strip.SetPixelColor(6, green); strip.SetPixelColor(7, green); strip.SetPixelColor(8, green); strip.SetPixelColor(9, green); strip.SetPixelColor(10, black); strip.SetPixelColor(11, black); strip.SetPixelColor(12, black); strip.SetPixelColor(13, black); strip.SetPixelColor(14, black); strip.SetPixelColor(15, black); strip.Show(); } void strip_11(){ strip.SetPixelColor(0,green); strip.SetPixelColor(1, green); strip.SetPixelColor(2, green); strip.SetPixelColor(3, green); strip.SetPixelColor(4, green); strip.SetPixelColor(5, green); strip.SetPixelColor(6, green); strip.SetPixelColor(7, green); strip.SetPixelColor(8, green); strip.SetPixelColor(9, green); strip.SetPixelColor(10, green); strip.SetPixelColor(11, black); strip.SetPixelColor(12, black); strip.SetPixelColor(13, black); strip.SetPixelColor(14, black); strip.SetPixelColor(15, black); strip.Show(); } void strip_12(){ strip.SetPixelColor(0,green); strip.SetPixelColor(1, green); strip.SetPixelColor(2, green); strip.SetPixelColor(3, green); strip.SetPixelColor(4, green); strip.SetPixelColor(5, green); strip.SetPixelColor(6, green); strip.SetPixelColor(7, green); strip.SetPixelColor(8, green); strip.SetPixelColor(9, green); strip.SetPixelColor(10, green); strip.SetPixelColor(11, green); strip.SetPixelColor(12, black); strip.SetPixelColor(13, black); strip.SetPixelColor(14, black); strip.SetPixelColor(15, black); strip.Show(); }
void strip_13(){ strip.SetPixelColor(0,green); strip.SetPixelColor(1, green); strip.SetPixelColor(2, green); strip.SetPixelColor(3, green); strip.SetPixelColor(4, green); strip.SetPixelColor(5, green); strip.SetPixelColor(6, green); strip.SetPixelColor(7, green); strip.SetPixelColor(8, green); strip.SetPixelColor(9, green); strip.SetPixelColor(10, green); strip.SetPixelColor(11, green); strip.SetPixelColor(12, green); strip.SetPixelColor(13, black); strip.SetPixelColor(14, black); strip.SetPixelColor(15, black); strip.Show(); } void strip_14(){ strip.SetPixelColor(0,green); strip.SetPixelColor(1, green); strip.SetPixelColor(2, green); strip.SetPixelColor(3, green); strip.SetPixelColor(4, green); strip.SetPixelColor(5, green); strip.SetPixelColor(6, green); strip.SetPixelColor(7, green); strip.SetPixelColor(8, green); strip.SetPixelColor(9, green); strip.SetPixelColor(10, green); strip.SetPixelColor(11, green); strip.SetPixelColor(12, green); strip.SetPixelColor(13, green); strip.SetPixelColor(14, black); strip.SetPixelColor(15, black); strip.Show(); } void strip_15(){ strip.SetPixelColor(0,green); strip.SetPixelColor(1, green); strip.SetPixelColor(2, green); strip.SetPixelColor(3, green); strip.SetPixelColor(4, green); strip.SetPixelColor(5, green); strip.SetPixelColor(6, green); strip.SetPixelColor(7, green); strip.SetPixelColor(8, green); strip.SetPixelColor(9, green); strip.SetPixelColor(10, green); strip.SetPixelColor(11, green); strip.SetPixelColor(12, green); strip.SetPixelColor(13, green); strip.SetPixelColor(14, green); strip.SetPixelColor(15, black); strip.Show(); }
void strip_16(){ strip.SetPixelColor(0,green); strip.SetPixelColor(1, green); strip.SetPixelColor(2, green); strip.SetPixelColor(3, green); strip.SetPixelColor(4, green); strip.SetPixelColor(5, green); strip.SetPixelColor(6, green); strip.SetPixelColor(7, green); strip.SetPixelColor(8, green); strip.SetPixelColor(9, green); strip.SetPixelColor(10, green); strip.SetPixelColor(11, green); strip.SetPixelColor(12, green); strip.SetPixelColor(13, green); strip.SetPixelColor(14, green); strip.SetPixelColor(15, green); strip.Show(); } void doTimer(){ if(timer_value == 0){ strip_0(); timer.detach(); } else { switch(timer_value){ case 1: strip_1(); timer_value--; break; case 2: strip_2(); timer_value--; break; case 3: strip_3(); timer_value--; break; case 4: strip_4(); timer_value--; break; case 5: strip_5(); timer_value--; break; case 6: strip_6(); timer_value--; break; case 7: strip_7(); timer_value--; break; case 8: strip_8(); timer_value--; break; case 9: strip_9(); timer_value--; break; case 10: strip_10(); timer_value--; break; case 11: strip_11(); timer_value--; break; case 12: strip_12(); timer_value--; break; case 13: strip_13(); timer_value--; break; case 14: strip_14(); timer_value--; break; case 15: strip_15(); timer_value--; break; case 16: strip_16(); timer_value--; break; } }
} void sliderChanged(const char* id, int value){ //set the value timer_set = value % 16;//the slider goes up to 100
} void buttonClicked(const char* id){ //Start the Timer timer_value = timer_set; timer.attach(1,doTimer);
} void setup()
{ Serial.begin(115200); while (!Serial); // wait for serial WiFi.mode(WIFI_STA); WiFi.begin(ssid, password); if (WiFi.waitForConnectResult()!= WL_CONNECTED) { Serial.printf("WiFi Failed!n"); return; } Serial.print("IP Address: "); Serial.println(WiFi.localIP()); ESPDash.init(server); // Initiate ESPDash and attach your Async webserver instance ESPDash.addSliderCard("slider1", "Timer", 3); ESPDash.addButtonCard("btn1","Start/Stop Button"); ESPDash.attachButtonClick(buttonClicked); ESPDash.attachSliderChanged(sliderChanged); server.begin(); Serial.println(); Serial.println("Initializing..."); Serial.flush(); // this resets all the neopixels to an off state strip.Begin(); strip.Show();
} void loop()
{
}
Dashboard
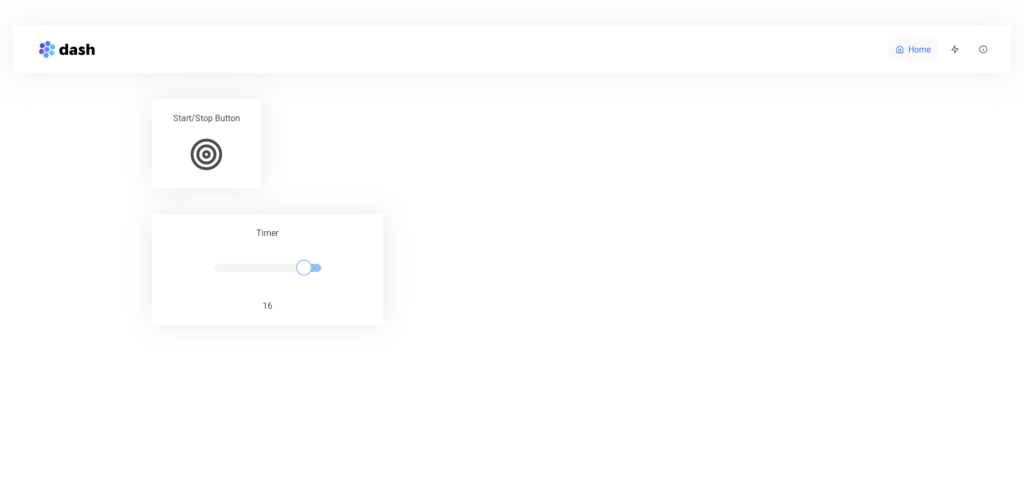
You’ll end up with something like this after accessing the IP address given by the microcontroller through serial. You can toggle the timer to run by clicking on the button, and use the slider to set the exact timer count – you can modify the code to have it take any length of time desired.
You can use the dashboard library’s built in functions to make additional buttons, sliders and other cards to use as triggers or to visualize data.
That’s all folks!
Congratulations, you’ve successfully freed yourself from the shackles of internet! Your projects can now be controlled wirelessly in real time, and through a dashboard hosted not on the web, but on your friendly neighborhood microcontroller.
Good luck, and stay creative!
Frequently Asked Questions
[faq] [faq_q]What is a NeoPixel?[/faq_q] [faq_a]NeoPixel is Adafruit brand for individually-addressable RGB LEDs based on the WS2812 chip. Each pixel is a tiny full-color LED with built-in driver IC, controlled by a single data line.[/faq_a][faq_q]What is the maximum NeoPixel ring size for this project?[/faq_q] [faq_a]The code works for any ring size from 12 to 60 pixels. Larger rings need more current (60 mA per pixel at full white), so plan your power supply accordingly.[/faq_a][faq_q]Do I need a level shifter between ESP8266 and NeoPixels?[/faq_q] [faq_a]Sometimes. NeoPixels are designed for 5V data, but the ESP8266 uses 3.3V logic. Many NeoPixel rings tolerate 3.3V data fine. If your ring is flaky, a 74HCT245 or SN74AHCT125N level shifter fixes it.[/faq_a][faq_q]Why control NeoPixels wirelessly instead of via a button?[/faq_q] [faq_a]Convenience. You can adjust the timer from anywhere on your phone, no need to walk to the device. The web dashboard also makes it easy to add features like presets and scheduling.[/faq_a][faq_q]What happens if Wi-Fi goes down during the timer?[/faq_q] [faq_a]The ESP8266 keeps running the current timer locally. You just cannot change settings until Wi-Fi comes back. The article includes auto-reconnect logic for stability.[/faq_a] [/faq]Frequently Asked Questions
What does this Neopixel Timer with Real Time Wireless Control tutorial cover?
Overview In this simple tutorial you will: Use the Arduino IDE to program an ESP8266 Interface a Neopixel ring, battery management module, and lithium polymer battery to the ESP8266 Control the device using a dashboard hosted on the ESP8266, without using any online services or an internet connection Components All the hardware we’ll need for this project.
What Arduino library does the Neopixel Timer with Real Time Wireless Control tutorial use?
The sketch uses standard Wire.h (I2C) or SPI.h plus a part-specific library installable via Arduino IDE → Sketch → Include Library → Manage Libraries. See the Sample Code section.
Why does the Neopixel Timer with Real Time Wireless Control act differently on USB power vs battery?
Battery voltage sags under load. Add a 100uF cap across the rails, use a 5V/2A regulator-backed pack, and never power motors from the Arduino's onboard regulator.