
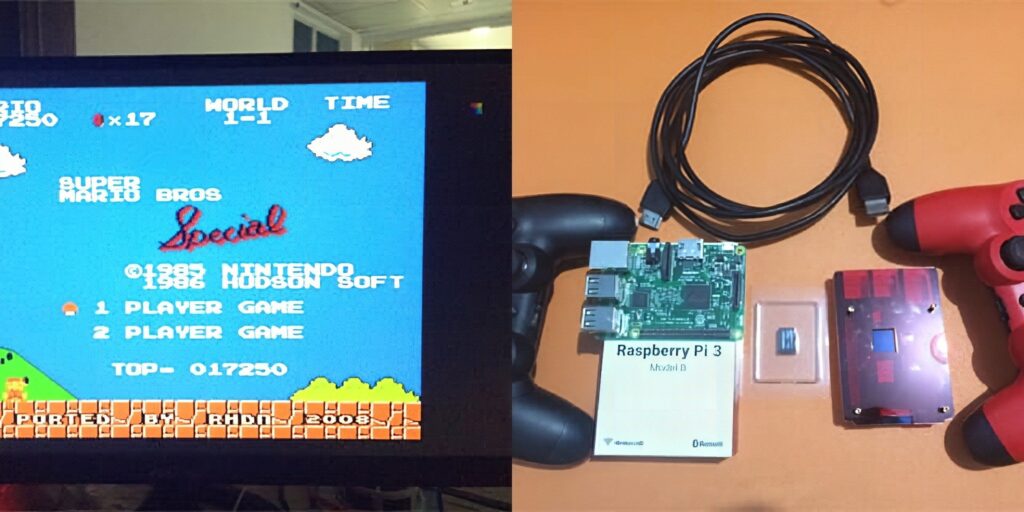


This guide will show you how to build your very own #RetroGaming machine with your awesome Pi 3 micro-computer and a DualShock 4 controller.
Step 1: Prerequisites
Hardware Requirements
Software Requirements
- RetroPie. (choose the one for RPi 3) This is going to be our Operating System. This OS already contains several emulators though initially you’ll see only a few (more on that later)
- SD Card Writer
- For Windows: you can use Win32DiskImager.
- For Mac: you can use ApplePi Baker. This is what we are going to use for this tutorial. (Sorry Windows lovers, I’m using a Mac ¯_(?)_/¯)
Other Requirements
- Internet Connection (required only for the setup)
- USB Flash Drive We need this to transfer Game ROMs though it is not the only way. If you don’t have this readily, you can transfer your ROMs via your network as long as your Pi is in the same network as your host computer, and your network allows SFTP (more on that later).
- Filezilla Required only if you are going to transfer game ROMs via SFTP.
Step 2: Flashing RetroPie to your SD-Card
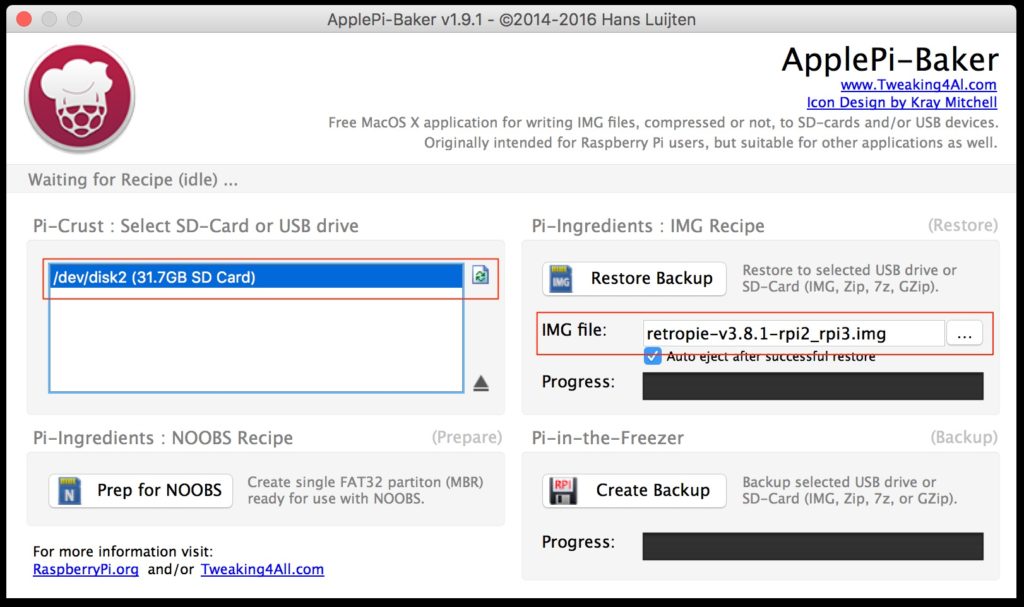
You already have your RetroPie image, right? Good. Now, we’re going to put that to your SD-Card.- Fire-up your ApplePi Baker (or Win32DiskImager if you’re on Windows.). You might be asked for the Admin Password.
- Choose your SD Card drive from the list. If it’s not yet listed, try clicking the refresh button beside the list.
- Inside the Pi-Ingredients, browse for your RetroPie image. In my case it’s retropie-v3.8.1-rpi2_rpi3.img.
- If all is well and ready, click Restore Ba… oh wait! I almost forgot the warning. WARNING: This step will wipe-out your SD Card. Choosing the incorrect drive from the list might lead to world destruction. Now that you’ve been warned, click the Restore Backup to continue.
 … done? Alright!
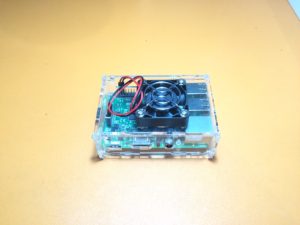
Additional Step: Assemble your Pi Case!
I already assembled mine ¯_(?)_/¯. Get yours here. Look at this beauty. We will create a tutorial for that. For now, be creative in assembling. Always be up for a challenge.
Step 3: Fire it up!
Now, LET’S PLUG EVERYTHING!- Connect your newly flashed SD Card to RPi;
- Connect your HDMI/Display;
- Connect your keyboard;
- Connect your Ethernet cable
- then POWER UP!
 What’s that? You don’t have ethernet cable with you? No worries! We can setup our WiFi inside RetroPie’s settings.
Step 4: Initial Setup
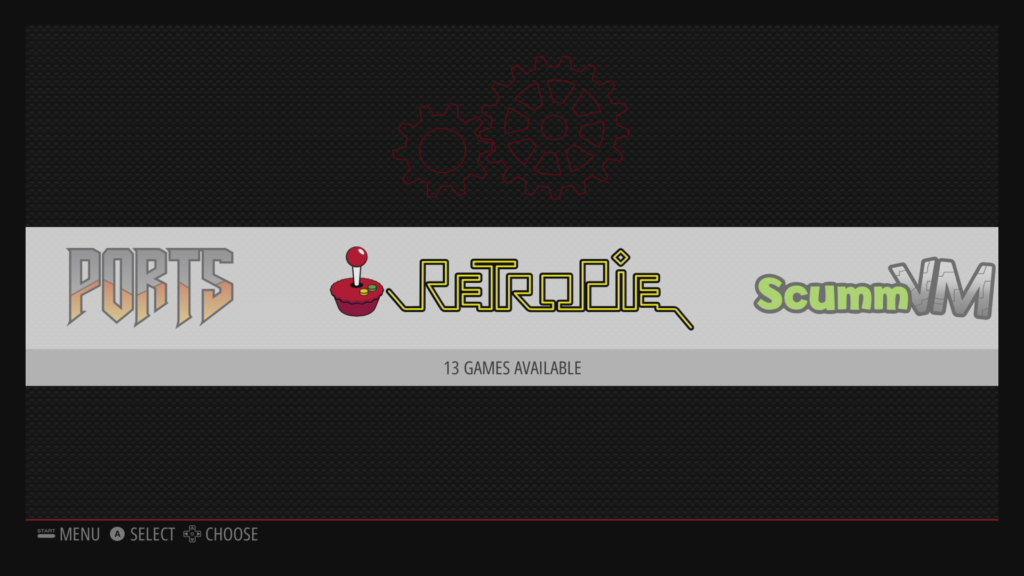
Once RetroPie booted up, it will ask you the initial controller configuration. Use your keyboard for now. Provide any keys that you want. Make sure to remember the D-Pad Controls, Select & Start, and the A, B, X, Y controls. You’re gonna need that to explore RetroPie and all other setup steps. You might notice that only a few emulator systems are showing up. No need to worry! It is there. It’s just that there are no games currently added to their list.That’s it! It’s done!
.. or is it? Of course not! You need some games! Though, there are already games included inside Ports, we know it is not enough for you. So let’s get started by adding some games. Note: Due to copyright (ehem!) terms, we can’t provide you with actual set of games, so you are on your own.Step 5: Transferring Game ROMS.
There are many ways to transfer game ROMs but we will only discuss two (2) – via SFTP and via flash drive.Flash Drive File Transfer
In this step, we’re gonna need a flash drive. The size? well, it will depend on how many games you’re going to put at a time so it is really up to you now.- Plug your flash drive to your host computer (do I really need to say this?)
- Make sure that it is formatted using a file system that is compatible for Linux. If you are using Mac (like me):
- Open Disk Utility
- Select your flash drive and click Erase
- Put the following settings: Format -> MS-DOS (FAT), Scheme -> Master Boot Record
- Click Er.. oh yeah, the warning, WARNING: This step will wipe-out your flash drive. Choosing the incorrect drive from the list might lead to world destruction. Click Erase to continue.
- Create folder inside it and name it
retropie <img class="aligncenter wp-image-45" src="https://learn.circuit.rocks/wp-content/uploads/2016/06/Screen-Shot-2016-06-13-at-11.09.46-PM-1024x435.png" alt="Screen Shot 2016-06-13 at 11.09.46 PM" width="727" height="303" /> - Eject your flash drive and plug it to your Pi 3 If your flash drive has an LED indicator, you’ll notice that it is going to blink rapidly. It means that it is busy. Wait for it to stabilize. If it does not have the LED (like the one I’m using), wait for about 30 seconds before pulling it out.
- Plug it back to your host computer.
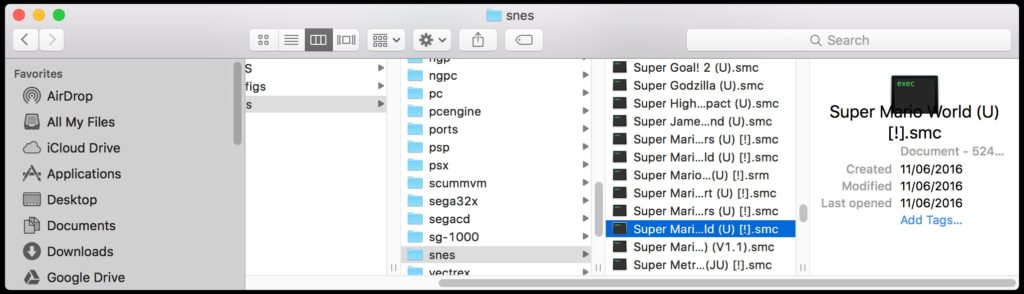
You will notice that inside the
retropiefolder, it now has new directories. Insideromsfolder, you’ll see the list of supported systems by RetroPie. Put your game ROMs inside their respective directories.
- Eject your flash drive and plug it again to your Pi 3 This step will take a while since RetroPie will copy your games from the flash drive to the SD Card. Again, if your flash drive has an LED indicator, it will blink rapidly. If none, a safe rule of thumb will be to wait more than twice the time it took to copy the games from your host computer to your flash drive.
- On your controller (keyboard in this case), press Start (you took note of it right? right?).
- Scroll to Quit option then press A.
- Select Restart EmulationStation option then press A.
SFTP Transfer
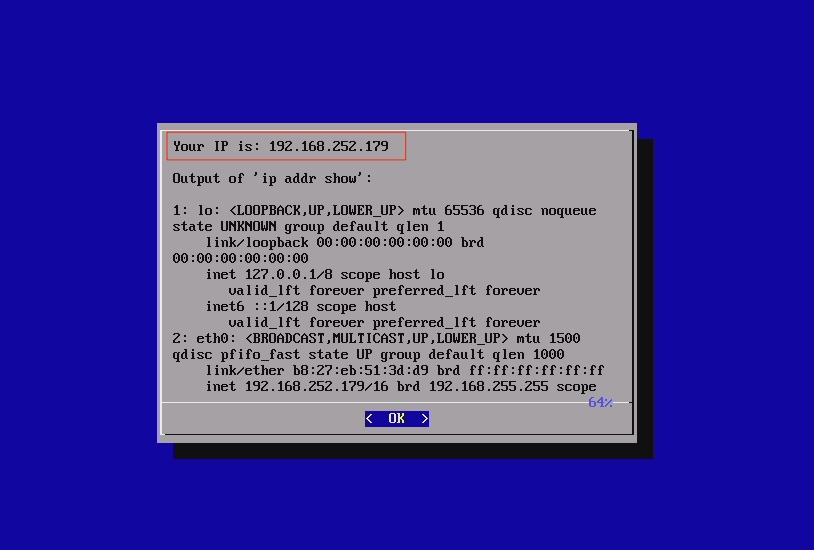
In this approach, we’re going to use Filezilla. Another requirement is that your Pi 3 should be accessible through your network from your host computer.- Get the IP Address of your Pi. Inside the RetroPie system, scroll to Show IP option then press A. It will show you the current IP Address of your Pi 3. If it does not show anything, please check your ethernet connection.
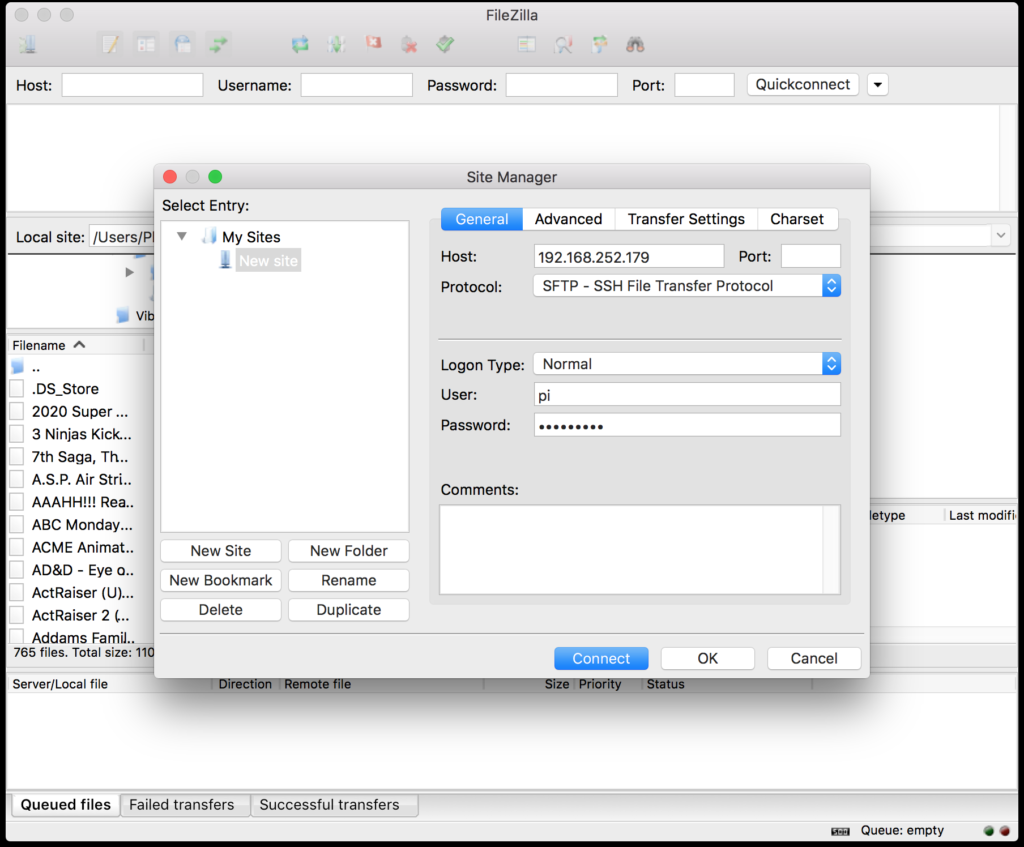
- Open up Filezilla. Go to Site Manager under File menu, or by pressing ?S. Put your Pi’s IP Address into the Host. Set the Protocol to SFTP – SSH File Transfer Protocol. Set Logon Type to Normal. Set the credentials – username: pi, password: raspberry.
- Browse to
/home/pi/RetroPie/roms/. You’ll see the supported game emulator systems directories. Put your games to their respective directories.

 Once it’s done, you will still not see those games immediately. You have to restart emulationstation (that’s the UI that is managing all your emulators).
- On your controller (keyboard in this case), press Start (you took note of it right? right?).
- Scroll to Quit option then press A.
- Select Restart EmulationStation option then press A.
Short FAQ
Q. How do I know the correct file format for my games? A. You can check/etc/emulationstation/es_systems.cfg to see the supported file types. Or, check for your target emulator here.That’s really it! We’re good to go!
We can now play with our #RetroGamingPie.
… but we still gonna use our keyboard though. Follow the next steps to setup your Dualshock 4 controller with Pi 3.
Step 6: Setting up Dualshock 4 controller
Setting up DS4 with Pi 3 is fairly easy but you need to know some terminal magic to do it. So let’s get started.- Exit the emulationstation by pressing F4 on your keyboard. Now you’ll see the terminal console.
- Type the following commands
In my version of RetroPie,sudo apt-get update sudo apt-get upgrade sudo pip install ds4drvpython3is already installed. If it is not, runsudo apt-get install python3 - Now we need to get
udevrules for this.udevrules are used to identify your hardware (in our case, it’s the DS4) such as vendor ID and device ID. Run the following command:wget https://raw.githubusercontent.com/chrippa/ds4drv/master/udev/50-ds4drv.rules sudo mv 50-ds4drv.rules /etc/udev/rules.d/ sudo udevadm control --reload-rules sudo udevadm trigger
- Run the following command:
You should see a console message saying that it is scanning for devices.ds4drv --led ff0000 - Turn on your DS4 controller and put it into pairing mode by holding the Share and PS buttons at the same time. Wait ’til the LED at the back of your controller starts to blink.

- Edit the booting script by running
sudo nano /etc/rc.local - Before the line
exit 0, add this:/usr/local/bin/ds4drv --led ff0000 &The file should look like this:... /usr/local/bin/ds4drv --led ff0000 & exit 0 - Press CTRL + X on your keyboard to save and exit.
- Reboot by running,
sudo reboot
- On your keyboard, press Start.
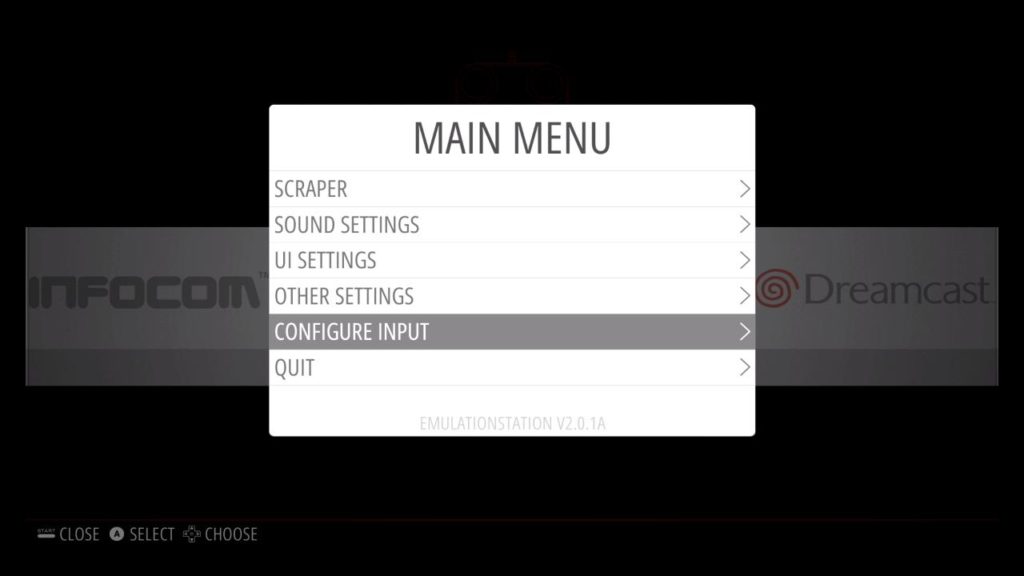
- Scroll to Configure Input option then press A
- Follow the instructions using your DS4 controller and you should be good to go!


That’s it! We’re really done! Happy #RetroGaming!
Hit the comments below if you have any concerns. Cheers!Bonus Step: Setting up WiFi
Setting up WiFi is easy but you still need your keyboard for this if you have a passcode for your router.- Go to RetroPie system from emulation station
- Scroll to WIFI option then press A.
- From there, the UI will look a little bit weird since you are actually in the terminal console. Use your keyboard or controller for the setup.
- And it’s done!

Frequently Asked Questions
What does this #RetroGamingPie tutorial cover?
This guide will show you how to build your very own #RetroGaming machine with your awesome Pi 3 micro-computer and a DualShock 4 controller.
Which Raspberry Pi model fits the #RetroGamingPie project?
Pi 4 (4GB) or Pi 5 for desktop apps and AI workloads. Pi Zero 2 W is enough for headless / sensor builds. Pi 3 B+ works but is slower for camera or ML.
How do I auto-start the #RetroGamingPie script on boot?
Use systemd. Create /etc/systemd/system/myproject.service with ExecStart=/usr/bin/python3 /home/pi/script.py and Restart=always. sudo systemctl enable myproject.