
The “Dynamic Directional & Information Display System” is a creative project that combines mechanical movement with digital messaging. For example, it uses a servo motor to show direction by rotating to specific angles. In addition, it features an OLED display that scrolls a preset message across the screen. As a result, this design offers an interactive way to mix physical movement with clear visual feedback.
This project brings a new approach to learning and prototyping. First, it shows how a microcontroller can control both movement and display. Next, it helps users understand how to coordinate a servo’s rotation with text on a screen. Because these features work together, it creates a richer, more engaging experience. Moreover, it teaches important concepts in electronics, coding, and design.
Finally, the system is a strong starting point for many ideas. For instance, it can model more advanced systems that need to point out directions or show messages in real time. Therefore, it’s useful for education, creative projects, and even art installations. Because it encourages experimentation and learning, this platform is valuable for anyone exploring technology and design.
Components
Connections:
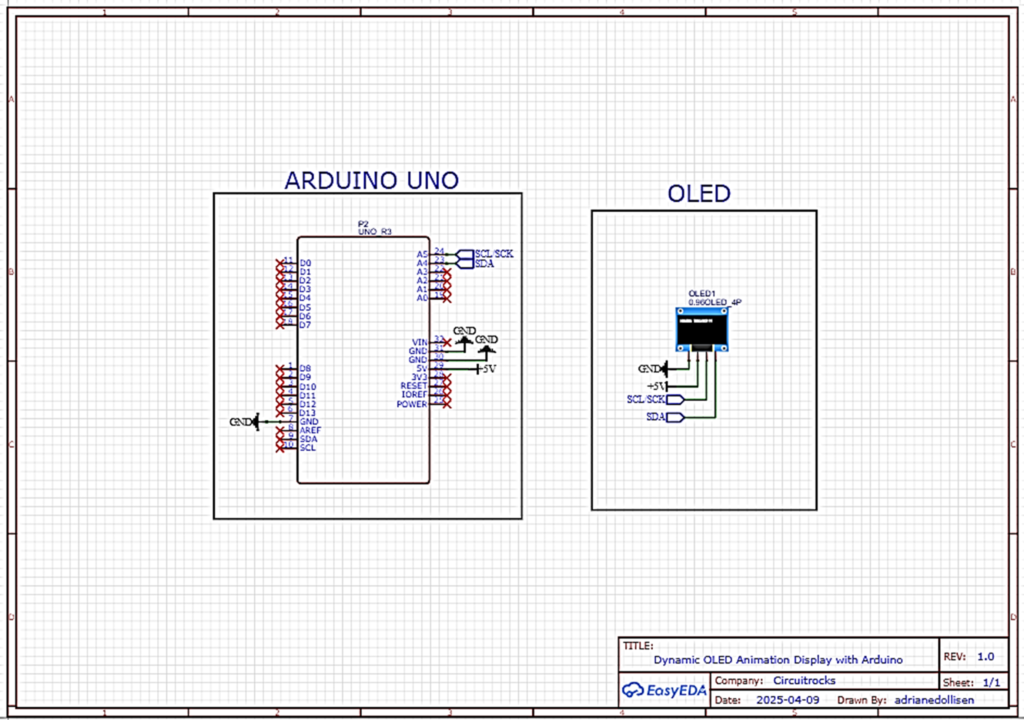
Arduino to Servo:
- Signal (usually orange or yellow wire): Connect to Digital Pin 9 on the Arduino.
- VCC (usually red wire): Connect to 5V on the Arduino.
- GND (usually brown or black wire): Connect to GND on the Arduino.
Arduino to OLED:
- VCC: Connect to 3.3V or 5V on the Arduino (check your display’s voltage rating).
- GND: Connect to GND on the Arduino.
- SCL: Connect to A5 on the Arduino.
- SDA: Connect to A4 on the Arduino.
Additional Notes
- Power Considerations: If your servo draws a lot of current or if you observe erratic behavior, consider using an external power supply for the servo, making sure to connect the grounds (external power supply and Arduino).
- Library Compatibility: Ensure you have installed the
Adafruit_GFXandAdafruit_SH110Xlibraries through the Arduino IDE Library Manager to compile this sketch successfully. - Display and Servo Libraries: Both libraries use hardware resources (I2C bus for the display and timer for the servo), which are generally compatible. However, be aware that using multiple libraries may lead to conflicts, especially on resource-constrained boards.
Code:
It is able to do things such as movement direction which is on the OLED display.
#include <SPI.h>
#include <Wire.h>
#include <Adafruit_GFX.h>
#include <Adafruit_SH110X.h>
#include <Servo.h> #define i2c_Address 0x3c // Initialize with the I2C addr 0x3C Typically eBay OLED's #define SCREEN_WIDTH 128 // OLED display width, in pixels
#define SCREEN_HEIGHT 64 // OLED display height, in pixels
#define OLED_RESET -1 // QT-PY / XIAO
Adafruit_SH1106G display = Adafruit_SH1106G(SCREEN_WIDTH, SCREEN_HEIGHT, &Wire, OLED_RESET); Servo myservo; // Create servo object to control a servo int textX = SCREEN_WIDTH; // Start text off screen to the right
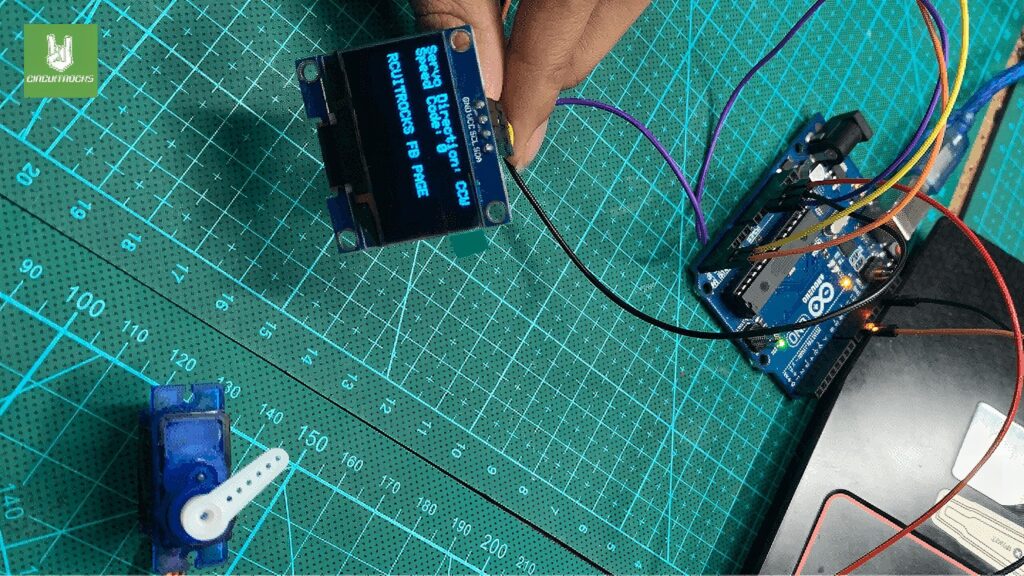
String message = "Visit CIRCUITROCKS FB PAGE"; // Text to animate void setup() { Serial.begin(9600); display.begin(i2c_Address, true); // Address 0x3C default display.display(); delay(2000); // Wait for the OLED to power up display.clearDisplay(); myservo.attach(9); // Attaches the servo on pin 9 to the servo object
} void loop() { rotateServo("CW", 180); for(int i = 0; i < 20; i++) animateText(); // Animate text for a period rotateServo("Stop", 90); for(int i = 0; i < 10; i++) animateText(); // Continue animation during pause rotateServo("CCW", 0); for(int i = 0; i < 20; i++) animateText(); // Animate text for a period rotateServo("Stop", 90); for(int i = 0; i < 10; i++) animateText(); // Continue animation during pause
} void rotateServo(String direction, int speedCode) { myservo.write(speedCode); // Control the servo based on the speedCode // Update the display with servo direction and speed code only when changing direction display.clearDisplay(); display.setTextSize(1); display.setTextColor(SH110X_WHITE); display.setCursor(0,0); display.print("Servo Direction: "); display.println(direction); display.print("Speed Code: "); display.println(speedCode); display.display();
} void animateText() { // Clear only the lower part of the display to preserve servo information display.fillRect(0, 16, SCREEN_WIDTH, SCREEN_HEIGHT - 16, SH110X_BLACK); display.setTextSize(1); display.setTextColor(SH110X_WHITE); display.setCursor(textX, 30); // Adjust Y position as needed display.print(message); display.display(); // Update text position for scrolling effect textX -= 2; // Adjust speed of text scrolling if (textX < -((int)message.length() * 6)) { // Reset text position after it scrolls off textX = SCREEN_WIDTH; } delay(100); // Delay to slow down the text animation
}Troubleshooting
OLED Display Issues
- Check Wiring: Confirm that the SDA and SCL wires are connected to the correct pins on the Arduino. For Arduino Uno, SDA is A4, and SCL is A5.
- Verify Power Supply: Make sure the OLED’s VCC and GND are properly connected to the Arduino’s 5V and GND.
- I2C Address: Ensure the OLED’s I2C address in the code (
0x3C) matches the actual device address. Use an I2C scanner sketch to confirm the address if unsure. - Library Installation: Confirm that the
Adafruit_GFXandAdafruit_SH110Xlibraries are correctly installed through the Arduino IDE. - Power Supply Issues: The Arduino’s 5V pin might not provide enough current, especially when powering both the display and a servo. Try using an external power supply or a powered USB hub.
Servo Motor Issues
- Pin Assignment: Ensure the servo’s signal wire is connected to the correct pin defined in your code (
9). - Power Supply: Servos can draw a considerable amount of current. If the servo is not moving, it might be due to insufficient power. Use an external power source for the servo, remembering to connect the grounds.
- Interference from OLED: Both the OLED display and servo might be trying to draw too much power from the Arduino, causing voltage drops. Again, using an external power source for the servo can help.
- Code Logic: Double-check the logic in
rotateServo. Usingmyservo.write(speedCode);implies setting the servo to a specific angle. Misinterpretation ofspeedCodeas a speed rather than an angle could cause confusion.
QUICK LINKS
Frequently Asked Questions
What does this Dynamic Directional & Information Display System tutorial cover?
The “Dynamic Directional & Information Display System” is a creative project that combines mechanical movement with digital messaging.
What's the working voltage of the Dynamic Directional & Information Display System?
Check the Sample Code section for the exact pinout — most maker-grade sensors run on 3.3V or 5V. Wire VCC to the matching rail, GND common with your MCU, data to a digital or analog pin.
Why does the Dynamic Directional & Information Display System read garbage or saturated values?
Three usual causes: wrong voltage rail, missing pull-up resistor on I2C lines (4.7k–10k to VCC), or a floating data pin. Double-check wiring against the diagram, then probe with a multimeter.